This manual contains detailed instructions for using the GPS monitoring system "JUSTRAC GPS".
To quickly find the information you need, use the search in the top bar.
The main capabilities of the system "JUSTRAC GPS":
- Online monitoring of the objects;
- Flexible reporting system;
- Fuel consumption control;
- Support for a large number of maps;
- Points of interest and geofences;
- Notification system;
- Creation of routes and control of traffic on them.
Features of the system "JUSTRAC GPS":
- Low cost of implementation, ownership and technical support of the system due to lack of costs for the acquisition of licenses;
- Support for different languages;
- Rebranding (launch the system under a different domain, logo, name and copyright of the system);
- There is an API for integration with different systems;
- Support for a large number of external maps (over 10);
- Wide functionality;
- Support for 200+ types of GPS/GLONASS trackers;
Server center of the system "JUSTRAC GPS":
Server center of the system "JUSTRAC GPS" consists of several physical servers, located in the data center Hetzner Online in Germany. Hetzner Online is a professional provider of web hosting services and an experienced operator of data centers.
Browser requirements
The following web browsers are supported by the System:
In browsers not mentioned above, the system may not work correctly.
Computer requirements
Minimum computer requirements:
Recommended computer requirements:
Requirements for Internet connection
The minimum speed of Internet connection is 128 kb/s.
We recommend the speed of Internet connection - from 256 kb/s and above.
To monitor objects various automobile or personal GPS/GLONASS trackers (controllers) are used, as well as mobile apps or other devices.
Set up your device
Data from the devices should transfer to the server of the System. You can configure the device remotely or using a special configuration program if this device is connected to a computer. For details, refer to the device manual.
In order for the device to send data to the System server, you need to configure the IP address and port that correspond to the specific device model.
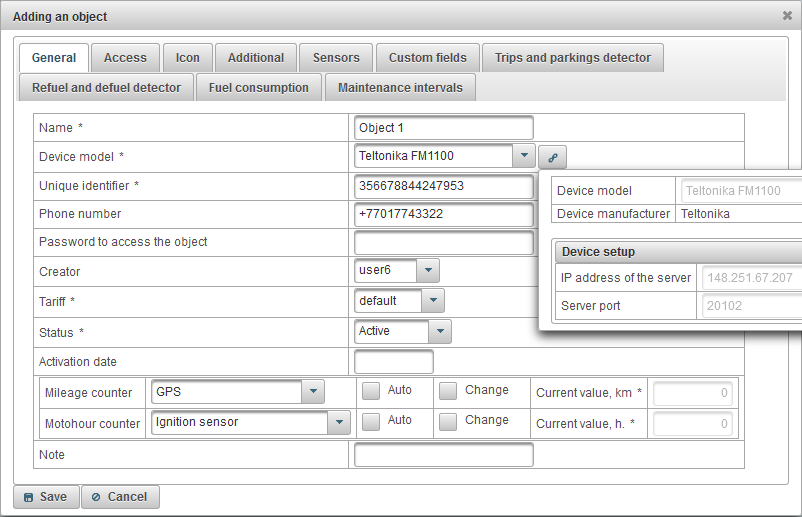
Adding a device to the System
If the device is configured correctly and sends data to the System, then to see it on the map, it is necessary to create an object for it in the system. When creating an object, you need to fill in the following fields:
-
Name (custom object name);
-
Device model (after selecting a device model, an icon

will appear to the right of it to view the connection parameters: server IP address and server port);
-
Unique identifier (IMEI code or serial number of the device);
-
Phone number (number of the SIM card inserted into the device).
The user interface of the system is intuitive.
The system interface is divided into several areas:
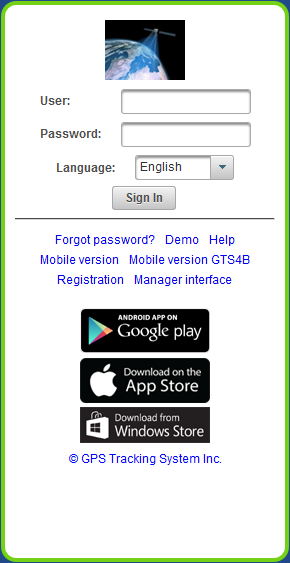
1. Login to the system
On the login page, enter your user name (login) and password, then click on the "Sign In" button.

2. User interface
You are logged into the user interface of the system. By default, the "Monitoring" panel opens.
3. User settings
To open the user settings dialog, click on the user menu, which is located in the right corner of the top panel and click on "User settings".
In the user settings dialog box in the "Time zone" field, specify your time zone, this is necessary to correctly display the time everywhere and click on the "Save" button.

4. Object creation
Go to the "Objects" panel and click the "Add" button.
The dialog for creating a new object opens. In the "Name" field, enter the name of the object, in the "Device model" field, select the device model from the list, in the "Unique identifier" field enter the unique identifier (IMEI or serial number) of the object, in the "Phone number" field enter the phone number of the SIM card, inserted into the device. After selecting the model of the device, a button will appear on the right, when you click it, a window will open displaying the server's IP address and server port, configure the device for the specified IP address and server port. Click on the "Save" button to save the object.
The created object appears in the list of objects.
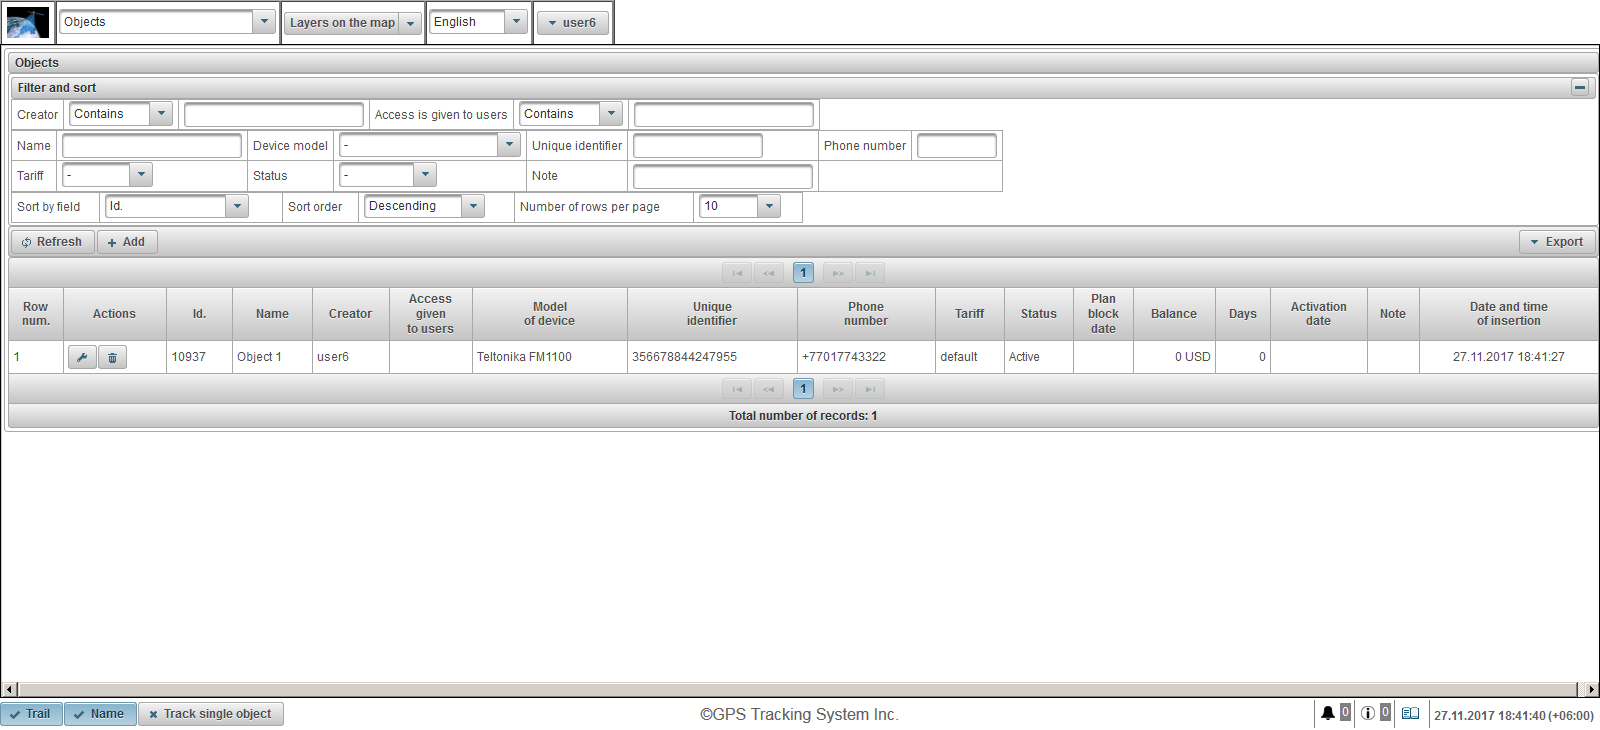
It will also appear in the "Monitoring" panel. To display the object in the center of the map, click on the object name in the list.

5. Check the operation of the object
If the object is correctly configured, the data will begin to transfer into the system. When a new message arrives from the object, a new record appears in the journal. To view the journal, in the bottom panel on the right, click on the journal display button  .
.

Enter the address of the system in the address bar of the browser.
On the login page, enter your login (username) and password.
The interface language is defined at the beginning by the browser. You can change the language of the system interface. The system interface language can also be changed after logging in.
After you enter your user name and password, click the "Sign In" button.
If you are already a user of this resource and have forgotten your password, click on the link "Forgot password?". Here you will be asked to enter your login (username) and e-mail.
When you click on the "Demo" button, you will enter the demo version of the system.
If you would like to learn more about the system, click on the "Help" link.
When you click on the button "Mobile version", you will be taken to the mobile version of the system for mobile devices.
When you click on the button "Mobile version GTS4B", you will be taken to the mobile version GTS4B of the system for mobile devices.
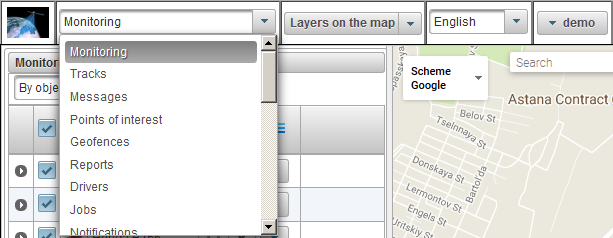
There are two interfaces, a user interface and a manager interface (by default there is a user interface). The interface of the manager is considered to be a shortened user interface, the following panels are missing in the manager interface:
- Monitoring;
- Tracks;
- Messages;
- Points of interest;
- Geofences;
- Reports.
To go to the manager interface, click on the link "Manager interface". Also below are links to mobile apps for Android, iOS and Windows Store operating systems.
The top panel displays the following items:
- Logo of the provider of monitoring services;
- The panel selection, the list of available panels depends on the user's rights and the selected interface (user interface or manager interface);
- Layers on the map (you can select the layers that you want to see on the map);
- Language of the interface (it is possible to change the interface language);
- User menu.

Logo of the provider of monitoring services
Displays the logo of the monitoring service provider.

Panel selection
The list of available panels depends on the user's rights and the selected interface (user interface or manager interface).
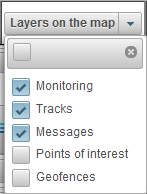
Layers on the map
You can select the layers that you want to see on the map.
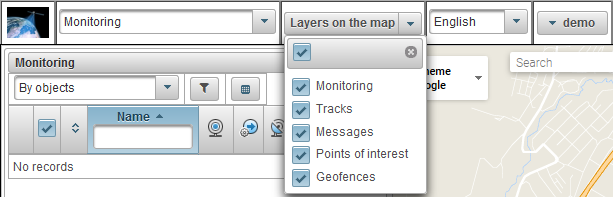
Interface language
It is possible to change the interface language.

User menu
In the right corner of the top panel, the user's login is displayed, under which the user was logged on.
When clicking on the user name, an additional menu appears, which contains the following options:
-
User settings
Opens the user settings dialog.
-
Change password
Opens the password change dialog.
-
Switch user
Opens the user change dialog, you can sign in under another user.
-
Feedback
Opens the feedback dialog, here you can ask questions to your monitoring service provider.
-
History of changes in the system
Opens a history of changes in the system dialog, shows the history of changes in the system.
-
User interface
To go to the user interface, this item is available if you are in the manager interface.
-
Manager interface
To go to the manager interface, this item is available if you are in the user interface.
-
Reconnect
To reconnect to the system.
-
Mobile version
To go to the mobile version of the system, adapted for mobile devices.
-
Help
To go to the system documentation.
-
Sign out
To log off the system.
In the left part of the screen there is a working area in which various actions are carried out.
The content of the working area depends on the selected panel.
The working area width can be adjusted. To do this, move the cursor to its right border and drag it to the desired direction while holding the left mouse button. In addition, the workspace can be completely hidden by clicking on the slider located in the middle of the right border.

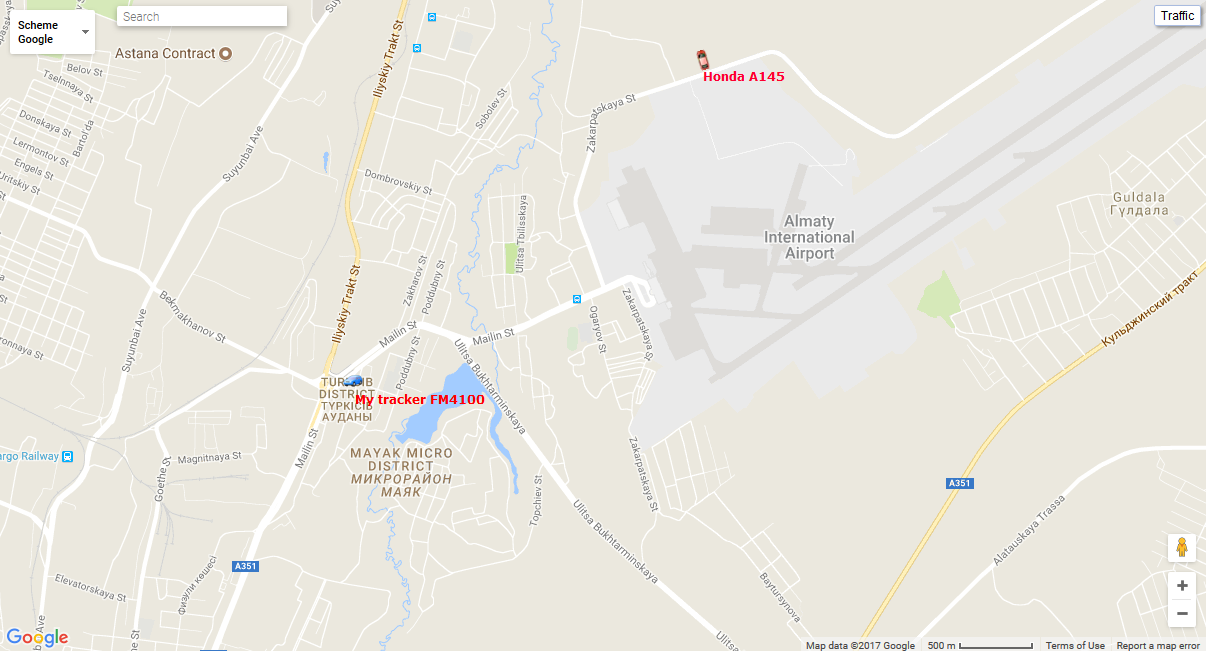
The map is displayed when working with some panels, it occupies a significant part of the screen. It displays the monitoring objects, their movements, points of interest, geofences, etc.
The dimensions of the map can be changed in width. To do this, drag the slider to the right / left, which is located between the working area and the map. Also, you can open the map in the maximum width by clicking in the center of the slider.
In most browsers, you can switch to full-screen display mode, it is activated by the key <F11>.
Using the map in different panels
The map is the same for many panels, except the "Reports" panel, the "Reports" panel has its own map. This means that when switching between panels, the map scale and the coordinates of its center are saved. Also, graphic elements such as track lines, markers, icons of objects, points of interest, geofences and etc. remain in their places.
Many panels can have their own layers on the map: «Monitoring», «Tracks», «Messages», «Points of interest», «Geofences». Graphic elements drawn on the map in a particular panel can be easily turned off and turned on. Display or hide certain layers is configured in the top panel.
Navigation on the map
Navigating with the mouse.
Click the left mouse button on any place of the map and, without releasing the buttons, pull in the desired direction.
Scaling the map
To scale the map, you can use several methods:
-
Using the scale on the map.
In the lower right corner of the map there are zoom buttons, which allows you to zoom in (+) or zoom out (-) objects. In this case, the center of the map does not change its position. You can click on the "+" or "-" buttons to change the scale in a step-by-step mode.
-
Use the mouse scroll wheel.
It is even more convenient to set the appropriate scale using the mouse scroll wheel ("scroll"): from itself - approaching the object, on itself - its moving away. In this case, the cursor itself needs to be directed to the place of interest to you so that when the scale is changed it will not be lost from view.
-
Double-clicking with the left mouse button at any point of the map leads to the approach of this place.
The lower right corner of the map also shows the current scale in which the map is displayed.
In the upper left corner of the map, you can select the source of the map.
In the upper left corner of the map there is a search.
In the upper right corner of the map, depending on the selected source of the map, the "Traffic" button may be displayed.
To enable the display of traffic jams, click the "Traffic" button (to turn off the mode - press it again).
The bottom panel allows you to display or hide certain windows, and also contains buttons that control how objects are displayed on the map.

The following buttons are located in the left part of the bottom panel:
Trail — hide/show the last track of objects;
Name — hide/show names of the objects on the map;
Track single object — disable/enable the tracking mode for single object, when you enable the tracking mode for single object, tracking will be only for one object, in the list of monitoring objects when you click on the name of the object, the tracking option of the selected object will be enabled, and tracking option of the other objects will be disabled;
In the right part of the bottom panel are the following buttons:
 — hide/show online notifications;
 — hide/show information messages;
— hide/show journal;
Also at the end of the right part is the current date and time according to the user's time zone (in brackets the user's time zone, the time zone can be changed in the user's settings).
In the center of the bottom panel is a copyright with a link to the site of the monitoring service provider.
The journal allows you to view received new messages from objects in the worklist.
In the bottom panel to the right is the button for hiding / displaying the journal. The size of the journal can be adjusted in height and width, to do this, press the left mouse button on the border of the journal, hold it down to the desired direction. The journal is semi-transparent, which allows you to see under it a map and objects on the map. In the journal, an arrow  is displayed at the end of each line, when clicked, you can move to the place of the event on the map.
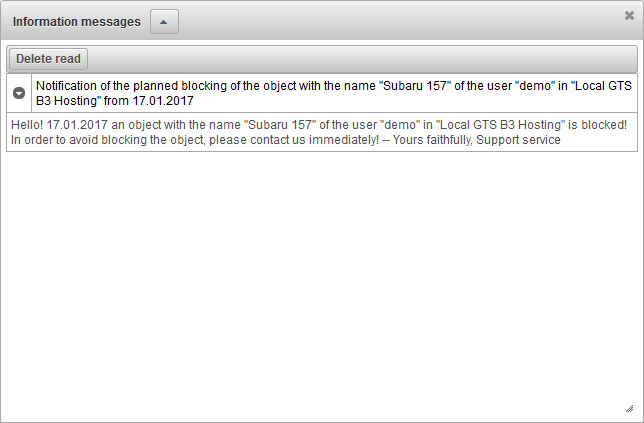
The user can receive informational messages if he is authorized in the system. Information messages are displayed in a pop-up window as they appear, and the number of unread information messages will be displayed in the bottom panel to the right of the icon . The window of information messages can be closed, you can also open it by clicking on the icon in the bottom panel. If you press the left mouse button on the header of the information message, the text of the information message will be displayed, the message will be marked as "Read". Unread messages are marked in bold. The information message window will appear every time you log in until you read all unread messages.
As information messages can serve as a message about a new version of the system, a message about the planned blocking of the object or user.
Each user can personalize some parameters of the system.
To open the user settings dialog, click on the user name in the top panel and select the "User settings" menu item.
The "User settings" dialog window, depending on the rights, can contain the following tabs:
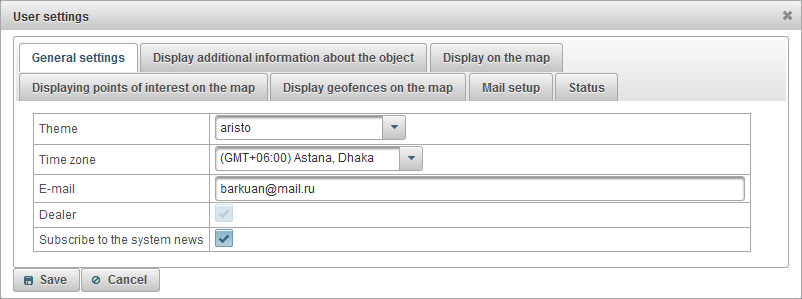
The "General settings" tab contains the following fields depending on the rights:
- Theme. The theme is a combination of colors, backgrounds, icons and buttons. The default theme is "aristo".
- Time zone. Selecting the user's time zone, affects the time in the system.
- E-mail. Your email address is required to recover your password if it is lost.
- Dealer. A sign of the dealer.
- Subscribe to the system news. In case you are subscribed to the newsletter of the system, you will be notified by e-mail about new features of the system.
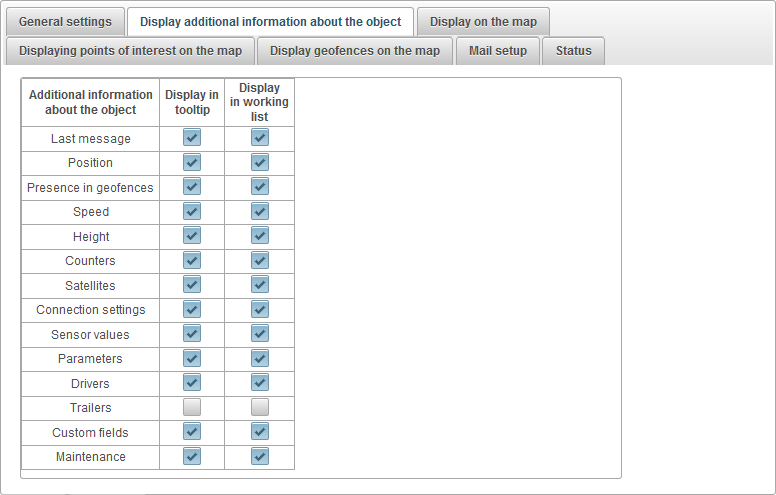
The "Display additional information about the object" tab shows what additional information about the object will be displayed in different places of the monitoring system.
The flags in the "Display in tooltip" column define the content of the tooltip to the object (it occurs when you hover the mouse over an object on the map, in the worklist, etc.).
The flags in the "Display in working list" column determine the contents of the extended information about the object in the worklist.
There are the following types of additional information about the object:
- Last message. The time of the last message from the object.
- Position. The location of the last message of the object.
- Presence in geofences. List of geofences, within which the object was in the last message from the object.
- Speed. The speed of the last message from the object.
- Height. Height above sea level (if the device transmits such data).
- Counters. The values of mileage and motohour counters.
- Satellites. Number of satellites that were captured in the last message.
- Connection settings. Device model, unique identifier and phone number, which are specified in the properties of the object.
- Sensor values. Sensors and their values.
- Parameters. Parameters and their initial values.
- Drivers. The name, photo and phone of the driver who manages the object at the moment, there may be several drivers.
- Trailers. The name and photo of the trailer, which is attached to the object at the moment. There may be more than one.
- Custom fields. Custom fields from the properties of the object.
- Maintenance. Specified maintenance intervals and their statuses.
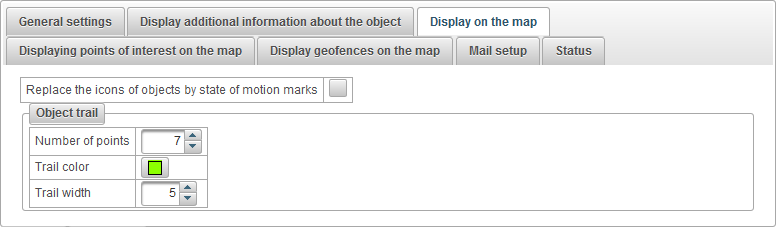
The "Display on the map" tab contains the following fields depending on the rights:
- Replace the icons of objects by state of motion marks. When the flag is set, all icons of objects on the map will be replaced by conditional signs.
- Icon at stop. Icon at zero speed of the object. This field is displayed if the flag "Replace the icons of objects by state of motion marks" is set.
- Icon width. Icon width. This field is displayed if the flag "Replace the icons of objects by state of motion marks" is set.
- Object trail. You can specify how long the trail will follow the object (the number of points corresponds to the number of messages) when it is online monitoring on the map, select the trail color and its width.
- Number of points.
- Trail color.
- Trail width.
The tab "Display points of interest on the map" contains the following fields depending on the rights:
- Display points of interest names on the map. A sign of displaying the names of points of interest on the map.

The "Display geofences on the map" tab contains the following fields depending on the rights:
- Display geofence names on the map. The sign for displaying the names of geofences on the map.

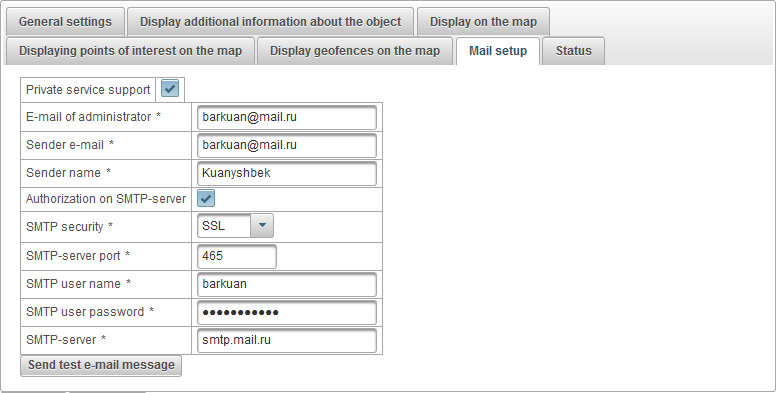
The "Mail setup" tab is available only for dealers, it allows you to configure the e-mail of the support service (administrator) and e-mail for sending messages to the users of the dealer. Dealer users will receive emails from the specified e-mail address.
The "Mail setup" tab contains the following fields depending on the rights:
- Private service support. A sign of having your own support service, only dealers have the ability to set this attribute and set up mail. If the sign is set, all outgoing mail, regarding the users of the dealer will be sent from the specified e-mail address.
- E-mail of administrator. E-mail of the system administrator. E-mail messages of feedback of the users of the dealer will come to the specified e-mail address.
- Sender e-mail. E-mail of the sender, which will be used when sending e-mail messages to the users of the dealer.
- Sender name. The name of the sender that will be used when sending e-mail messages by the system. For example, there may be a name for the system.
- Authorization on SMTP-server. If your mail server requires authorization, then you need to put this flag. For example, mail.ru uses authorization on an SMTP server.
- SMTP security. Choosing the security of the mail server. For example, mail.ru uses SSL security.
- SMTP-server port. The SMTP server port used when sending e-mail messages by the system. For example, mail.ru uses port 465.
- SMTP user name. The user name of the mail server.
- SMTP user password. The password of the mail server user.
- SMTP-server. The address of the SMTP server. For example, mail.ru uses smtp.mail.ru.
The "Send test e-mail message" button allows you to test the settings and send a test e-mail message to the specified administrator e-mail.
The "Status" tab contains the following tabs depending on the rights:
- General.
- Services.
- Balance detailing.
- Days detailing.
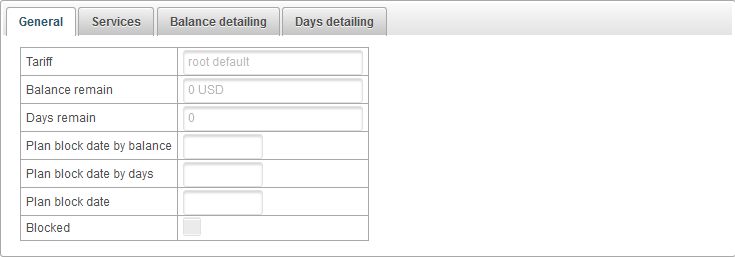
The "General" tab contains the following fields depending on the rights:
- Tariff. The tariff assigned to the user.
- Balance remain. Balance of the user.
- Days remain. Days remain of the user.
- Plan block date by balance. Calculated date, according to which the user is scheduled to block by balance.
- Plan block date by days. Calculated date, according to which it is planned to block the user by days.
- Plan block date. Calculated date, according to which the user is to be blocked.
- Blocked. User block flag.
The "Services" tab contains the table of the provided services to the user with the cost and quantity, contains the following columns:
- №. Serial number.
- Service. The name of the provided service to the user.
- Enabled. The flag for enabling this service to the user.
- Cost correspondence table. The cost can depend on the number, accordingly the table will show the correspondence of the quantity and cost of services.
- Frequency of charge. Time interval, according to which the user will be charged for using the service.
- Max quantity. The maximum allowed number.
- Max quantity limit. Maximum number limit from the parent user.
- Created. The number created by the user.

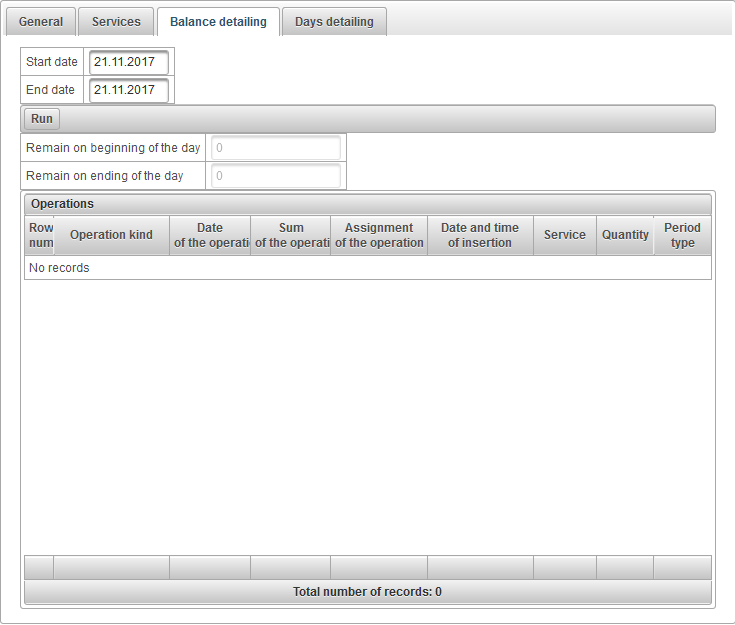
On the "Balance detailing" tab, you can view the details by the user's balance.
To view the details by balance, you need to fill in the "Start date" and "End date" fields, then click the "Run" button.
The balance table contains the following columns:
- Row num.
- Operation kind.
- Date of the operation.
- Sum of the operation.
- Assignment of the operation.
- Date and time of insertion.
- Service.
- Quantity.
- Period type.
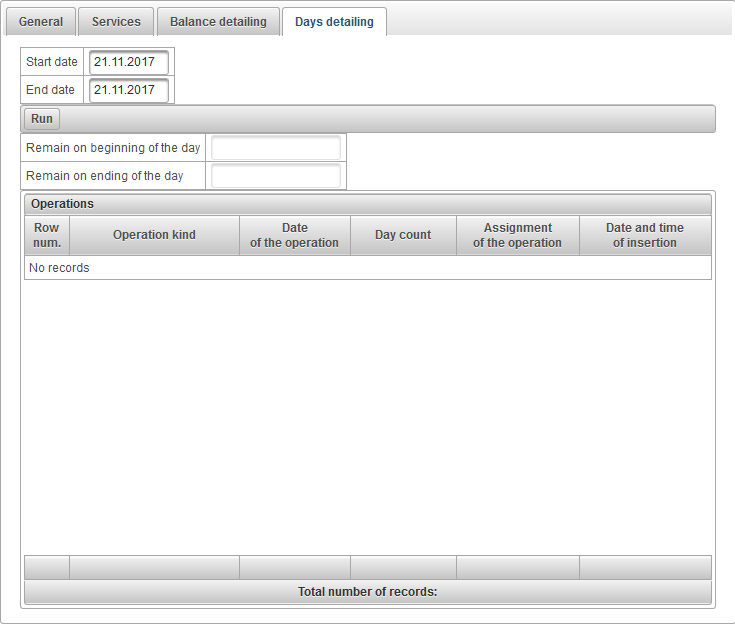
On the "Days detailing" tab, you can view the details by user's day.
To view the details by the day, you need to fill in the "Start date" and "End date" fields, then click the "Run" button.
The table by days contains the following columns:
- Row num.
- Operation kind.
- Date of the operation.
- Day count.
- Assignment of the operation.
- Date and time of insertion.
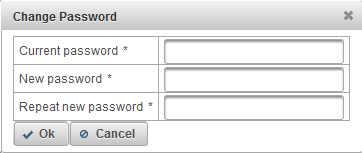
To open the password change dialog, click on the user name in the top panel and select the menu item "Change Password".
The "Change Password" dialog box appears. Enter your current password and new password with retry and click "OK".
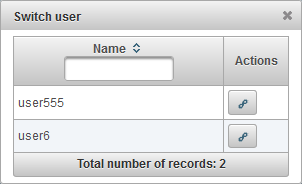
It is possible to sign in under a different (subordinate) user.
To open the user change dialog, click on the user name in the top panel and select the menu item "Switch user".
After that, the "Switch user" dialog box opens, which contains a list of available users. Click on the button to the right of the user to sign in under it. For convenience of search it is possible to use a dynamic filter by user name.
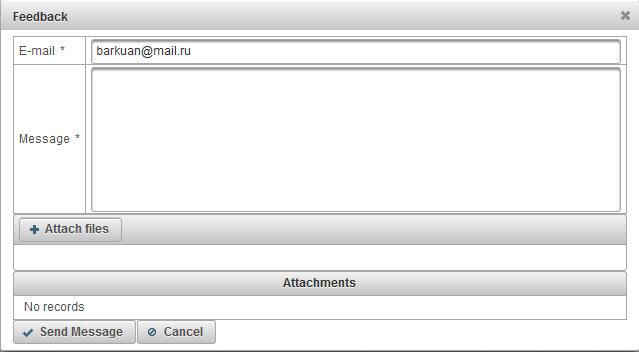
It is possible to send a message to the service provider's support service.
To open the feedback dialog, click on the user name in the top bar and select the "Feedback" menu item.
The "Feedback" dialog box opens. By default, the e-mail of the current user will be filled in the "E-mail" field, the response from the support service will be sent to this e-mail. In the "Message text" field, enter your message text. You can also attach files by clicking the "Attach files" button.
To send a message, click the "Send a message" button and this message will be sent to the service provider's support.
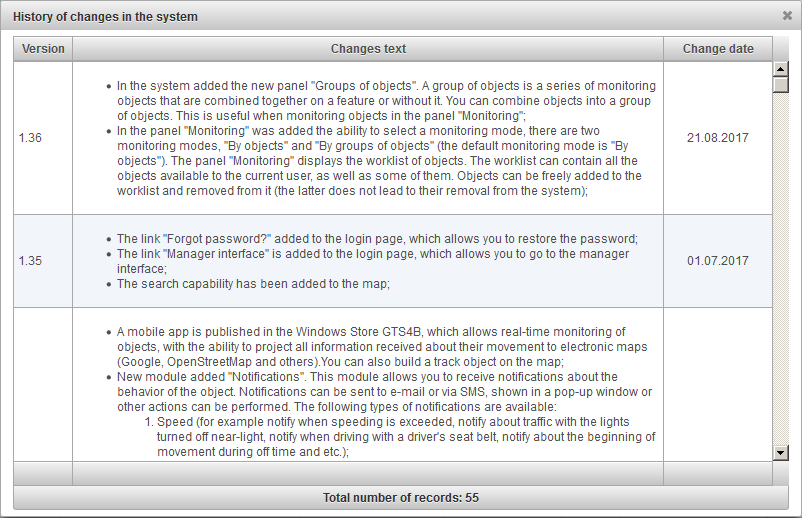
It is possible to view the history of changes in the system.
To open the change history dialog in the system, click on the user name in the top panel and select the menu item "History of changes in the system".
The "History of changes in the system" dialog box opens.
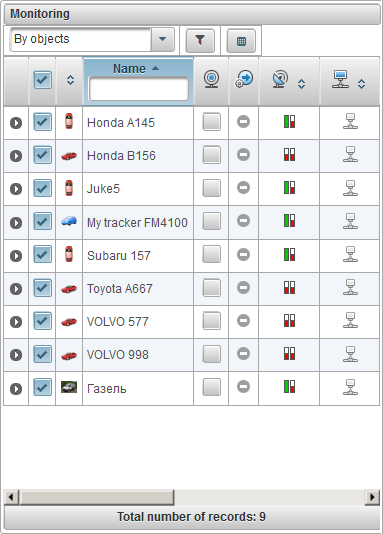
The monitoring panel allows you to monitor worklist objects on the map.
To open the monitoring panel, in the top panel, select "Monitoring" from the drop-down list.
The worklist can contain all the objects available to the current user, as well as some of them. Objects can be freely added to the worklist and removed from it (the latter does not lead to their removal from the system).
There are two monitoring modes:
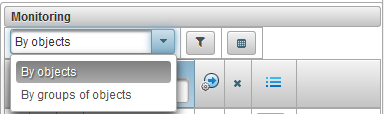
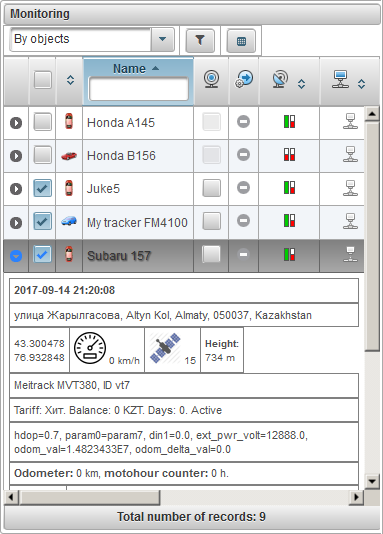
In the monitoring panel, in order to enter the monitoring mode by objects, select "By objects" from the drop-down list.

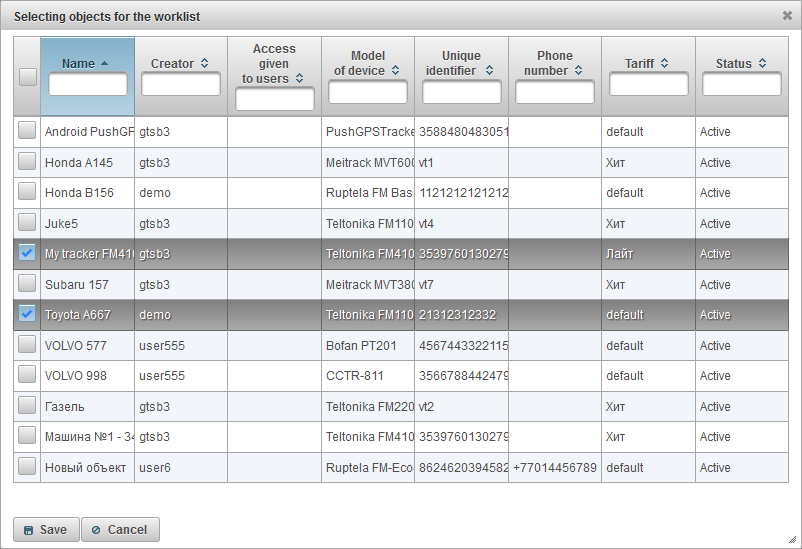
In the monitoring mode "By objects" to the right of the monitoring mode selection there is a button  for selecting objects for the worklist, when clicked, a dialog box for selecting objects for the worklist will appear.
In the object selection table, you can filter records by different fields. In the first column you need to put the flags on those objects that you want to see in the worklist and click the "Save" button, after that the dialog form will close and the worklist will be updated.
By default, the table is sorted by object name in alphabetical order in ascending order. It is possible to sort any column in alphabetical order in ascending or descending order, for this, in the column header, click on the icon  ,
,  or
or  .
.
It is also possible to filter on any column by entering the text in the column header and filtering the table.
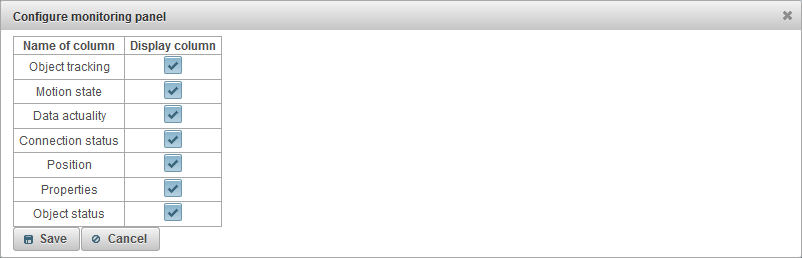
You can adjust the visibility of the columns of the worklist table in accordance with your requirements and needs - in the monitoring panel settings, to configure the monitoring panel you need to click on the button  .
.
The worklist table consists of the following columns:
 Button to show / hide extended information about the object. When clicking on the button, an expanded information about the object will be displayed below this record, with the reverse click will be hidden.
  Flag of object visibility on the map. Objects marked in this column are visible on the map only when they fall into the visibility zone. The map can be freely moved and scaled. You can mark all objects at the same time by putting a flag at the very top of the column. Removing this flag causes the flags to be removed from all objects in the list. The objects will be visible on the map only if the check mark in the "Monitoring" layer is on the top panel in the "Layers on the map" drop-down list.
 The object icon. The icon assigned to the object. The icon can be changed in the properties of the object on the "Icon" tab.
 - Object name. To see the location of the object on the map, you need to click the left mouse button on the name of the object in the worklist, the map will be centered on the specified object, the scale will not be changed.
 Flag of tracking object on the map. The objects marked in this column are always visible on the map. When a new positional message is received from the marked objects, the map is automatically scaled so that all these objects are in the field of view. You can mark all the objects at the same time by clicking on the icon at the very top of the column.
 Motion state. Displays with the help of conventional symbols, the object moves or stands. The state of the object's motion is determined on the basis of information about the speed in the last message from the object.
 - according to the last message from the object, received within 60 minutes, the object stands.
  - object stands.
 - according to the last message from the object, received within 60 minutes, the object moves.
 - object moves.
 Data actuality. Displays the relevance of information about the object. When you hover the mouse over the icon, a tooltip is displayed, which shows the number of captured satellites and the elapsed time since the last message of the object.
The first column shows whether the satellites are captured:
 - satellites are not captured;
 - satellites are captured;
The second column shows elapsed time from the last message of the object:
- - object transmitted data within the last 5 minutes;
 - the object transmitted data for the last hour;
 - the object transmitted data within the last 24 hours;
- - the last time the data from the object were received more than a day ago;
 Connection status. Displays the status of the connection to the server:
 - the object is connected, the object transmitted data to the server within the last 10 minutes;
  - object is disconnected, the object has not transmitted data to the server in the last 10 minutes;
 Remove an object from the worklist. Objects can be added to and removed from the worklist. When you click on this icon, the object is removed from the list. You can remove all objects from the list by clicking on the icon at the very top of the column.
- Object status. When you hover your mouse over the icon, a tooltip is displayed, showing the following fields: tariff, balance, remaining days and status.
 - the object is active, the active object can receive data on the server;
  - the object is locked, the locked object can not receive data on the server;
 - Additional menu. Additional menu for selecting actions with the object.
 Object properties. Opens the object properties dialog.
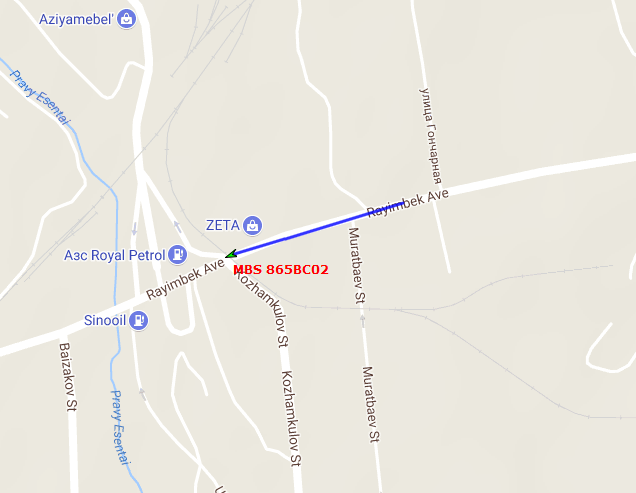
- Location. Displays the location of the object as address information.
By default, the table is sorted by object name in alphabetical order in ascending order. It is possible to sort any column in alphabetical order in ascending or descending order, for this, in the column header, click on the icon , or .
It is also possible to filter by object name, for this purpose enter the text in the header of the column "Name" and the table is filtered by the name of the object.
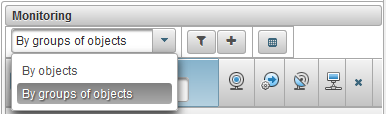
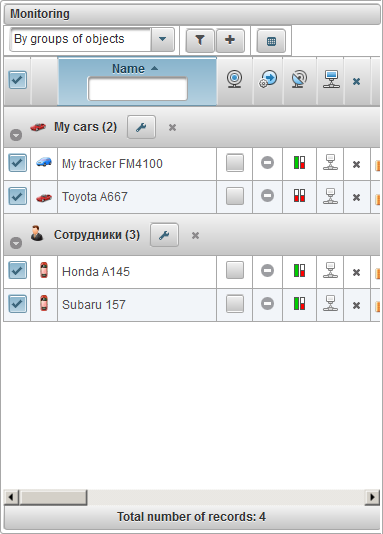
In the monitoring panel, to go to monitoring mode by groups of objects, select "By groups of objects" from the drop-down list.
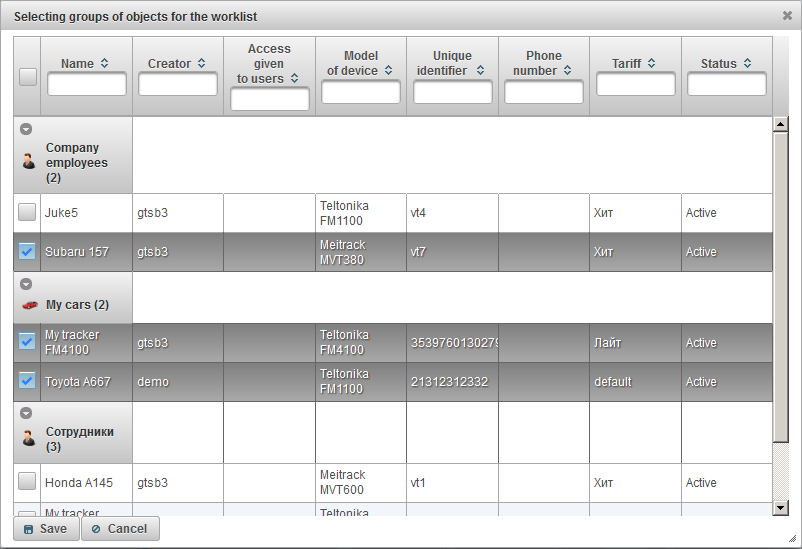
In monitoring mode "By groups of objects" to the right of the monitoring mode selection, there is a button for selecting objects for the worklist, when clicked, a dialog box for selecting the groups of objects for the worklist will appear.
In the table for selecting groups of objects, you can filter records by different fields. In the first column you need to put the flags on those objects that you want to see in the worklist and click the "Save" button, after that the dialog form will close and the worklist will be updated.
By default, the table is sorted by object name in alphabetical order in ascending order. It is possible to sort any column in alphabetical order in ascending or descending order, for this, in the column header, click on the icon , or .
It is also possible to filter on any column by entering the text in the column header and filtering the table.
You can adjust the visibility of the columns of the worklist table in accordance with your requirements and needs - in the monitoring panel settings, to configure the monitoring panel you need to click on the button .
In the worklist table, the objects are displayed by groups, next to the group name, the number of objects included in the bracket. To view the objects in the group, you need to expand the group by clicking on the icon .
To collapse a group, click on the icon  . To the left of the group name of the object, an icon of the group of the object is displayed. When you hover the mouse over the name of a group of objects, a tooltip will appear, displaying a list of all the objects included in it. To open the properties group of the object group, click the icon to the right of the object group name. To delete a group of objects from the worklist, click the icon to the right of the object group name.
The worklist table consists of the following columns:
- Flag of object visibility on the map. Objects marked in this column are visible on the map only when they fall into the visibility zone. The map can be freely moved and scaled. You can mark all objects at the same time by putting a flag at the very top of the column. Removing this flag causes the flags to be removed from all objects in the list. The objects will be visible on the map only if the check mark in the "Monitoring" layer is on the top panel in the "Layers on the map" drop-down list.
- Object icon. The icon assigned to the object. The icon can be changed in the properties of the object on the "Icon" tab.
- Name of the object. To see the location of the object on the map, you need to click the left mouse button on the name of the object in the worklist, the map will be centered on the specified object, the scale will not be changed.
- Flag of tracking object on the map. The objects marked in this column are always visible on the map. When a new positional message is received from the marked objects, the map is automatically scaled so that all these objects are in the field of view. You can mark all the objects at the same time by clicking on the icon at the very top of the column.
- Motion state. Displays with the help of conventional symbols, the object moves or stands. The state of the object's motion is determined on the basis of information about the speed in the last message from the object.
- - according to the last message from the object, received within 60 minutes, the object stands.
- - object stands.
- - according to the last message from the object, received within 60 minutes, the object moves.
- - object moves.
- Data actuality. Displays the relevance of information about the object. When you hover the mouse over the icon, a tooltip is displayed, which shows the number of captured satellites and the elapsed time since the last message of the object.
The first column shows whether the satellites are captured:
- - satellites are not captured;
- - satellites are captured;
The second column shows elapsed time from the last message of the object:
- - the object transmitted data within the last 5 minutes;
- - the object transmitted data for the last hour;
- - the object transmitted data within the last 24 hours;
- - the last time the data from the object were received more than a day ago;
- Connection status. Displays the status of the connection to the server:
- - the object is connected, the object transmitted data to the server within the last 10 minutes;
- -object is disconnected, the object has not transmitted data to the server in the last 10 minutes;
- Remove an object from the worklist. Objects can be added to and removed from the worklist. When you click on this icon, the object is removed from the list. You can remove all objects from the list by clicking on the icon at the very top of the column.
- The status of the object. When you hover your mouse over the icon, a tooltip is displayed, showing the following fields: tariff, balance, remaining days and status.
- - the object is active, the active object can receive data on the server;
- - the object is locked, the locked object can not receive data on the server;
- - Additional menu. Additional menu for selecting actions with the object.
- Object properties. Opens the object properties dialog.
- Location. Displays the location of the object as address information.
By default, the table is sorted by object name in alphabetical order in ascending order. It is possible to sort any column in alphabetical order in ascending or descending order, for this, in the column header, click on the icon , or .
It is also possible to filter by object name, for this purpose enter the text in the header of the column "Name" and the table is filtered by the name of the object.
In the monitoring panel, you can set the visibility of the worklist table columns.
To do this, you need to click on the button , when you click on it, the dialog form for setting up the monitoring panel opens.
Set the flags for those columns that you want to see in the worklist table and click the "Save" button.
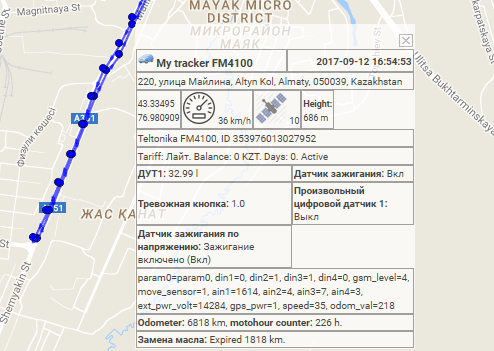
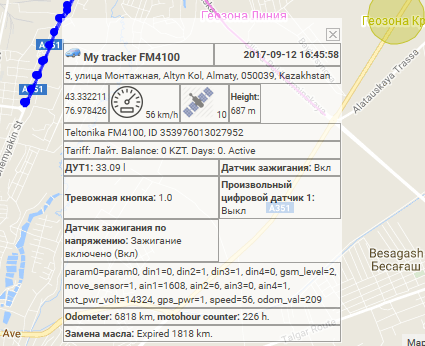
A tooltip to an object is displayed if you move the mouse cursor over an object in the worklist, on the map, in dialog boxes, and so on. The content of the tooltip depends on the user settings.

Extended information about the object is displayed when clicking on the icon in the working list of the objects in the monitoring panel (in monitoring mode by objects). The content of the extended information about the object depends on the user settings.
The object on the map can be displayed by its icon and the signature with its name (the color of the signature is red by default, you can choose a different color in the object properties on the "Additional" tab). The object icon can also be selected, or you can load it in the properties of the object on the "Icon" tab. There you can also set the flag rotation icon (depending on the direction of movement). You can also change the width of the icon.
By default, the icons of the objects on the map are replaced by motion state symbols. This can be configured in the user settings on the "Display on the map" tab, the flag "Replace the icons of objects by state of motion marks".
There you can also select the icon at stop and the width of the icon.
When moving, the shape of the icon will be an arrow pointing to the direction of movement.
If the flag "Replace the icons of objects by state of motion marks" is set, the icons of the objects will be replaced by motion state symbols.
If the flag "Replace the icons of objects by state of motion marks" is removed, the icons of the object itself will be used.
If the object is in motion, then behind the object there may be a tail showing the movement for the last few messages. The length of the tail is determined in the user settings, and it will also be possible to change the color of the track and the thickness of the line.
The following buttons are located in the left part of the bottom panel:
Trail — hide / show the track of the last displacements of objects;
Name — hide / show the names of objects on the map;
Track single object — disable / enable the tracking mode for one object, when the tracking mode of one object is activated, tracking will be performed only for one object, in the list of monitoring objects, when you click on the object name, the tracking feature of the selected object will be set, and for others, the tracking feature will be removed;
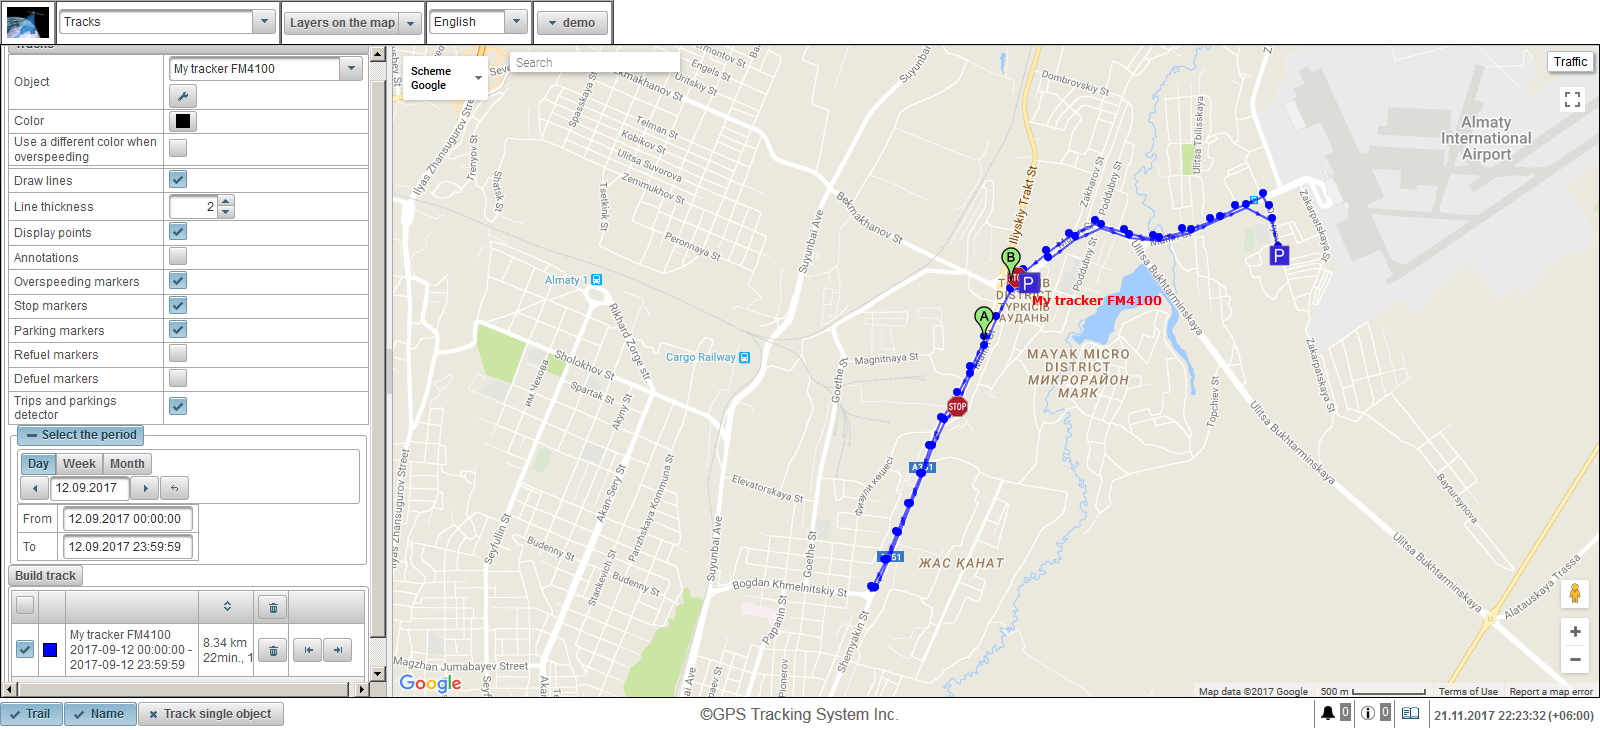
A track is a line of movement of an object on a map. The track is constructed according to the messages of the object and connected by segments into one line. Markers can also be placed along the track, for example, speeding, stops, refuels, defuels, etc.
On the map, you can view any number of tracks at different time intervals for different objects. For each track, you can select an individual color.
To open the "Tracks" panel, from the drop-down list, select "Tracks".
Fields for building a track:
- Object. Select an object from the drop-down list.
- Color. Select the color of the track.
- Use a different color when overspeeding. Flag using a different color when speeding. The default is red.
- Overspeed color. Select the color of the track when the speed is exceeded.
- Draw lines. Flag drawing the track line. If you set this flag, lines will be drawn between the points.
- Line thickness. The thickness of the track line.
- Display points. Flag for displaying points along the track line.
- Annotations. This field is visible if the flag "Display points" is set. Flag for displaying the tooltip to each point of the track. Annotations are useful, but make the track line visually heavier in the browser, it is advisable to turn them off.
- Overspeeding markers. Flag for displaying markers of excess speed along the track line.
- Stop markers. Flag for displaing stop markers along the track line.
- Parking markers. Flag for displaing parking markers along the track line.
- Refuel markers. Flag for displaing refuel markers along the track line.
- Defuel markers. Flag for displaing defuel markers along the track line.
- Trips and parkings detector. Flag for using trips and parking detector. This flag affects the counting of the mileage and the visualization of the track on the map. For example, if you set this flag, in parkings and stops, instead of a large number of points, only one point will be displayed. Trips and parking detector can be configured in the object properties on the "Trips and parkings detector" tab.
- Select the period. You must select the track period.
To build a track, click the "Build track" button.
As a result, the map will display the track according to the specified parameters.
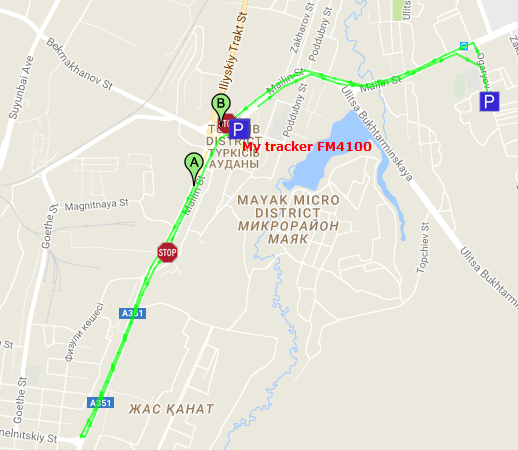
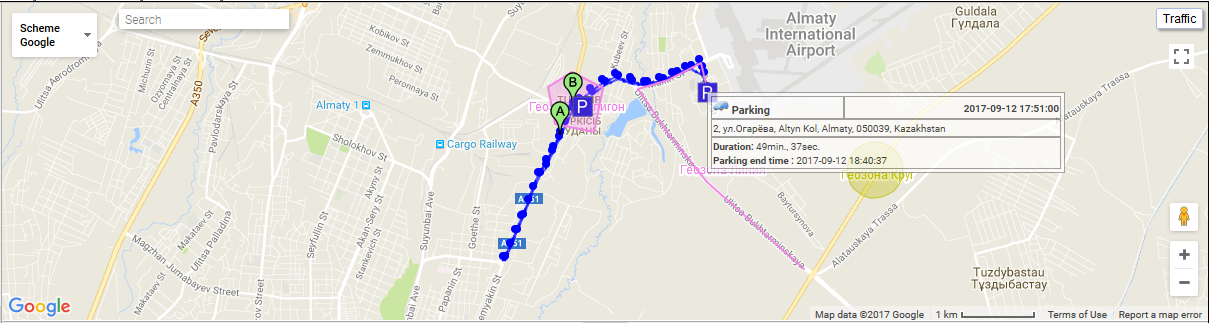
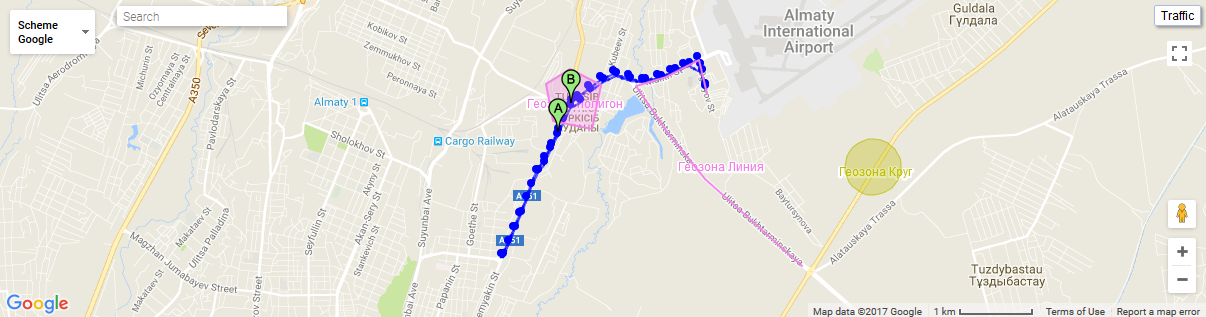
The "A" marker will indicate the start point of the track, and the "B" marker will indicate the end point of the track.
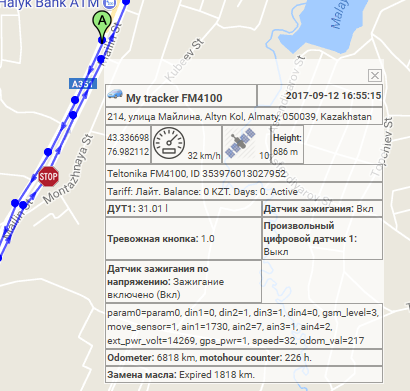
When you click the left mouse button on the track point, information about a particular point will be displayed.
The list of tracks can be seen under the "Build track" button.
The table of tracks consists of the following fields:
- Visibility flag on the map. Tracks marked in this column are visible on the map only when they fall into the visibility zone. The map can be freely moved and scaled. You can mark all tracks at the same time by putting a flag at the very top of the column. Removing this flag causes the flags to be removed from all tracks in the list. Tracks will be visible on the map only if a check mark is on the "Tracks" layer in the top panel in the "Layers on the map" drop-down list.
- Track color on the map.
- Name of the object with the selected period. If you click with the left mouse button, the track will be displayed in the center of the map.
- Mileage and total trip time for the specified period.
- Button to delete a track. Pressing the button, the track will be deleted from the map. On the header of the column there is a button for deleting all tracks, when clicked, all tracks on the map will be deleted.

 Move buttons to the start and end points of the track.
There is a possibility to sort the tracks in ascending / descending order of the track. To do this, click on the column header, where the mileage and total trip time are displayed.
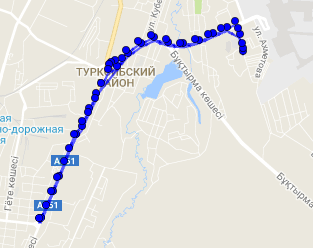
The "Messages" panel allows you to view messages received from the object (coordinates, speed, parameters, etc.). The track on the map is built according to the messages of the object and connected by segments into one line.
To open the "Messages" panel, in the top panel, select "Messages" from the drop-down list.
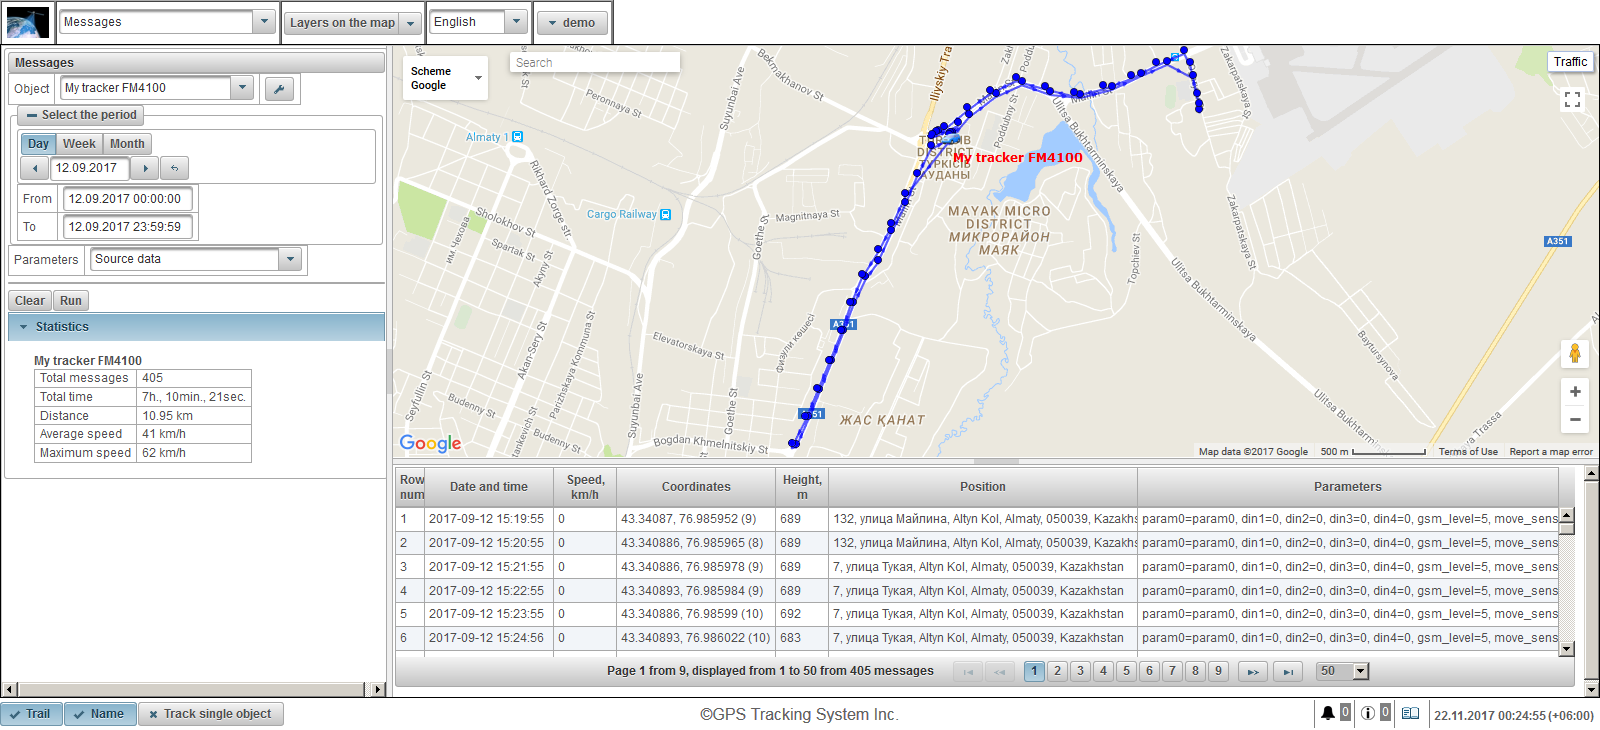
In the upper left part, specify the parameters for requesting messages.
The statistic is displayed in the lower left part.
The map is displayed in the right upper part.
The lower right-hand side contains the results of the query, that is, the messages themselves.
Borders can be changed by clicking on the border between regions and holding it to move the border.
Fields for requesting messages:
- Object. Select an object from the drop-down list.
- Select the period. You must select the track period.
- Parameters. A drop-down list with the following values:
- Source data. In the "Parameters" column, the value of the parameters will be in one line.
- Sensor values. Each sensor will be displayed as a separate column with the sensor value.
- Smoothed values of sensors. Each sensor will be displayed as a separate column with a smoothed sensor value.
To execute the message request, click on the "Run" button. The query results will be displayed in the lower right part below the map. To clear the table, click on the "Clear" button.

A table can consist of the following columns:
- Row num. The ordinal number of the record.
- Date and time. The date and time of the message from the object.
- Speed, km/h. The speed of movement of the object.
- Coordinates. The latitude and longitude of the object, the number of captured satellites is indicated in brackets.
- Height, m. Height above sea level.
- Position. Address of the object.
- Parameters. Parameter values.
If the messages do not fit, then they will be divided into several pages. You can adjust the width of columns by clicking on the left mouse button on the border of the column and holding it to the desired direction. When you click on a row in the table, the record will be highlighted in gray, the message marker will be displayed on the map and centered on the map.
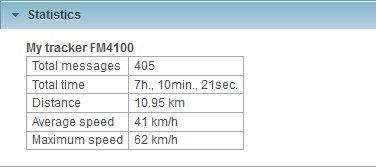
The lower left part displays statistics with the following fields:
- Total messages. The number of messages for the specified period.
- Total time. The difference between the time of the last message and the first message.
- Distance. Mileage for the specified period.
- Average speed. Average speed for the specified period.
- Maximum speed. The maximum speed for the specified period.
After the query is executed, a message track will be displayed on the map, according to the specified parameters.
By default the color of the message track is blue, you can change the color of the track in the properties of the object on the "Additional" tab.
When switching to other panels, the track of messages on the map is saved. In order to delete the track of messages on the map, you need to return to the "Messages" panel and click on the "Clear" button or turn off the "Messages" layer in the map layers selection in the top panel.
Clicking the left mouse button on the track point displays information about a specific point on the map and in the message table there is an record for this point and will be highlighted in gray.
The "Points of interest" panel allows you to create places on the map that are necessary for the user.
To the point of interest, you can attach an image or a photo, specify a name on the map and a description. For example, as points of interest, you can add cafes, restaurants, hospitals, retail outlets, etc.
Points of interest complement the visualization of the map.
To open the "Points of interest" panel, select "Points of interest" from the drop-down list in the top panel.
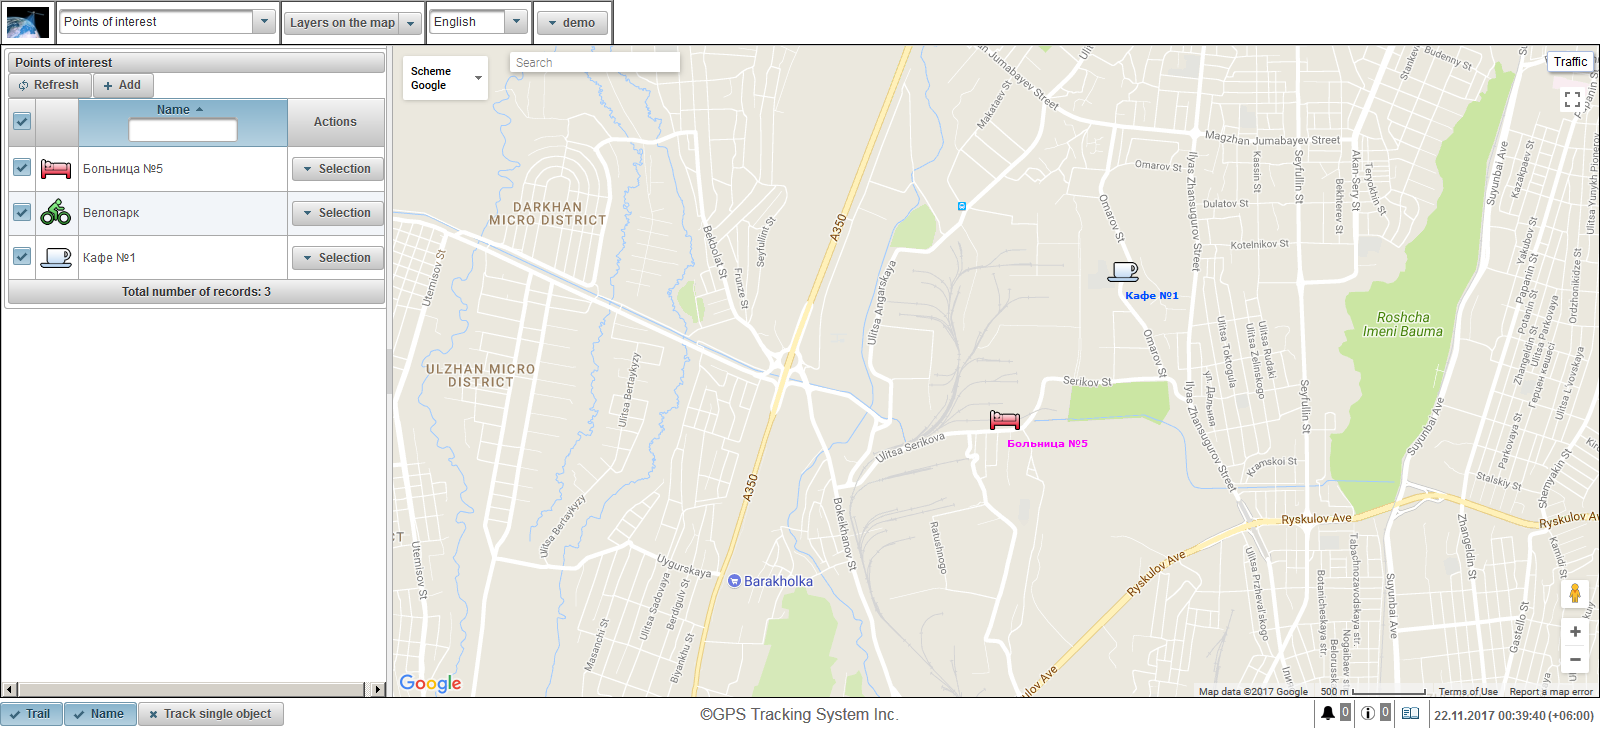
The panel of points of interest is displayed in the left part.
A map is displayed on the right side.
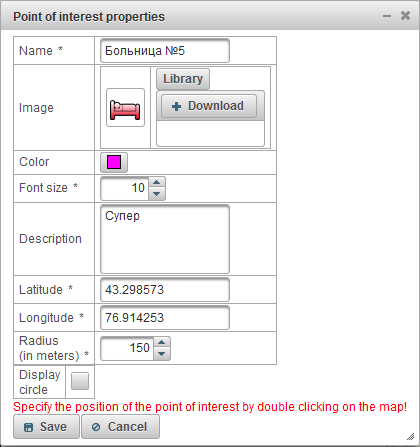
To create a point of interest, click on the "Add" button in the points of interest panel. In the upper left corner, the properties dialog of the point of interest opens.
The properties dialog of the point of interest can consist of the following fields:
- Name. Point of interest name.
- Image. The image can be selected from the standard library by clicking on the "Library" button, or upload your image.
- Color. Signature color on the map.
- Font size. The font size of the signature on the map.
- Description. Custom text of the point of interest description.
- Latitude. The latitude of the point of interest. You can set it manually or double-click the left mouse button on the map.
- Longitude. The longitude of the point of interest. You can set it manually or double-click the left mouse button on the map.
- Radius (in meters). The radius of the point of interest in meters.
- Display circle. Flag of displaying the circle around the point of interest.
Double-click on the map to specify the position of the point of interest. The point can be moved by left-clicking on the point, holding it, move it to the desired place.
To save the point of interest, click the "Save" button.
By default, the names of points on the map are displayed, if you want to change this setting, then you need to go to the user settings on the tab "Displaying points of interest on the map."
On the left, under the "Add" button, a table of points of interest is displayed.
The table of points of interest consists of the following fields:
- Flag of visibility on the map. Points of interest marked in this column are visible on the map only when they fall into the zone of visibility. The map can be freely moved and scaled. You can mark all points of interest at the same time by putting a flag at the very top of the column. Removing this flag leads to the removal of flags from all points of interest in the list. The points of interest will be visible on the map only if the layer "Points of interest" is selected in the "Layers on the map" drop-down box on the top panel.
- Name. The name of the point of interest. When you click on the point of interest name, the point of interest will be in the center of the map.
- Actions.
- - opens a dialog of properties of the point of interest, the point of interest itself is centered on the map.
 - add a copy of the point of interest.
 - delete the point of interest.
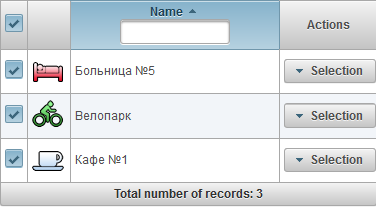
By default, the table is sorted by the point of interest name in alphabetical order in ascending order. You can sort by the name of the point of interest in alphabetical order in ascending or descending order, for this, in the column header you need to click on the icon , or . You can also filter by the name of the point of interest by entering the text in the column header and the table will be filtered.
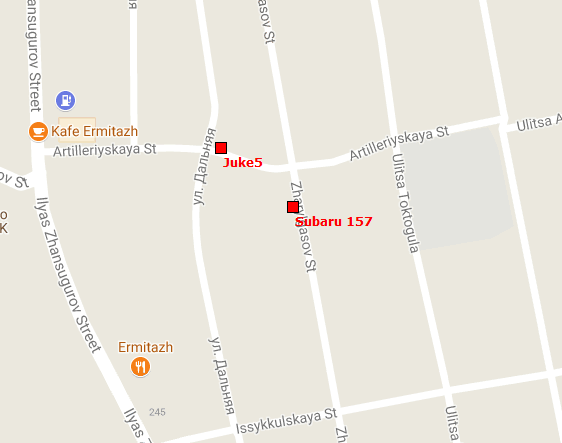
When you hover your mouse over the point of interest on the map, a tooltip will appear with the name, description and image of the point of interest.

The "Geofences" panel allows you to create geographic areas necessary for the user's work.
To open the "Geofences" panel, select "Geofences" from the drop-down list in the top panel.
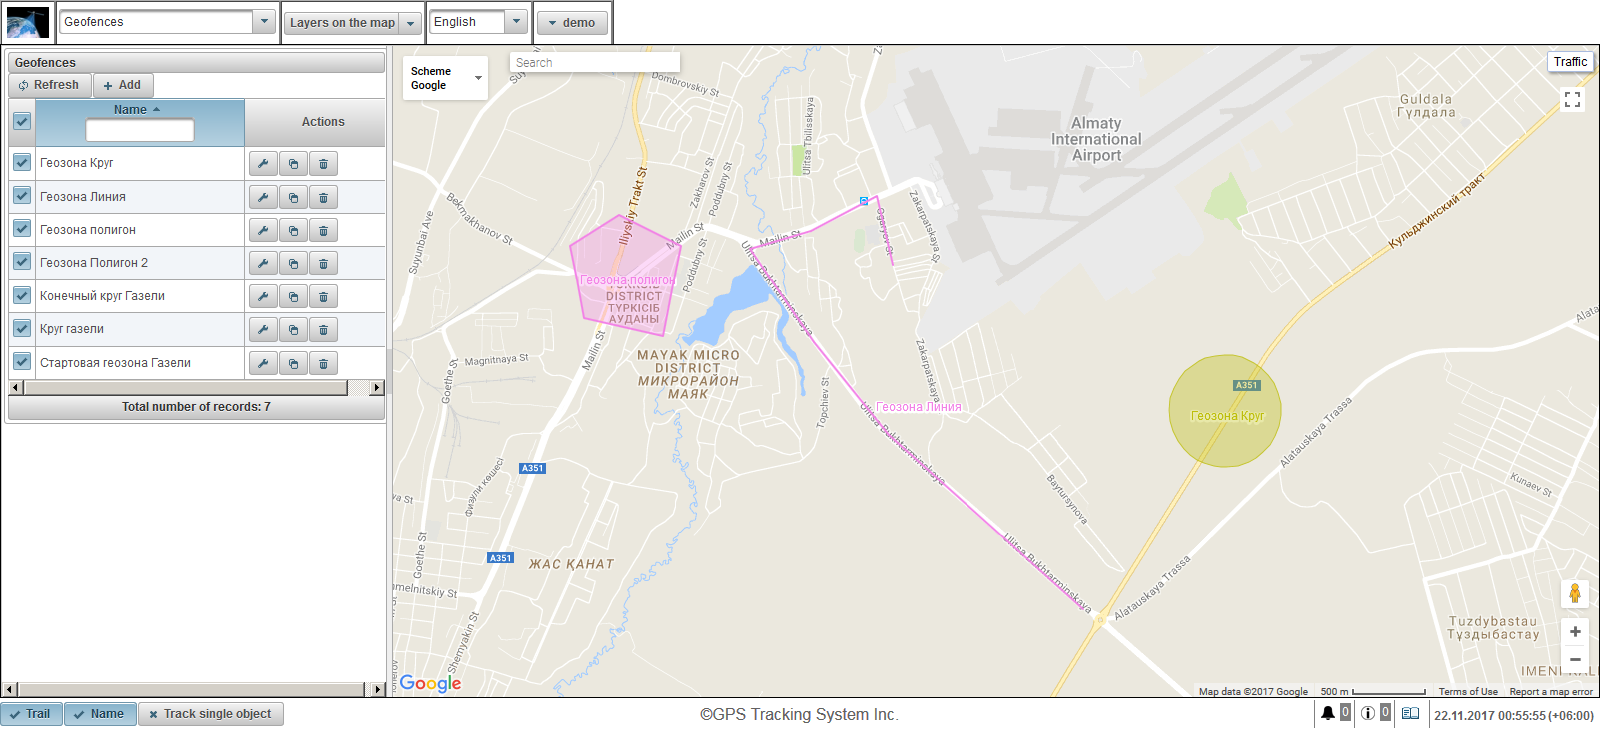
Geofences can have different forms (polygon, circle or line).
In addition to visual mapping on the map, geofences can be used in reports, notifications, tooltips, etc.
The geofences panel is displayed in the left part.
A map is displayed on the right side.
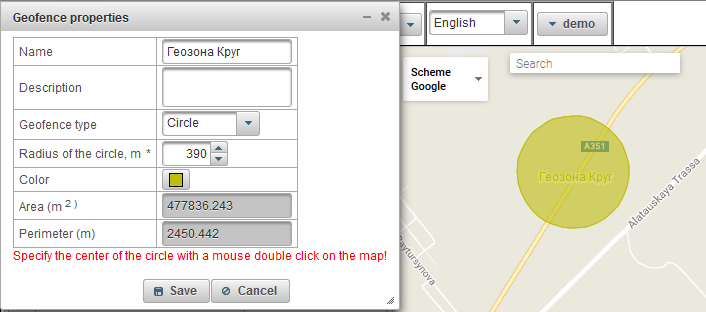
To create a geofence, click on the "Add" button in the geofences panel. The geofence properties dialog box appears in the upper left corner.
The geofence properties dialog box can consist of the following fields:
- Name. Geofence name.
- Description. Custom description text of the geofence.
- Geofence type.
- Circle. A geofence in the form of a circle, an additional field "Radius of the circle, m" will appear, in which you can specify the radius of the circle in meters. For example, it is convenient to use a circle for printing out trade points.
- Line. Geofences in the form of a line, the "Line thickness" field will appear, in which you can specify the thickness for the line. Lines, for example, are convenient for applying to certain streets.
- Polygon. Geofences in the form of a polygon, the "Line thickness" field will appear, in which you can specify the thickness for the line. Polygons, for example, are convenient to use to apply the city or territory of the base.
- Radius of the circle, m. The radius of the circle in meters. This field is visible if the geofence type "Circle" is selected.
- Line thickness. The thickness for the line. This field is visible if the type of the "Line" geofence is selected.
- Color. The color of the geofence on the map.
- Area (m2). Informative field, automatically calculates and displays the area.
- Perimeter (m). An informative field that automatically calculates and displays the perimeter.
At the bottom instructions for creating geofence points are written in red color.
First you need to select the type of geofence, then double-click on the map you need to put the first point of the geofence. Other points are added in the same way. To delete a point, right-click on the point. You can move the points by left-clicking on the point, holding it, move it to the desired place.
To save the geofence click the "Save" button.
By default, the geofence names on the map are displayed, if you want to change this setting, then you need to go to the user settings on the "Display geofences on the map" tab.
The geofence table is displayed under the "Add" button on the left.
The geofence table consists of the following fields:
- Visibility flag on the map. Geofences marked in this column are visible on the map only when they fall into the zone of visibility. The map can be freely moved and scaled. It is possible to mark simultaneously all geofences by putting a flag at the very top of the column. Removing this flag causes the removal of the flags from all geofences in the list. Geozones will be visible on the map only if a check mark is on the "Geofences" layer on the top panel in the "Layers on the map" drop-down list.
- Name. Geofence name. When you click on the name of the geofence, the geofence will be in the center of the map.
- Actions.
- - opens a dialog of the properties of the geofence, the geofence itself is centered on the map.
- - add a copy.
- - remove geofence.
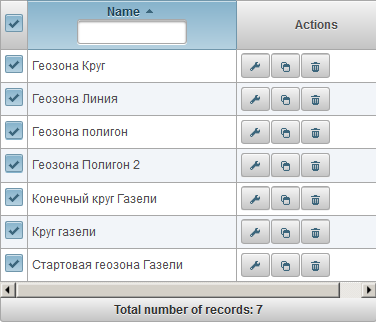
By default, the table is sorted by geofence name in alphabetical order in ascending order. It is possible to sort by geofence name in alphabetical order in ascending or descending order, for this in the column header, click on the icon , or . It is also possible to filter by geofence name, enter the text in the column header and the table will be filtered.
The "Reports" panel allows you to generate reports on user-defined parameters. Reports can be viewed in the browser, and exported to files in various formats.
To open the report panel, in the top panel, select "Reports" from the drop-down list.
On the left side of the screen are three panels:
- System reports.
- Custom reports.
- Selected report.
The "System reports" panel displays a list of reports available to all users. Above there is the possibility of filtering by the name of the reports. To select a report, click on the report name, after selecting the report, the "System reports" panel will close and the "Selected report" panel will open.
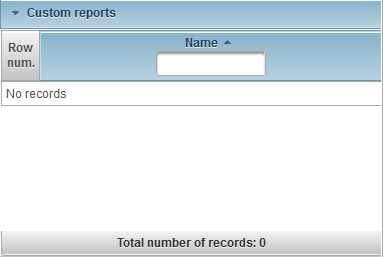
The "Custom reports" panel displays a list of reports that are only available to the logged-in user. Above there is the possibility of filtering by the name of the reports. To select a report, click on the report name, after selecting the report, the "Custom reports" panel closes and the "Selected report" panel opens.
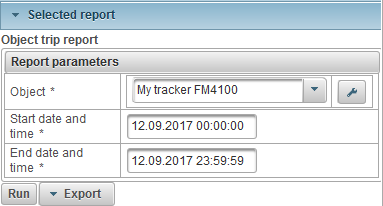
The "Selected report" panel displays the name of the selected report and the available parameters of the selected report. To run the report in the browser, fill in the report parameters and click on the "Run" button. After the report is run, the report itself will appear in the lower right part of the screen, the report map itself will be displayed in the right upper part of the screen. To export a report, specify the report parameters and click the button with the drop-down menu "Export" and select the format of the report file. After the report is run, a report file will be loaded, which you can view. There are the following file formats:
- Portable Document Format (.pdf). In Windows, Adobe Acrobat Reader is used to view this file format. By default, the function of displaying the location by reference (in the presence of coordinates) is supported, by pressing which the Google Maps service will be opened in the browser, where the marker will display the location on the map.
- Excel (.xls). To view this file format in Windows, use the Excel program from the Microsoft Office suite.
- Excel (.xlsx). To view this file format in Windows, use the Excel program from the Microsoft Office suite.
- Word (.docx). To view this file format in Windows, use the Word program from the Microsoft Office suite.
- HTML (.html). A report in the form of a web page will open in a separate browser window.
- Rich Text Format (.rtf). To view this file format in Windows, use the Word program from the Microsoft Office suite.
- PowerPoint (.pptx). To view this file format in Windows, use the PowerPoint program from the Microsoft Office suite.
- Comma-Separated Values (.csv). CSV is a text file format intended for the presentation of tabular data. To view this file format in Windows, use the Excel program from the Microsoft Office suite.
- eXtensible Markup Language (.xml). XML presents information as a text file for storing structured data. To view this file format, Windows uses a browser.
- OpenDocument Spreadsheet (.ods). This free format, using the standards of the International Organization for Standardization, is popular in many countries around the world thanks to its support by many programs, including such as LibreOffice Suite and OpenOffice. Also to view this file format in Windows, use the Excel program from the Microsoft Office suite.
- OpenDocument Text (.odt). This free format, using the standards of the International Organization for Standardization, is popular in many countries around the world thanks to its support by many programs, including such as LibreOffice Suite and OpenOffice. Also to view this file format in Windows, use the Word program from the Microsoft Office suite.
At the bottom right of the screen is the panel for viewing the completed report. Also there is a button "Print", which allows you to print the report on the printer. If the height of the completed report is higher than the panel itself, then the right side displays the scroll bar. In many reports, an icon is displayed inside the fields of the tables, when clicked on the map, the marker displays the location on the map.
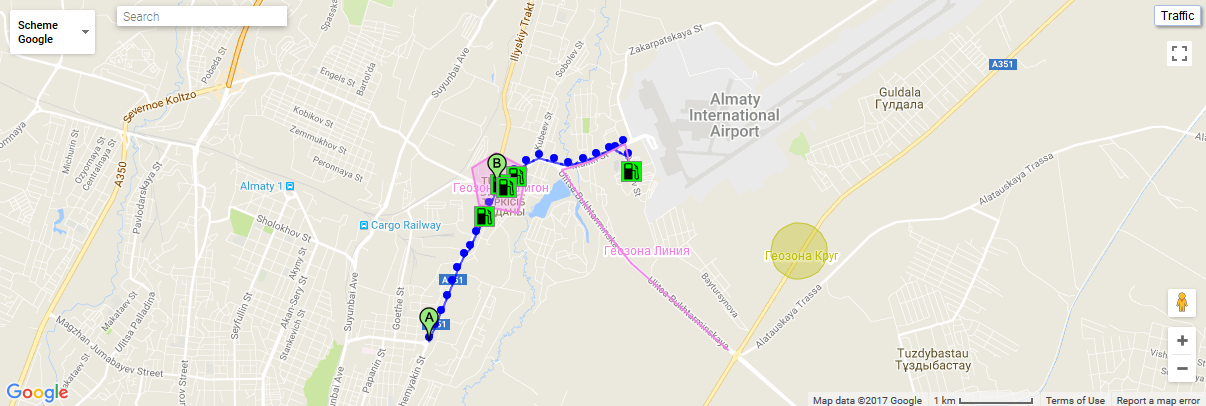
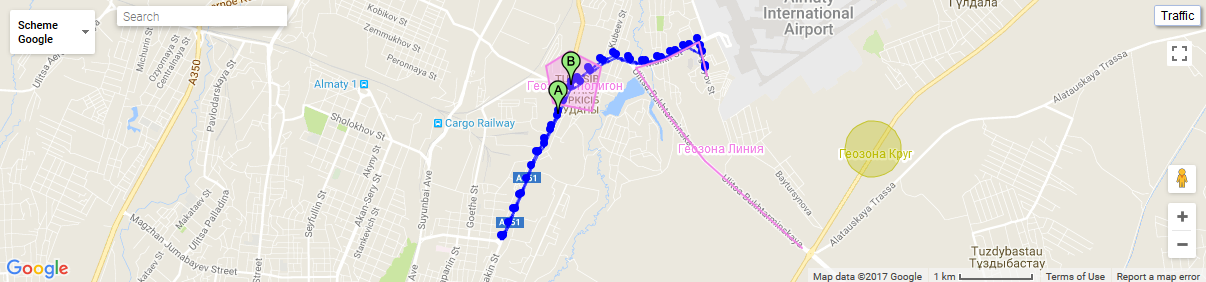
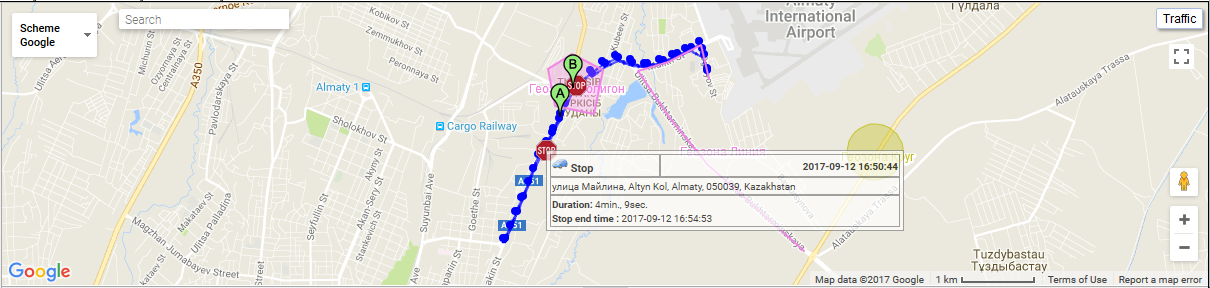
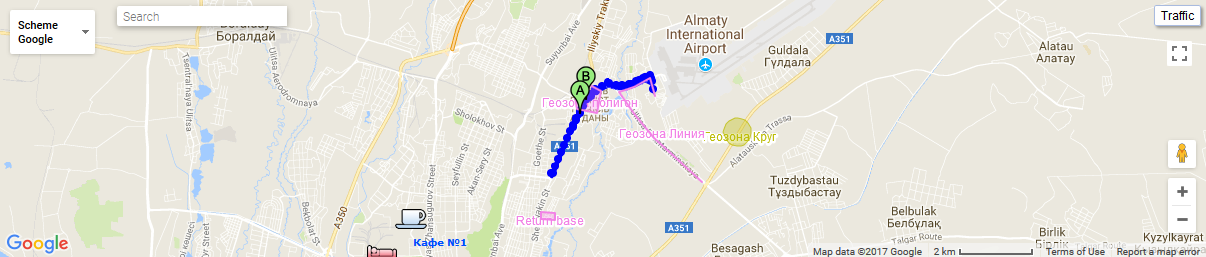
At the top right of the screen is the report map view panel, for example, the "Object trip report" report allows you to view the track of an object on the map. Marker A displays the start point of the track. Marker B displays the end point of the track. The "Reports" panel has its own map. While in the report panel, the map can be scaled, moved, changed the source of the map, and searched. On the map of the report, geofences and points of interest can be displayed. On the map, tracks of object trips can be marked for the specified period of the report. Markers for speeding, stopping, parking, refuel and defuel can also be displayed. All this depends on the selected report. When creating a new report, all tracks and markers from the previous report will be deleted on the map.

When you click on a track point on the map, a tooltip on the map is displayed.
When you hover the mouse cursor on the marker, a tooltip on the map is displayed.
The boundaries of the areas can be changed in width and height, for this you need to click the left mouse button on the border of the area and drag it to the desired direction.
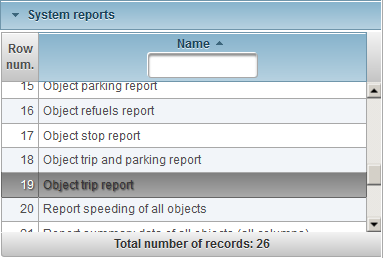
The "System reports" panel displays a list of reports available to all users. The following system reports are available:
-
Chart by object sensor.
-
Chart by object message additional parameter.
-
Chart by object message standard parameter.
-
Absolute fuel expense sensor report (AFES).
-
Fuel level sensor (FLS) report of all objects.
-
Object fuel level sensor (FLS) report.
-
Object refuels report.
-
Object motohour report.
-
Object stop report.
-
Object trip and parking report.
-
Object trip report.
-
Geofences visit report of all objects.
-
Object geofences visit report.
-
Report speeding of all objects.
-
Object overspeeding report.
-
Report summary data of all objects (all columns)
-
Summary data report of all objects (mileage, average speed, maximum speed).
-
Report summary data of all objects (mileage).
-
Report summary data of the object (all columns).
-
Report summary data of the object (mileage, average speed, maximum speed).
-
Report summary data of the object (mileage).
-
Object defuels report.
-
Object messages report.
-
Object parking report.
-
Object chronology report.
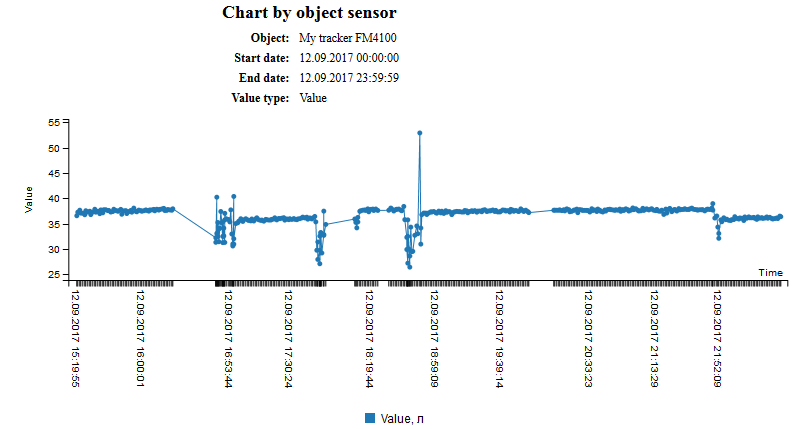
The system report "Chart by object sensor" displays a graph of the values of the object sensor and consists of the following parameters:
- Object. Select an object from the list.
- Start date and time. Date and time of report start.
- End date and time. Date and time of report end.
- Sensor. Select an object sensor from the list.
- Value type. Selecting the sensor value types, you can select several types of sensor values.
- Source value. Display the initial value of the sensor.
- Value. Display the calculated value of the sensor.
- Smoothed value. Display the smoothed value of the sensor.
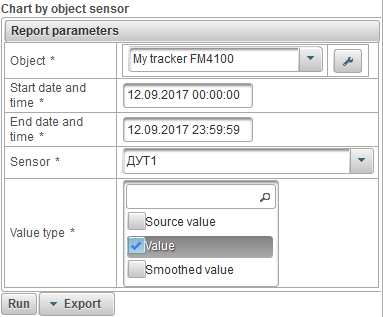
After filling in the report parameters, click on the "Run" button.
Below is an example of a completed report.
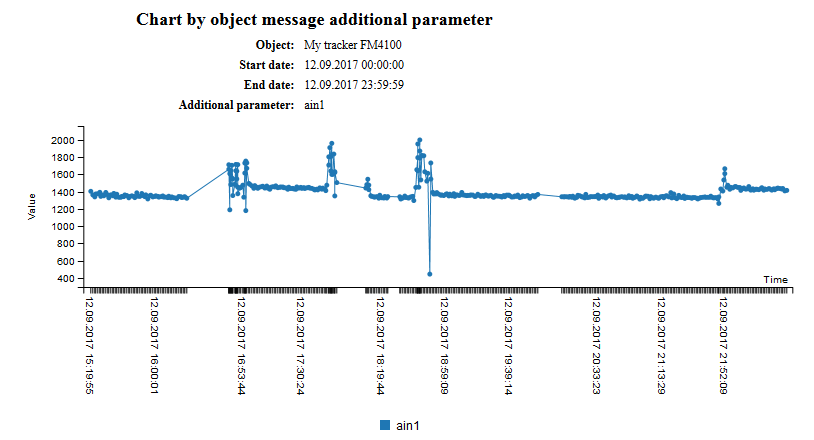
The system report "Chart by object message additional parameter" displays a graph on the additional parameter of the object message and consists of the following parameters:
- Object. Select an object from the list.
- Start date and time. Date and time of report start.
- End date and time. Date and time of report end.
- Additional parameter. Selecting additional parameters for the message of the object, you can select several.
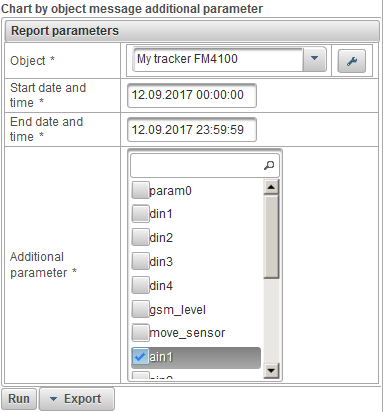
After filling in the report parameters, click on the "Run" button.
Below is an example of a completed report.
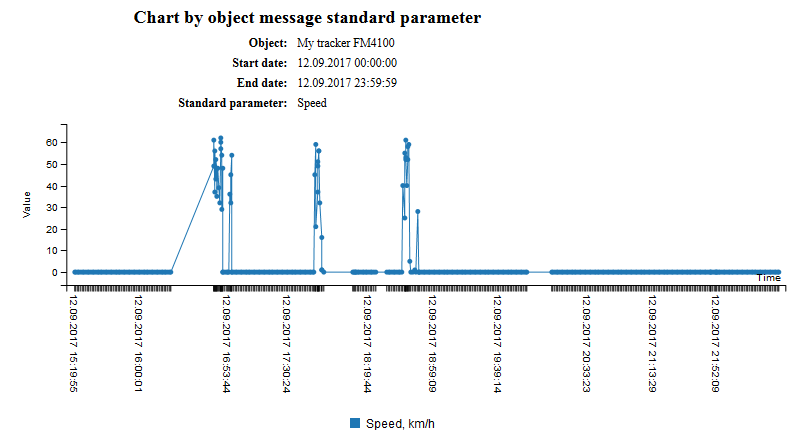
The system report "Chart by object message standard parameter" displays a graph on the standard message parameter of the object and consists of the following parameters:
- Object. Select an object from the list.
- Start date and time. Date and time of report start.
- End date and time. Date and time of report end.
- Message standard parameter. Selecting the standard parameters for an object message, you can select several.
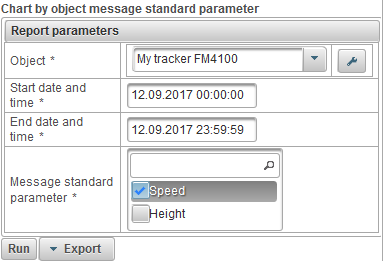
After filling in the report parameters, click on the "Run" button.
Below is an example of a completed report.
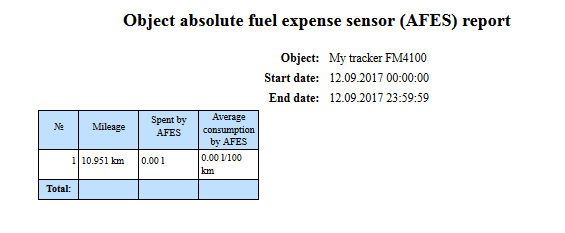
The system report "Absolute fuel expense sensor report (AFES)" consists of the following parameters:
- Object. Select an object from the list.
- Start date and time. Date and time of report start.
- End date and time. Date and time of report end.
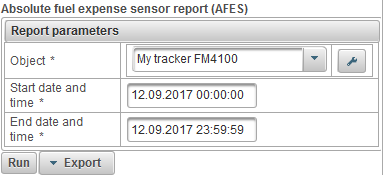
After filling in the report parameters, click on the "Run" button.
A completed report can consist of the following columns:
- №. Serial number.
- Mileage. Mileage for the reporting period.
- Spent by AFES. Spent on the absolute fuel expense sensor (AFES).
- Average consumption by AFES. The average flow rate for the absolute fuel expense sensor (AFES).
Below is an example of a completed report.
The system report "Fuel level sensor (FLS) report of all objects" displays a summary report on the fuel level sensor of all objects and consists of the following parameters:
- Start date and time. Date and time of report start.
- End date and time. Date and time of report end.
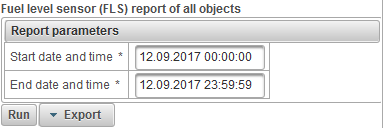
After filling in the report parameters, click on the "Run" button.
A completed report can consist of the following columns:
- №. Serial number.
- Name of the object. Object name.
- Mileage, km. Mileage of the object for the reporting period.
- Spent by FLS, l. The amount of fuel consumed by the fuel level sensor.
- Average consumption by FLS, l/ 100 km. Average fuel consumption by fuel level sensor.
- FLS initial level, l. The initial fuel level by the fuel level sensor.
- FLS final level, l. The final fuel level by fuel level sensor.
- Total refuels. Number of refuels.
- Total defuels. Number of defuels.
- Refueled, l. Volume of refuel.
- Defueled, l. Volume of defuel.
Below is an example of a completed report.

The system report "Object fuel level sensor (FLS) report" displays the report on the fuel level sensor of the selected object and consists of the following parameters:
- Object. Select an object from the list.
- Start date and time. Date and time of report start.
- End date and time. Date and time of report end.
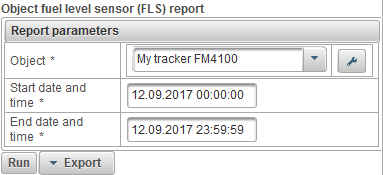
After filling in the report parameters, click on the "Run" button..
A completed report can consist of the following columns:
- №. Serial number.
- Mileage. Mileage of the object for the reporting period.
- Spent by FLS. The amount of fuel consumed by the fuel level sensor.
- Average consumption by FLS. Average fuel consumption by fuel level sensor.
- FLS initial level. The initial fuel level by the fuel level sensor.
- FLS final level. The final fuel level by the fuel level sensor.
- Total refuels. Number of refuels.
- Total defuels. Number of defuels.
- Refueled. Volume of refuel.
- Defueled. Volume of defuel.
Below is an example of a completed report.

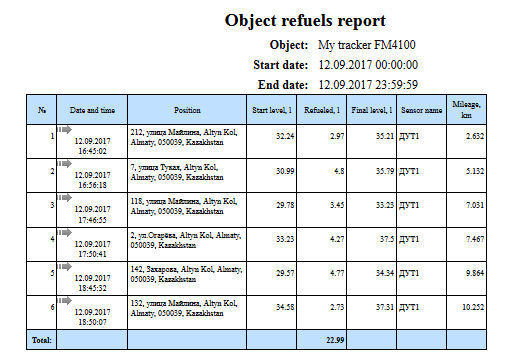
System report "Object refuels report" allows you to find out where and when the refueling of the object was made and consists of the following parameters:
- Object. Select an object from the list.
- Start date and time. Date and time of report start.
- End date and time. Date and time of report end.
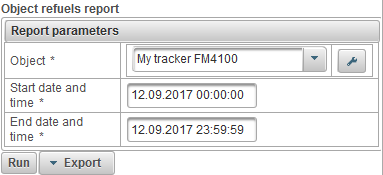
After filling in the report parameters, click on the "Run" button.
A completed report can consist of the following columns:
- №. Serial number.
- Date and time. Date and time of refilling the object.
- Position. The position of the object at the time of refueling.
- Start level, l. The fuel level, fixed before refueling the object.
- Refueled, l. Volume of fuel.
- Final level, l. The fuel level, fixed after refilling the object.
- Sensor name. Name of the fuel level sensor.
- Mileage, km. Mileage from the beginning of the interval to the end of the current fueling.
Below is an example of a completed report and its display on the map.
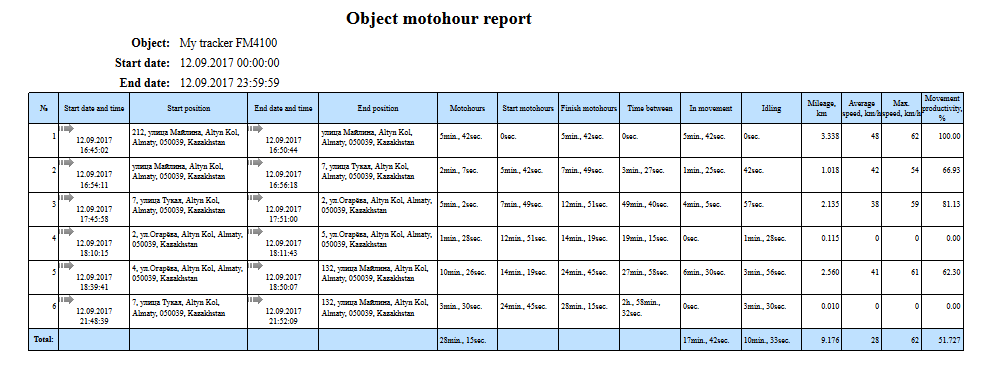
The system report "Object motohour report" allows you to find out how long the object was with the engine turned on, how long it was in motion and consists of the following parameters:
- Object. Select an object from the list.
- Start date and time. Date and time of report start.
- End date and time. Date and time of report end.

After filling in the report parameters, click on the "Run" button".
A completed report can consist of the following columns:
- №. Serial number.
- Start date and time. Date and time when the machine starts working.
- Start position. The position of the object when the engine is turned on.
- End date and time. Date and time of the end of work hours.
- End position. The position of the object when the engine is turned off.
- Motohours. The motohour counter value for the interval.
- Start motohours. Hour meter readings at the beginning of the interval.
- Finish motohours. Indication of the hour meter at the end of the interval.
- Time between. The time that elapsed from the end of the previous interval to the beginning of the current interval.
- In movement. The time during which the object moved.
- Idling. The time during which the object stood with the engine running.
- Mileage, km. Distance traveled during the operating hours.
- Average speed, km/h. Average speed during the working hours.
- Max. speed, km/h. Maximum speed during the work of the machine hours.
- Movement productivity, %. The percentage of hours worked when the object moved.
Below is an example of a completed report and its display on the map.
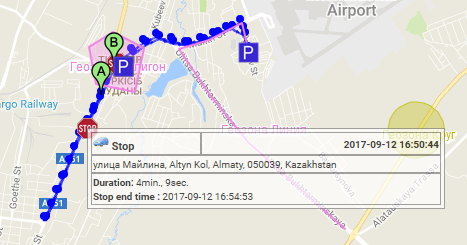
System report "Object stop report" allows you to find out where and when the object was stopped. Stops can be fixed at traffic lights, in traffic jams, etc. The parameters for determining stops are set on the "Trips and parkings detector" tab of the properties of the object. The report consists of the following parameters:
- Object. Select an object from the list.
- Start date and time. Date and time of report start.
- End date and time. Date and time of report end.
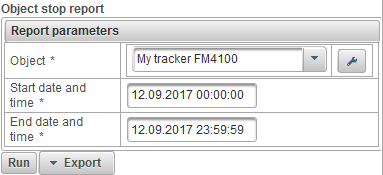
After filling in the report parameters, click on the "Run" button.
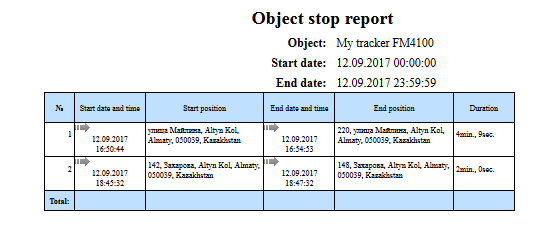
A completed report can consist of the following columns:
- №. Serial number.
- Start date and time. Date and time of the start of the stop.
- Start position. The position of the object at the time the stop begins.
- End date and time. Date and time of the stop.
- End position. The position of the object at the end of the stop.
- Duration. Stop time.
Below is an example of a completed report and its display on the map.
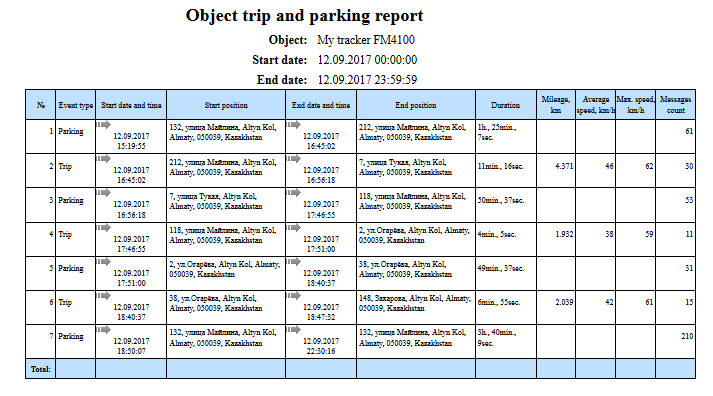
Object trip and parking report
System report "Object trip and parking report" allows you to find out where and when the object moved and stood. The parameters for determining trips and parking are set on the "Trips and parkings detector" tab of the properties of the object. The report consists of the following parameters:
- Object. Select an object from the list.
- Start date and time. Date and time of report start.
- End date and time. Date and time of report end.
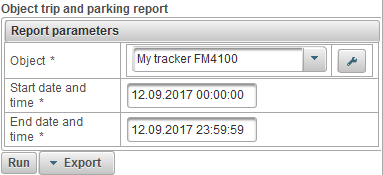
After filling in the report parameters, click on the "Run" button.
A completed report can consist of the following columns:
- №. Serial number.
- Event type.
- Parking. The object stood.
- Trip. The object moved.
- Start date and time. Date and time of the beginning of the event.
- Start position. The position of the object at the time the event begins.
- End date and time. Date and time of the end of the event.
- End position. The position of the object at the end of the event.
- Duration. Duration of the event.
- Mileage, km. Distance traveled during the event.
- Average speed, km/h. Average speed during the event.
- Max. speed, km/h. Maximum speed for the event time.
- Messages count. The number of messages during the event.
Below is an example of a completed report and its display on the map.
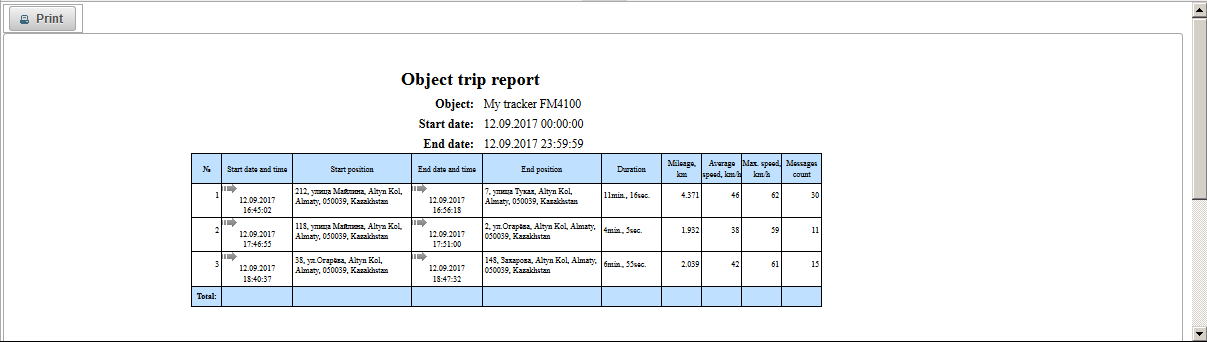
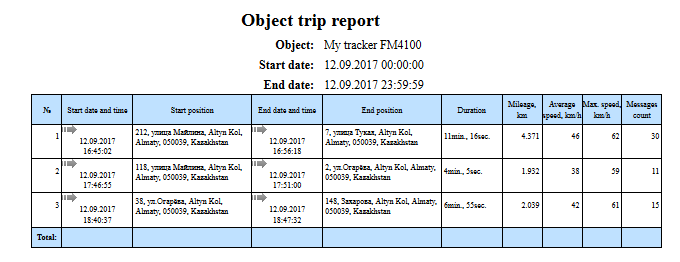
System report "Object trip report" allows you to find out where and when the object moved. The parameters for determining trips and parking are set on the "Trips and parking detector" tab of the properties of the object. The report consists of the following parameters:
- Object. Select an object from the list.
- Start date and time. Date and time of report start.
- End date and time. Date and time of report end.

After filling in the report parameters, click on the "Run" button.
A completed report can consist of the following columns:
- №. Serial number.
- Start date and time. Date and time of the trip.
- Start position. The position of the object at the time of the trip.
- End date and time. Date and time of the end of the trip.
- End position. Position of the object at the time of the end of the trip.
- Duration. Duration of the trip.
- Mileage, km. Distance traveled.
- Average speed, km/h. Average speed during the trip.
- Max. speed, km/h. Maximum speed during the trip.
- Messages count. Number of messages during the trip.
Below is an example of a completed report and its display on the map.
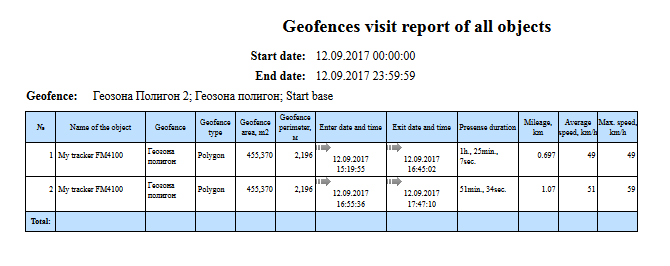
System report "Geofences visit report of all objects" allows you to find out where and when objects visited selected geofences.
- Start date and time. Date and time of report start.
- End date and time. Date and time of report end.
- Geofence. Selection of geofences.
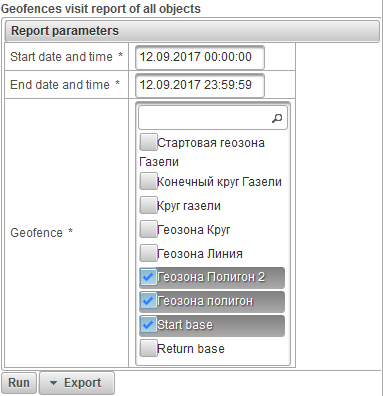
After filling in the report parameters, click on the "Run" button.
A completed report can consist of the following columns:
- №. Serial number.
- Name of the object. The name of the object.
- Geofence. The name of the geofence.
- Geofence type. Type of the geofence.
- Geofence area, m2. Area of geofence in m2.
- Geofence perimeter, m. Perimeter of the geofence in meters.
- Enter date and time. Date and time of entering the geofence.
- Exit date and time. Date and time of exit from the geofence.
- Presense duration. Length of stay in geofence.
- Mileage, km. The distance traveled within the geofence.
- Average speed, km/h. The average speed with which the object moved in geofence.
- Max. speed, km/h. The maximum speed with which the object moved in geofence.
Below is an example of a completed report.
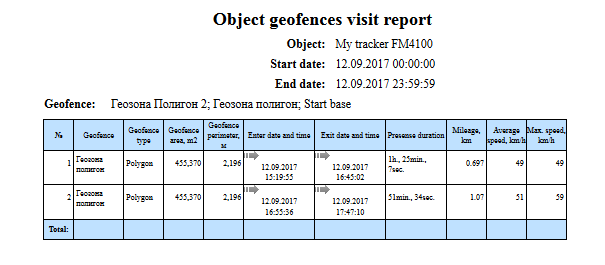
The system report "Object geofences visit report" lets you know where and when the object visited the selected geofences. The report consists of the following parameters:
- Object. Select an object from the list.
- Start date and time. Date and time of report start.
- End date and time. Date and time of report end.
- Geofence. Selection of geofences.
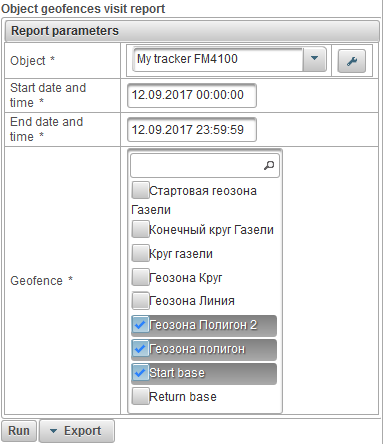
After filling in the report parameters, click on the "Run" button.
A completed report can consist of the following columns:
- №. Serial number.
- Geofence. The name of the geofence.
- Geofence type. Geofence type.
- Geofence area, m2. Geofence area in m2.
- Geofence perimeter, м. Perimeter of the geofence in meters.
- Enter date and time. Date and time of entering the geofence.
- Exit date and time. Date and time of exit from the geofence.
- Presense duration. Length of stay in geofence.
- Mileage, km. The distance traveled within the geofence.
- Average speed, km/h. The average speed with which the object moved in geofence.
- Max. speed, km/h. The maximum speed with which the object moved in geofence.
Below is an example of a completed report and its display on the map.
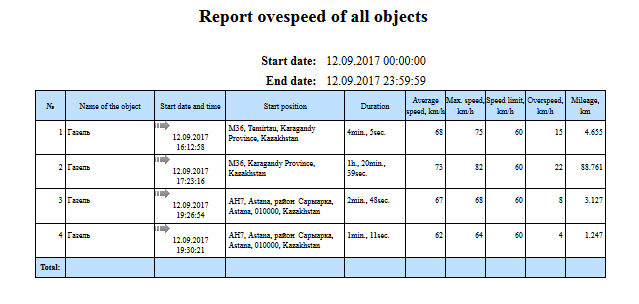
System report "Report speeding of all objects" allows you to find out where and when objects exceeded the speed. The parameters for determining the excess speed are set on the "Additional" tab of the object properties. The report consists of the following parameters:
- Start date and time. Date and time of report start.
- End date and time. Date and time of report end.
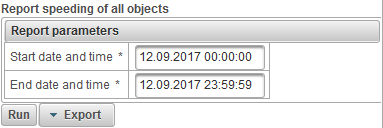
After filling in the report parameters, click on the "Run" button.
A completed report can consist of the following columns:
- №. Serial number.
- Name of the object. Object name.
- Start date and time. Date and time of exceeding speed.
- Start position. The position of the object at the moment of the excess of speed.
- Duration. Duration of excess speed.
- Average speed, km/h. Average speed during overspeeding.
- Max. speed, km/h. Maximum speed during overspeeding.
- Speed limit, km/h. The overspeed limit specified on the "Additional" tab of the object properties.
- Overspeed, km/h. Maximum speeding.
- Mileage, km. Distance traveled during speeding.
Below is an example of a completed report.
The system report "Object overspeeding report" allows you to find out where and when the object exceeded the speed. The parameters for determining the excess speed are set on the "Additional" tab of the object properties. The report consists of the following parameters:
- Object. Select an object from the list
- Start date and time. Date and time of report start.
- End date and time. Date and time of report end.
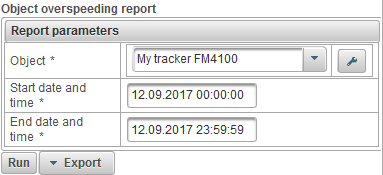
After filling in the report parameters, click on the "Run" button.
A completed report can consist of the following columns:
- №. Serial number.
- Start date and time. Date and time of exceeding speed.
- Start position. The position of the object at the moment of the excess of speed.
- Duration. Duration of excess speed.
- Average speed, km/h. Average speed during overspeeding.
- Max. speed, km/h. Maximum speed during overspeeding.
- Speed limit, km/h. The overspeed limit specified on the "Additional" tab of the object properties.
- Overspeed, km/h. Maximum speeding.
- Mileage, km. Distance traveled during speeding.
Below is an example of a completed report and its display on the map.
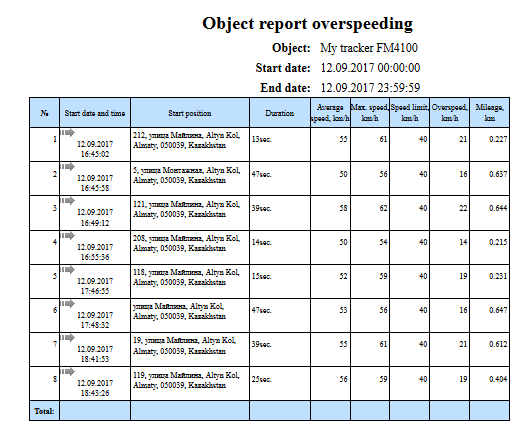
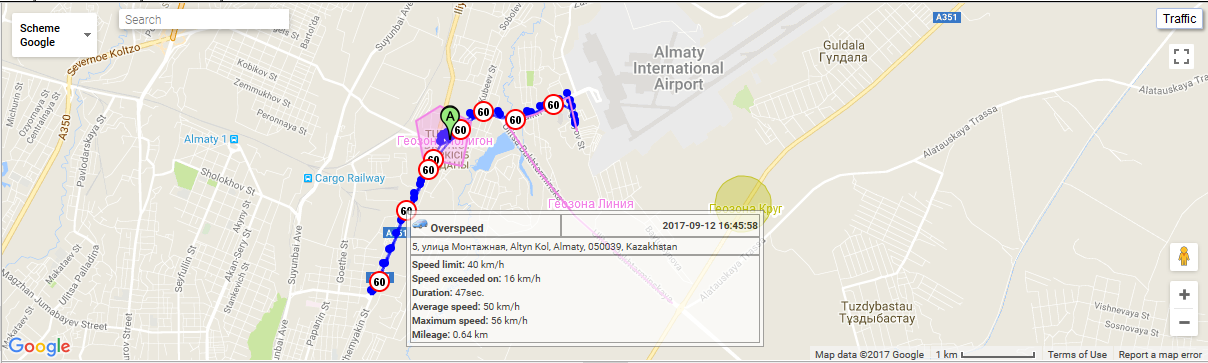
Report summary data of all objects (all columns)
System report "Report summary data of all objects (all columns)" allows you to view summary data on objects, such as mileage, maximum speed, total travel time, machine hours, etc. The report consists of the following parameters:
- Start date and time. Date and time of report start.
- End date and time. Date and time of report end.
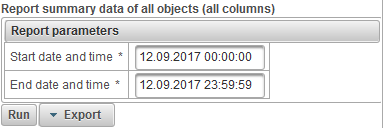
After filling in the report parameters, click on the "Run" button.
A completed report can consist of the following columns:
- №. Serial number.
- Name of the object. Object name.
- Mileage, km. Mileage of the object for the reporting period.
- Mileage (by trips), km. The mileage calculated for the object's trips for the reporting period.
- Average speed, km/h. Average speed for the reporting period.
- Max. speed, km/h. Maximum speed for the reporting period.
- Total time in trips. Total time spent on trips during the reporting period.
- Total time in parkings. Total time spent on parking for the reporting period.
- Motohours. Duration of work hours for the reporting period.
- Spent by AFES, l. The amount of fuel consumed by the absolute fuel consumption sensor for the reporting period.
- Spent by FLS, l. The volume of fuel consumed by the fuel level sensor for the reporting period.
- Spent by norms, l. The amount of fuel consumed for the reporting period in accordance with the consumption rates indicated on the "Fuel Consumption" tab of the properties of the object.
- Spent by norms (by trips), l. The amount of fuel consumed for the reporting period by the object's trips and parkings detector according to the consumption rates indicated on the "Fuel consumption" tab of the properties of the object.
- Average consumption by AFES, l/ 100 km. The average fuel consumption for the reporting period by the absolute fuel consumption sensor.
- Average consumption by FLS, l/ 100 km. Average fuel consumption for the reporting period by the fuel level sensor.
- FLS initial level, l. Fuel level by the fuel level sensor, fixed on the date and time of the report start.
- FLS final level, l. Final fuel level by the fuel level sensor, fixed on the date and time of the report end.
- Total refuels. Number of fueling during the reporting period.
- Total defuels. Quantity of fuel drains for the reporting period.
- Refueled, l. The volume of fuel for the reporting period.
- Defueled, l. The volume of the fusion fuel for the reporting period.
Below is an example of a completed report.
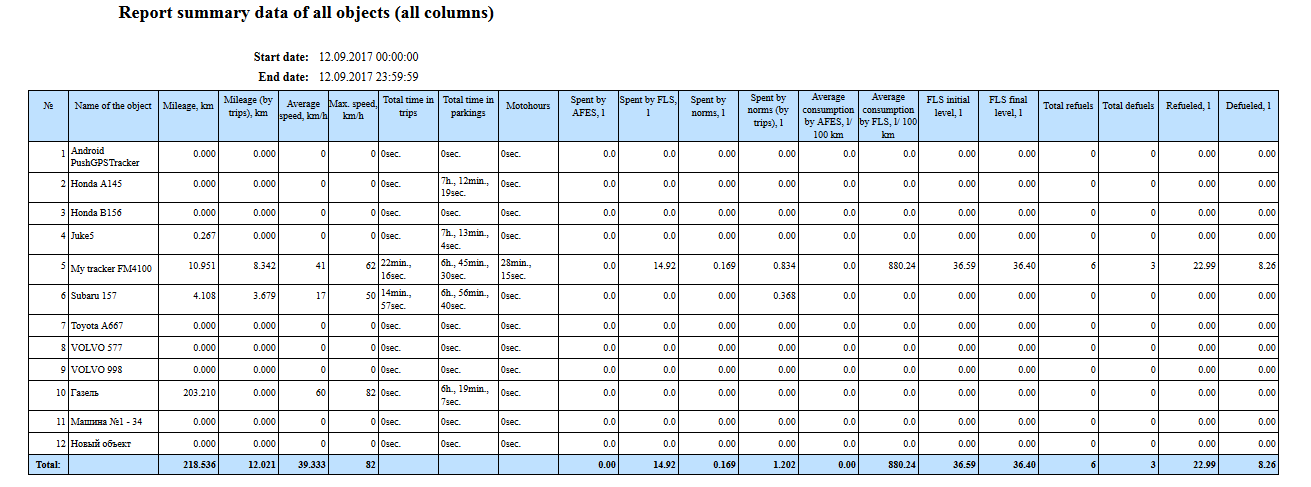
System report "Summary data report of all objects (mileage, average speed, maximum speed)" allows you to view summary data on objects, such as mileage, average speed and maximum speed. The report consists of the following parameters:
- Start date and time. Date and time of report start.
- End date and time. Date and time of report end.
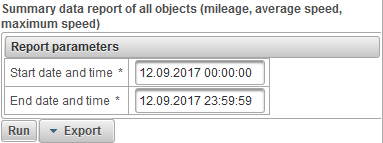
After filling in the report parameters, click on the "Run" button.
A completed report can consist of the following columns:
- №. Serial number.
- Name of the object. Object name.
- Mileage, km. Mileage of the object for the reporting period.
- Average speed, km/h. Average speed for the reporting period.
- Max. speed, km/h. Maximum speed for the reporting period.
Below is an example of a completed report.
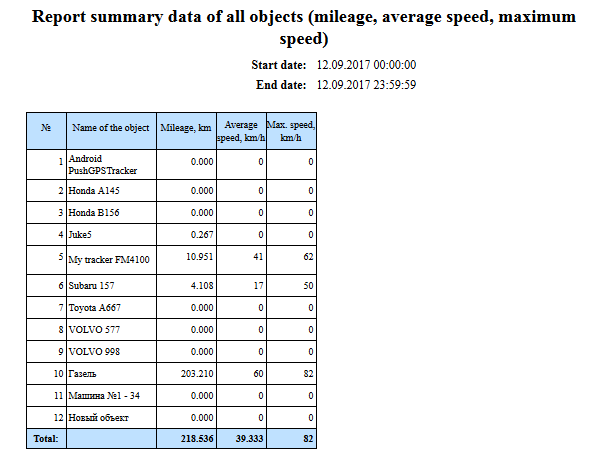
System report "Report summary data of all objects (mileage)" allows you to view the distance traveled by all objects. The report consists of the following parameters:
- Start date and time. Date and time of report start.
- End date and time. Date and time of report end.
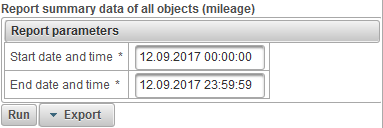
After filling in the report parameters, click on the "Run" button.
A completed report can consist of the following columns:
- №. Serial number.
- Name of the object. Object name.
- Mileage, km. The distance traveled during the reporting period.
Below is an example of a completed report.
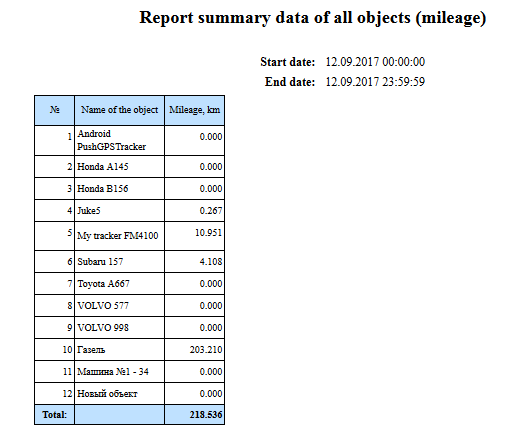
Report summary data of the object (all columns)
System report "Report summary data of the object (all columns)" allows viewing summary data of the object, such as mileage, maximum speed, total travel time, machine hours, etc. The report consists of the following parameters:
- Object. Select an object from the list.
- Start date and time. Date and time of report start.
- End date and time. Date and time of report end.
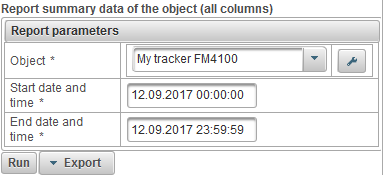
After filling in the report parameters, click on the "Run" button.
A completed report can consist of the following columns:
- №. Serial number.
- Mileage. Mileage of the object for the reporting period.
- Mileage (by trips). The mileage calculated for the object's trips for the reporting period.
- Average speed, km/h. Average speed for the reporting period.
- Max. speed, km/h. Maximum speed for the reporting period.
- Total time in trips. Total time spent on trips during the reporting period.
- Total time in parkings. Total time spent on parking for the reporting period.
- Motohours. Duration of work hours for the reporting period.
- Spent by AFES. The amount of fuel consumed by the absolute fuel consumption sensor for the reporting period.
- Spent by FLS. The volume of fuel consumed by the fuel level sensor for the reporting period.
- Spent by norms. The amount of fuel consumed for the reporting period in accordance with the consumption rates indicated on the "Fuel consumption" tab of the properties of the object.
- Spent by norms (by trips). The amount of fuel consumed for the reporting period by the object's trips and parkings detector according to the consumption rates indicated on the "Fuel consumption" tab of the properties of the object.
- Average consumption by AFES. The average fuel consumption for the reporting period by the absolute fuel consumption sensor.
- Average consumption by FLS. Average fuel consumption for the reporting period by the fuel level sensor.
- FLS initial level. Fuel level by the fuel level sensor, fixed on the date and time of the report start.
- FLS final level. Final fuel level by the fuel level sensor, fixed on the date and time of the report end.
- Total refuels. Number of fueling during the reporting period.
- Total defuels. Quantity of fuel drains for the reporting period.
- Refueled. The volume of fuel for the reporting period.
- Defueled. The volume of the fusion fuel for the reporting period.
Below is an example of a completed report.

System report "Report summary data of the object (mileage, average speed, maximum speed)" allows viewing summary data of the object, such as mileage, average speed and maximum speed. The report consists of the following parameters:
- Object. Select an object from the list.
- Start date and time. Date and time of report start.
- End date and time. Date and time of report end.
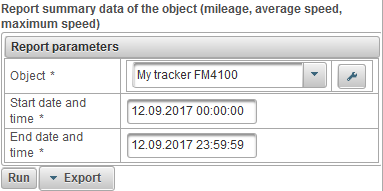
After filling in the report parameters, click on the "Run" button.
A completed report can consist of the following columns:
- №. Serial number.
- Mileage. Mileage of the object for the reporting period.
- Average speed, km/h. Average speed for the reporting period.
- Max. speed, km/h. Maximum speed for the reporting period.
Below is an example of a completed report.
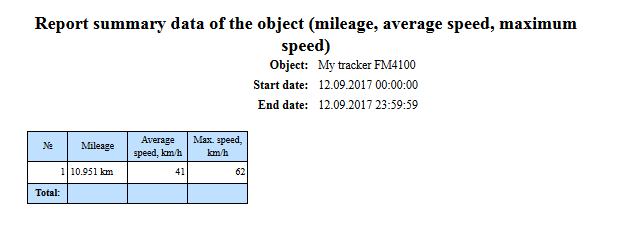
System report "Report summary data of the object (mileage)" allows you to view the distance traveled by the object. The report consists of the following parameters:
- Object. Select an object from the list.
- Start date and time. Date and time of report start.
- End date and time. Date and time of report end.
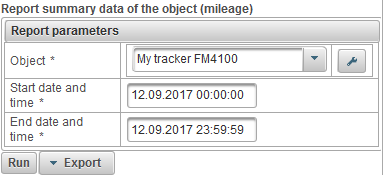
After filling in the report parameters, click on the "Run" button.
A completed report can consist of the following columns:
- №. Serial number.
- Mileage. The distance traveled by the object during the reporting period.
Below is an example of a completed report.
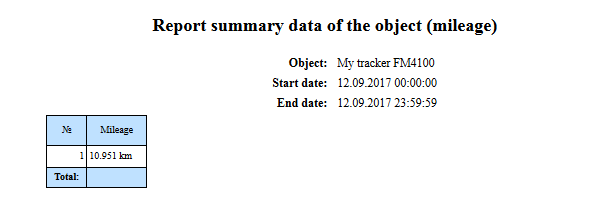
System report "Object defuels report" allows you to find out where and when the object's defuels were made and consists of the following parameters:
- Object. Select an object from the list.
- Start date and time. Date and time of report start.
- End date and time. Date and time of report end.
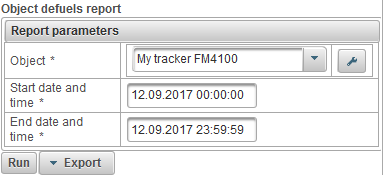
After filling in the report parameters, click on the "Run" button.
A completed report can consist of the following columns:
- №. Serial number.
- Date and time. Date and time of the object defuel.
- Position. Position of the object at the time of defueling.
- Start level, l. The level of fuel fixed before defueling the object.
- Defueled, l. Volume of the defueled fuel.
- Final level, l. The fuel level, fixed after the object is defueled.
- Sensor name. Name of the fuel level sensor.
- Mileage, km. Mileage from the beginning of the interval to the end of the current defuel.
Below is an example of a completed report and its display on the map.
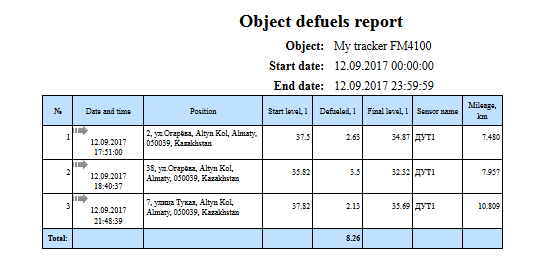

System report "Object messages report" allows you to view messages received from the object (coordinates, speed, parameters, etc.). The report consists of the following parameters:
- Object. Select an object from the list.
- Start date and time. Date and time of report start.
- End date and time. Date and time of report end.
- Parameters. A drop-down list with the following values:
- Source data. In the "Parameters" column, the parameter values will be in one line.
- Sensor values. In the "Sensors" column, the sensor values will be in one line.
- Smoothed values of sensors. In the "Sensors" column, the smoothed values of the sensors will be in one line.
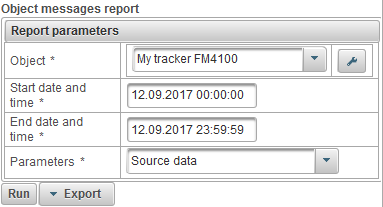
After filling in the report parameters, click on the "Run" button.
A completed report can consist of the following columns:
- №. Serial number.
- Date and time. The date and time of the message from the object.
- Speed, km/h. The speed of movement of the object.
- Coordinates. Latitude and longitude of the object, the number of captured satellites is indicated in brackets.
- Height, m. Height above sea level.
- Position. Position of the object.
- Parameters. Parameter values.
- Sensors. The values of the sensors.
Below is an example of a completed report.
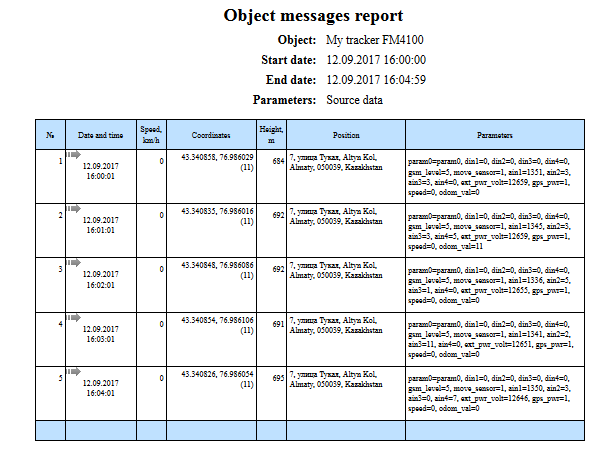
System report "Object parking report" allows you to find out where and when the object was standing. The parameters for determining trips and parking are set on the "Trips and parkings detector" tab of the properties of the object. The report consists of the following parameters:
- Object. Select an object from the list.
- Start date and time. Date and time of report start.
- End date and time. Date and time of report end.

After filling in the report parameters, click on the "Run" button.
A completed report can consist of the following columns:
- №. Serial number.
- Start date and time. Date and time of the beginning of the parking.
- Start position. The position of the object at the time of the start of the parking.
- End date and time. The date and time of the end of the parking.
- End position. The position of the object at the end of the parking.
- Duration. Duration of parking.
Below is an example of a completed report and its display on the map.
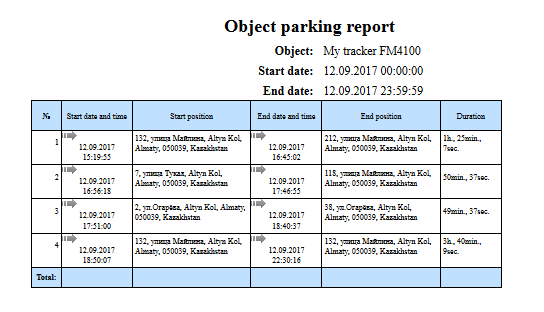
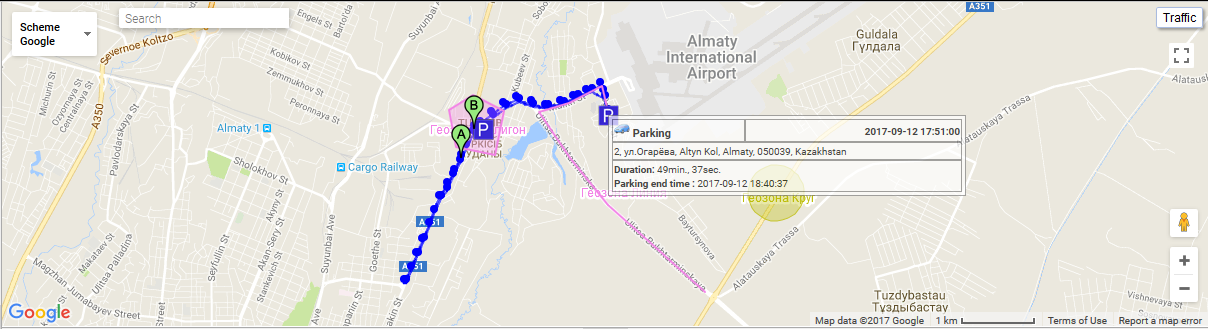
The system report "Object chronology report" lets you know where and when the object changed state. The parameters for determining trips and parking are set on the "Trips and parkings detector" tab of the properties of the object. The report consists of the following parameters:
- Object. Select an object from the list
- Start date and time. Date and time of report start
- End date and time. Date and time of report end.
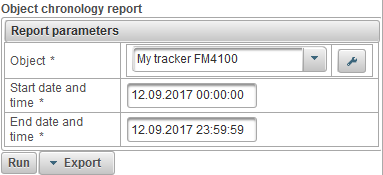
After filling in the report parameters, click on the "Run" button.
A completed report can consist of the following columns:
- №. Serial number.
- Event type.
- Parking. The object stood.
- Trip. The object was moving.
- Stop. The object was stopped.
- Start date and time. Date and time of the beginning of the event.
- Start position. The position of the object at the time of the event.
- End date and time. Date and time of the end of the event.
- End position. The position of the object at the end of the event.
- Duration. Duration of the event.
- Mileage, km. Distance traveled during the event.
- Average speed, km/h. Average speed for the event time.
- Max. speed, km/h. Maximum speed for the event time.
- Messages count. Number of messages during the event.
Below is an example of a completed report and its display on the map.
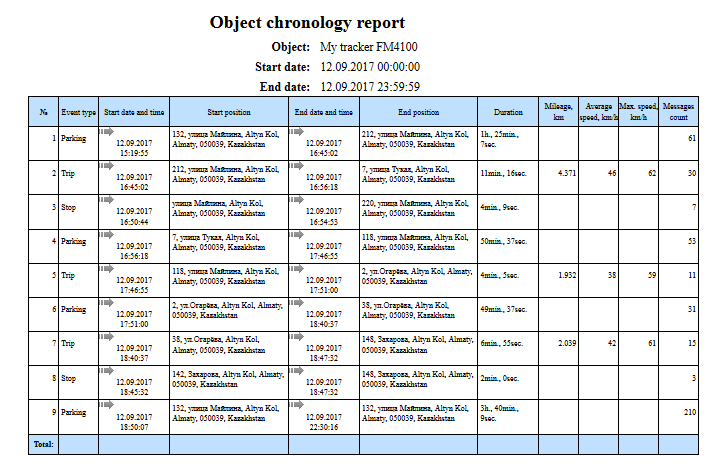
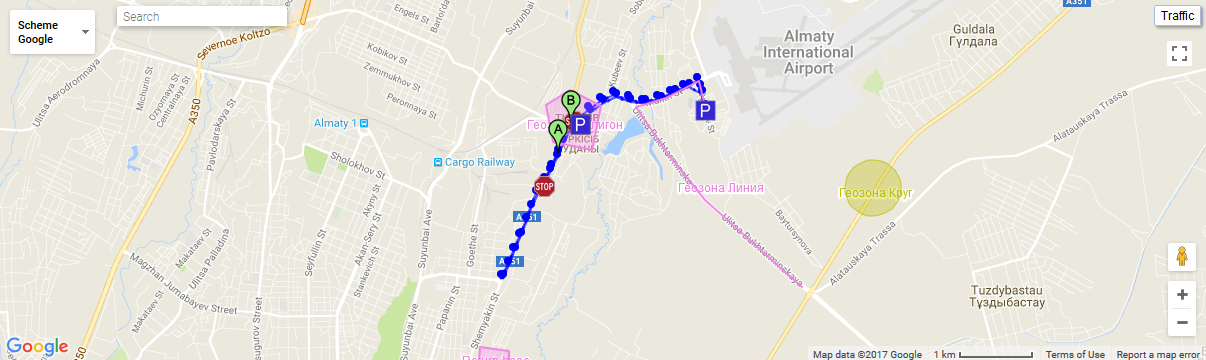
The system report "Object digital sensor report" allows you to find out, for example, where and when the object turned off and turned on the ignition. The report consists of the following parameters:
- Object. Select an object from the list.
- Start date and time. Date and time of report start.
- End date and time. Date and time of report end.
- Digital sensor. Select a digital sensor from the list.
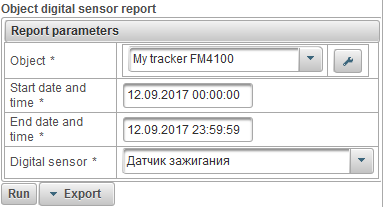
After filling in the report parameters, click on the "Run" button.
A completed report can consist of the following columns:
- №. Serial number.
- On date and time. Date and time of activation.
- On location. Position of the object at the moment of switching on.
- Off date and time. Date and time of deactivation.
- Off location. Position of the object at the moment of switching off.
- Duration. Duration of switching on.
- Time between. The time that elapsed from the end of the previous interval to the beginning of the current interval.
- Mileage, km. Distance traveled during the switching on time.
- Average speed, km/h. Average speed during switching on time.
- Max. speed, km/h. Maximum speed during switching on time.
Below is an example of a completed report and its display on the map.
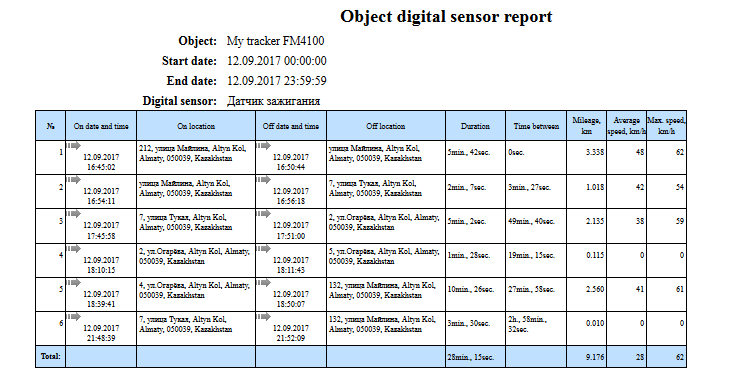
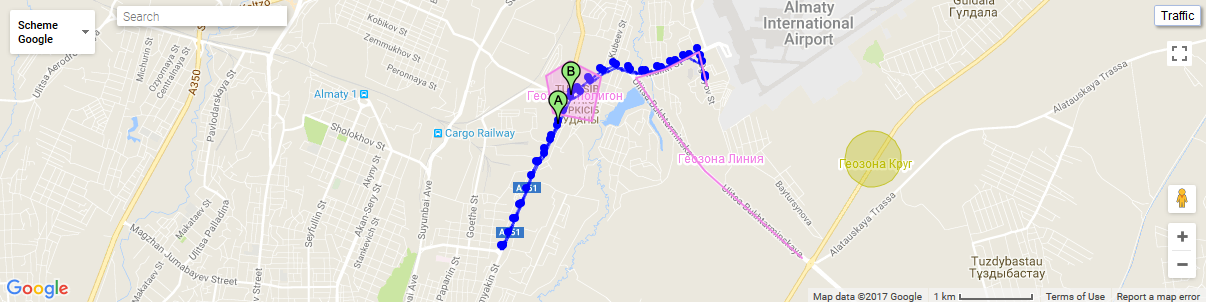
The "Drivers" panel allows you to create drivers and assign them to an object. Then the reports will show who was the driver at a certain point in time. It is also possible to determine the driver using iButton.
To open the "Drivers" panel, in the top panel, select "Drivers" from the drop-down list.
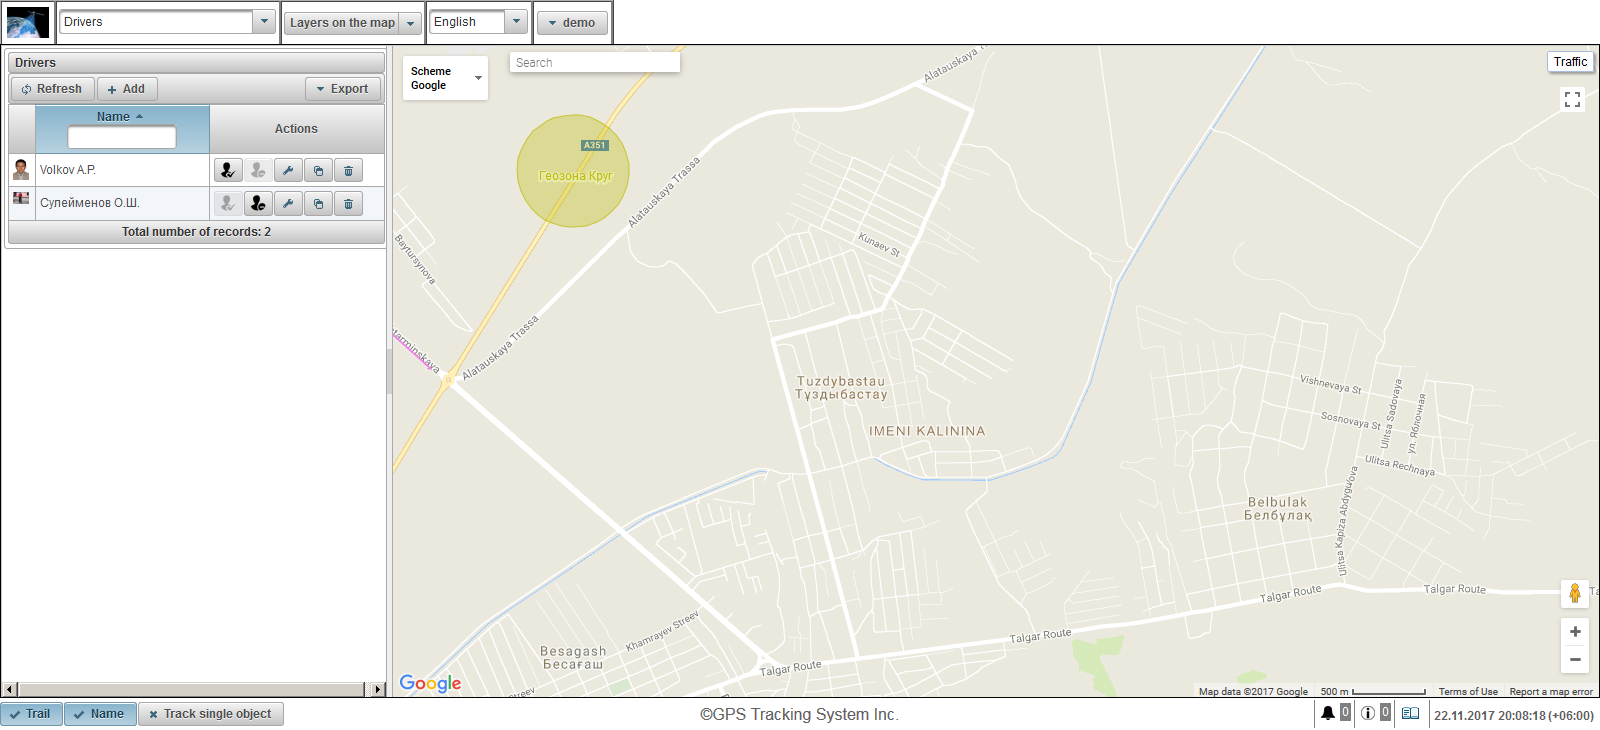
The left panel displays the driver panel.
A map is displayed on the right side.
To export the list of drivers to Excel or PDF, click the button with the drop-down menu "Export" in the drivers panel.
To create a driver, click the "Add" button in the drivers panel. The driver properties dialog box appears.
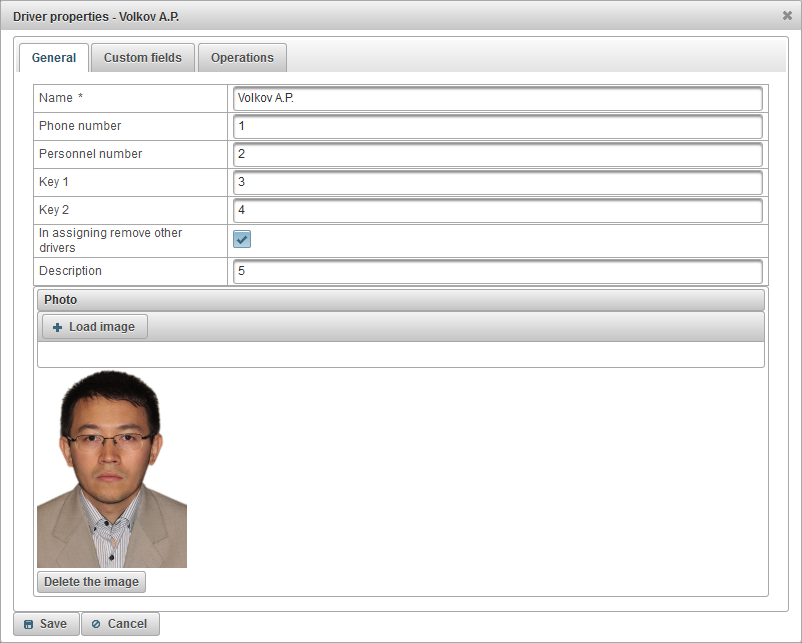
The driver properties dialog can consist of several tabs:
- General.
- Custom fields.
- Operations.
The "General" tab can consist of the following fields:
- Name. Name of the driver.
- Phone number. Phone number of the driver.
- Personnel number. Personnel number of the driver.
- Key 1. The driver's key. A key is required for automatic assignment when using iButton.
- Key 2. Spare key driver. This key is required for automatic assignment when using iButton.
- In assigning remove other drivers. A flag of removal of other drivers from the object at the assignment, that is, with the assignment of this driver, other assigned drivers for the object will be removed.
- Description. Description of the driver.
- Photo. Photo of the driver. You can upload any photo.
The "Custom fields" tab displays custom driver fields and consists of a table with the following fields:
- Name. The name of an custom field, such as the age of the driver.
- Value. The value of an custom field, for example 35 years.
 - Change record icon. When you click on this icon, you can change the values in the columns of the record.
 - - Delete record icon. When you click on this icon, an custom field will be deleted.
To add an custom field, click the "Add item" button.

The "Operations" tab allows you to see all the operations performed on the driver.
To view the operations, fill in the "Start date and time", "End date and time" and click the "Refresh" button.
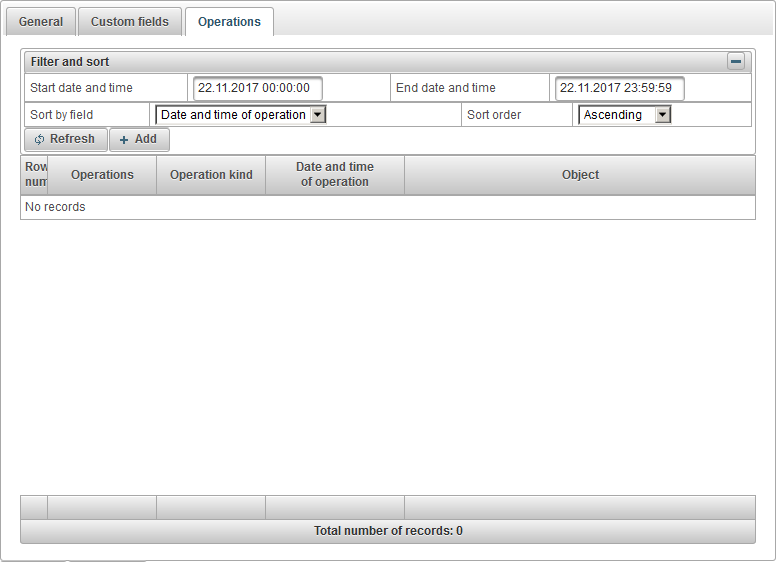
Also there is the possibility of manually adding an operation, for this click on the "Add" button.
The add operation dialog box opens, which consists of the following fields:
- Operation kind.
- Removal. To remove the driver from the object.
- Assignment. To assign a driver to an object.
- Date and time of operation. The date and time of the assignment or removal operation.

To save the driver, click the "Save" button.
On the left, under the "Add" button, the driver table is displayed.
The drivers table consists of the following fields:
- Photo. A smaller photo of the driver.
- Name. Name of the driver. When clicking on the driver's name, if the driver is assigned to an object, the map will be centered on the location of this object. When you hover the mouse over the name of the object, a tooltip showing the driver's name, his phone number, the enlarged photo and the name of the object to which he is assigned at the moment will be displayed.
- Actions.
 - Assign a driver. The dialog box for selecting an object for driver assignment opens.
  - Remove the driver. The driver is removed from the object.
- - open the driver properties dialog.
- - add a copy of the driver.
- - remove the driver.
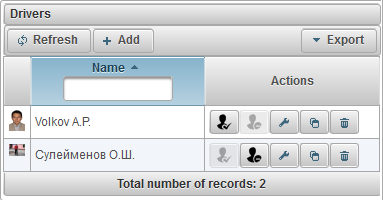
By default, the table is sorted by driver's name in alphabetical order in ascending order. You can sort by driver's name in alphabetical order in ascending or descending order. To do this, click on the icon , or in the header of the column. There is also the possibility of filtering by driver's name, for this purpose enter the text in the column header and the table will be filtered.
Drivers are displayed in the tooltip to the object, as well as in the extended information about the object, for this, the appropriate flag must be in the user settings.
The "Jobs" panel allows you to create tasks that are performed according to a specified schedule.
To open the "Jobs" panel, in the top panel, select "Jobs" from the drop-down list.
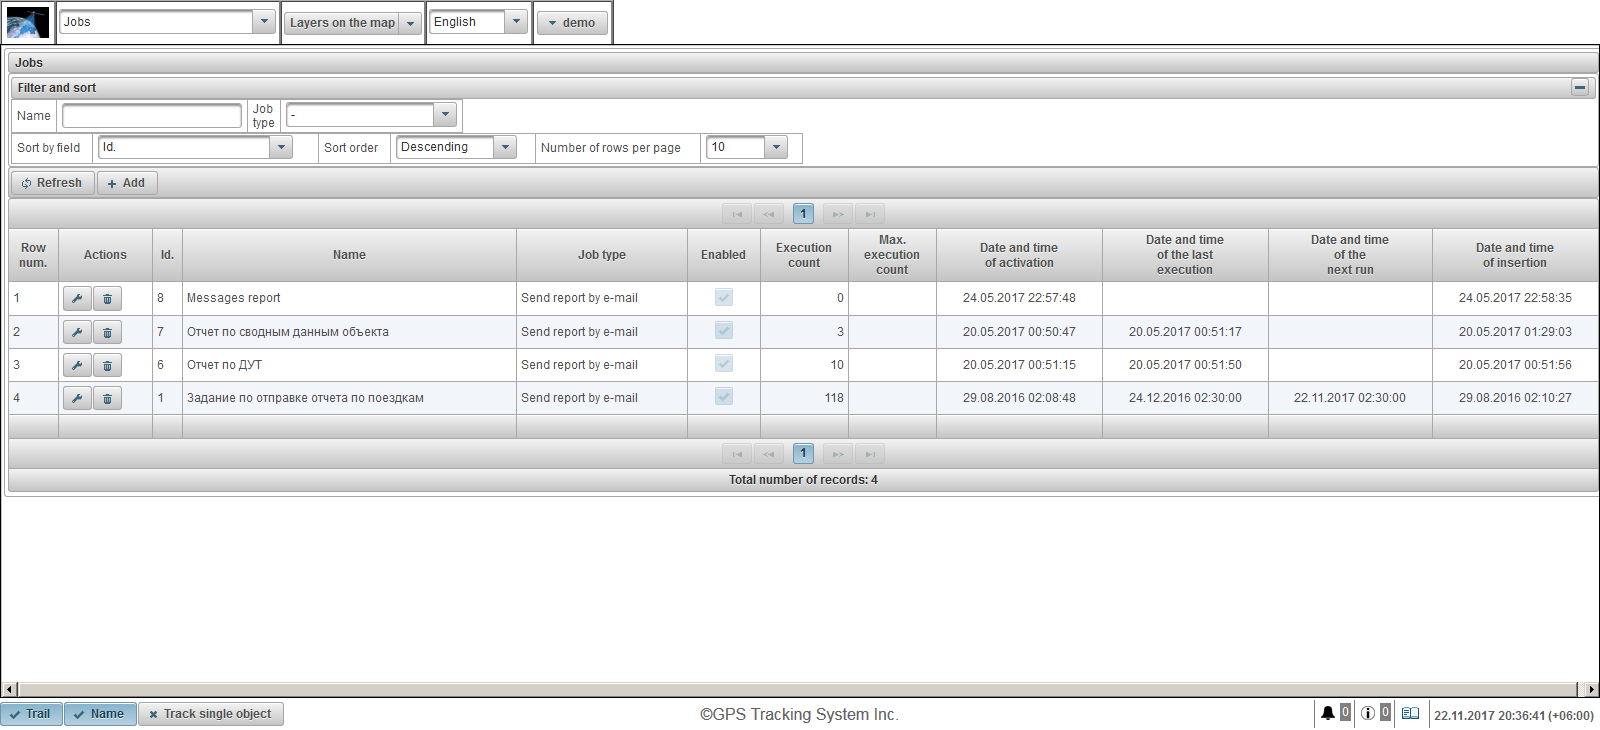
The job table consists of the following fields:
- Row num. Serial number.
- Actions.
- - open the job properties dialog.
- - delete the job.
- Id. The identifier of the record.
- Name. The name of the job.
- Job type. Type of job, for example "Send report by e-mail".
- Enabled. Task enable flag.
- Execution count. The number of task executions at the moment.
- Max. execution count. Limit on the number of job accomplishments.
- Date and time of activation. Date and time of activation of the job when the job starts executing.
- Date and time of the last execution. Date and time of the last job execution.
- Date and time of the next run. Date and time of the next job execution.
- Date and time of insertion. Date and time the job was created.
In the "Filter and sort" panel, you can configure sorting and filtering of records.
By default, the table is sorted by the field "Id." in descending order. To sort by a particular field, in the "Sort by field" field, select the field you want to sort, in the "Sort order" field, select the sort order and click on the "Refresh" button. It is also possible to filter on the field "Name" and "Job type", for this enter the values for these fields and click the "Refresh" button.
To create a job, click the "Add" button in the toolbar. The job properties dialog box opens.
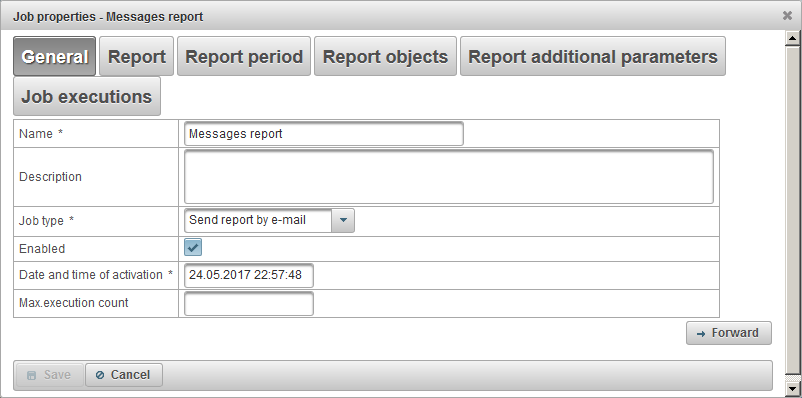
The job properties dialog box can consist of several consecutive tabs:
- General.
- Report.
- Report period.
- Report objects.
- Job executions.
Creating a job consists of several consecutive steps, broken into tabs, to go to the next tab you need to click the "Forward" button, to return to the previous tab you need to click the "Back" button.
The "General" tab can consist of the following fields:
- Name. The name of the job.
- Description. Custom description of the job. Not a required field.
- Job type.
- Send report by e-mail. The report will be sent by the system to the indicated e-mail addresses on the specified schedule.
- Enabled. Job enable flag.
- Date and time of activation. Date and time of activation of the job when the job starts executing.
- Max.execution count. Limit on the number of job executions. If you want to limit the number of job executions, you need to fill in this field.
The "Report" tab consists of the following fields:
- Report. Select the report you want to receive.
- Export formats. Select the report export formats.
In the "E-mail recipients" panel, there is an e-mail table for the addresses of the recipients of the report. To add an e-mail address of the recipient, click the "Add" button in the "E-mail recipients" panel.
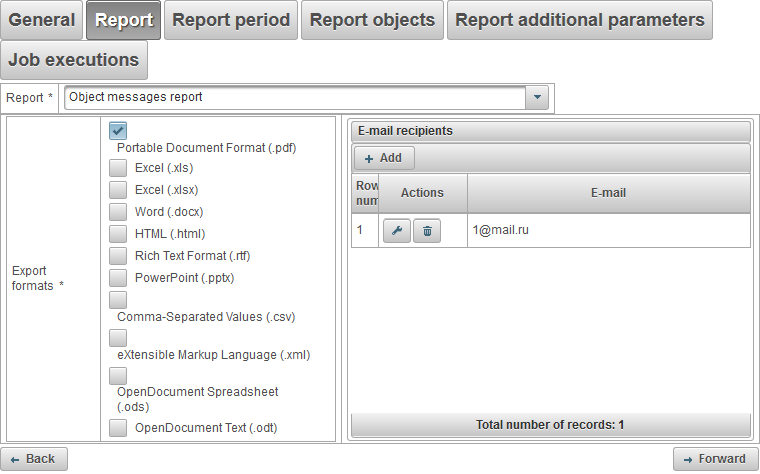
The "Report period" tab allows you to select for which period the report will be executed and consists of the following fields:
- Period.
- For previous. For example, to get a daily report, select the report interval "For the previous 1 days" and on the "Job executions" tab put the time for example 04:00, then in the morning when you come to work, in your e-mail will be the necessary reports for the previous day. To receive the weekly report, select the interval of the report "For the previous 1 weeks" and put the time on the "Job executions" tab for example 04:00, then on Monday morning you will already have these reports for the past week, etc.
- Specified period. To specify a specific report period.
- From. Date and time of report start.
- To. Date and time of report end.
- Including current. Flag for enabling the current period. This field is visible only when the period is selected "For previous".
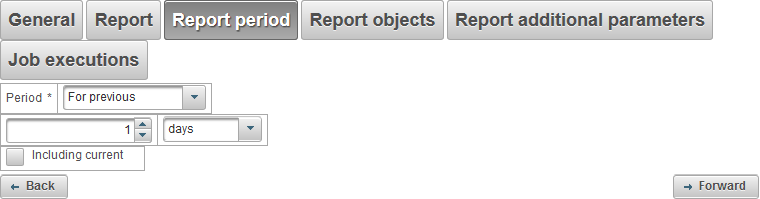
The "Report objects" tab allows you to select the objects on which reports will be executed.
In the first column, the objects should be selected.
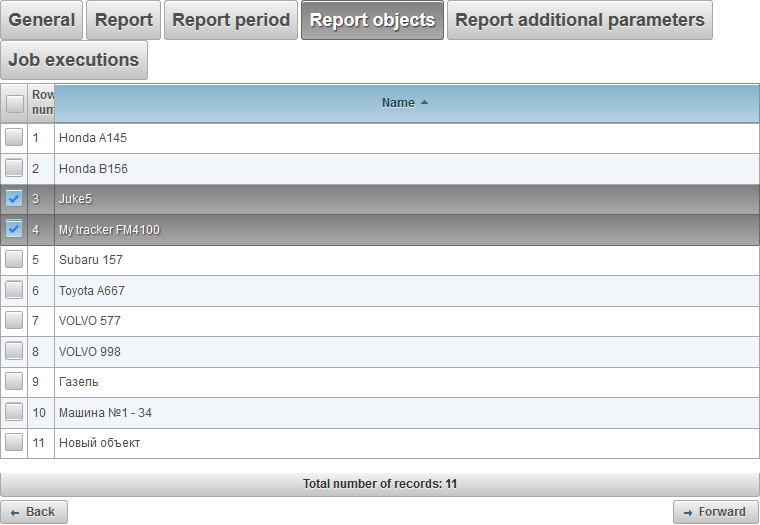
The "Job executions" tab allows you to set the schedule for the job.
The table contains the following columns:
- Row num. Serial number.
- Actions.
- - job execution properties.
- - delete the job.
- Job execution interval. Periodicity of the job.
- Start date and time. Date and time of the beginning of the action.
- Enabled. Enable flag.
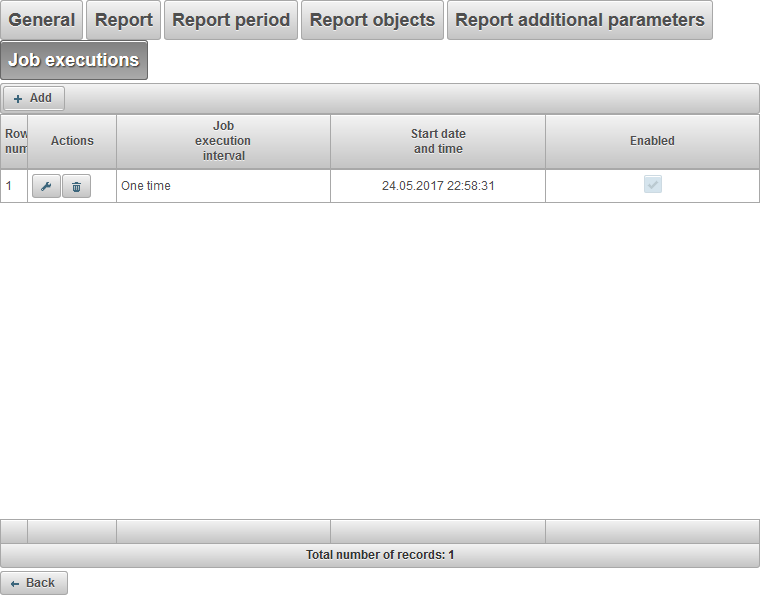
To add a job, click the "Add" button. The dialog box opens with the following fields:
- Job execution interval. Periodicity of the job.
- One time. The job will be executed once at a specific date and time.
- Daily. The job will be performed daily, for example at 04.00 AM.
- Weekly. The job will be performed weekly, for example on Monday and Wednesday at 04.00 AM.
- Monthly. The job will be performed monthly, for example on the 1st of the day at 04.00 in the morning.
- Start date and time. Date and time of the beginning of the action. If the value "One time" is selected in the "Job execution interval" field, this will be the date and time of a one-time job.
- Repeat every. This field is visible if the "Job execution interval" field is set to "Daily" or "Weekly". Specifies the frequency of the task, for example every 3 days or every 3 weeks on Mondays and Wednesdays.
- Months. Select months to run the job. This field is visible if "Monthly" is selected in the field "Job execution interval".
- Days of month. The job will be executed on certain days of the month, for example, you can select the last day of the month. This field is visible if "Monthly" is selected in the field "Job execution interval".
- Days of the week. The job will be executed on certain days of the week, for example, you can select the last Sunday. This field is visible if "Monthly" is selected in the field "Job execution interval".
- Additional parameters.
- Expire date. The duration of the job. To determine the validity period, set the flag and specify the date and time. If you do not want to limit the expiration date, clear the flag.
- Enabled. Flag for enabling.

Click "Save" to save the job.
The "Notifications" panel allows you to configure the receipt of notifications for certain object events (for example, when the object's speed exceeds, if the connection with the object is lost, etc.).
To open the "Notifications" panel, in the top panel, select "Notifications" from the drop-down list.
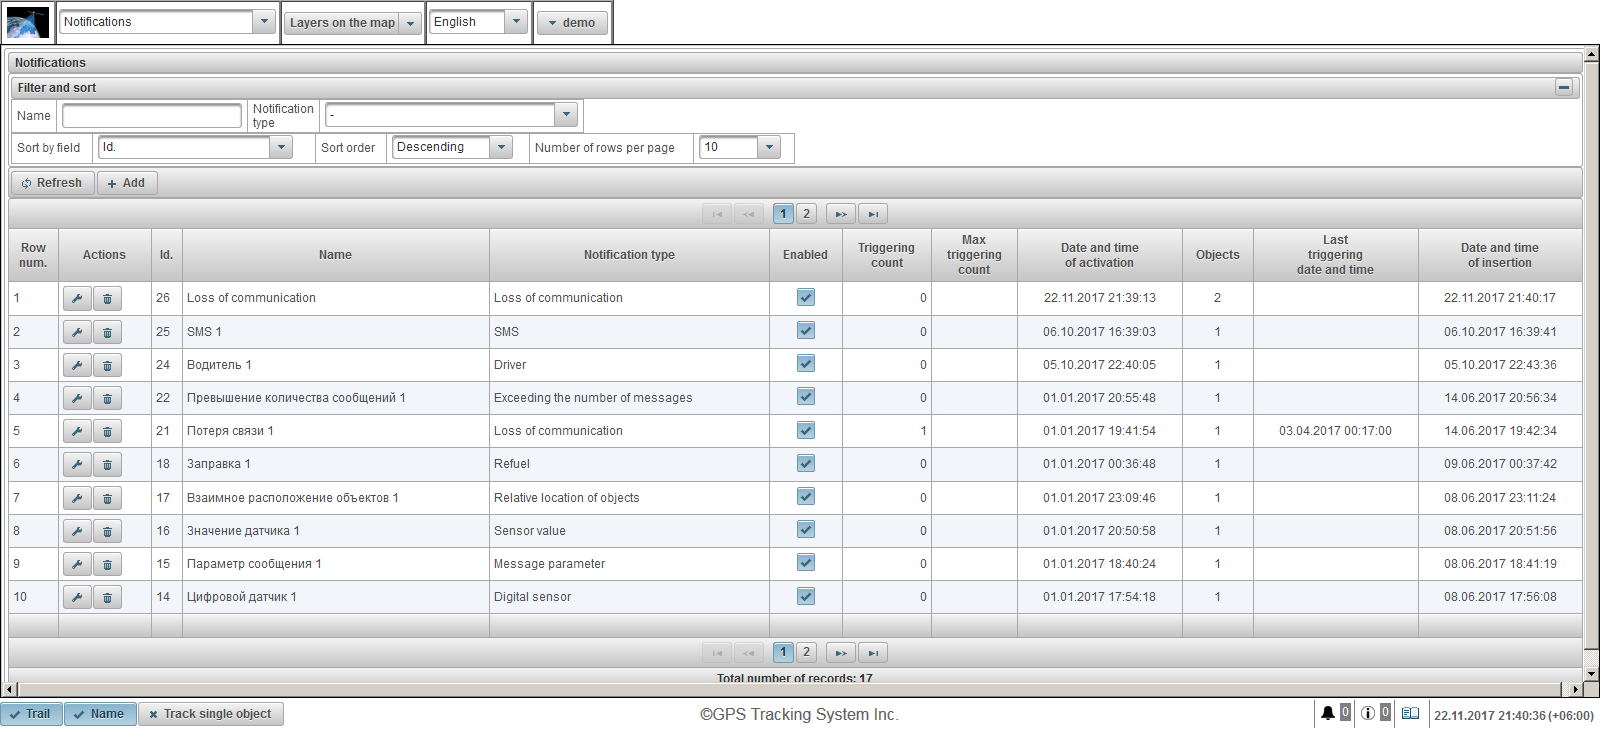
The notification table consists of the following columns:
- Row num. Serial number.
- Actions.
- - open the notification properties dialog.
- - delete the notification.
- Id. The identifier of the record.
- Name. The name of the notification.
- Notification type. Type of the notification, for example, "Loss of communication".
- Enabled. Notification flag. You can click the left mouse button to set or clear this flag.
- Triggering count. The number of notifications at this time.
- Max triggering count. Limit on the number of notifications.
- Date and time of activation. The date and time the notification was activated.
- Objects. The number of objects attached to the notification. When you hover the mouse over the number of objects, a tooltip with object names will be displayed.
- Last triggering date and time. Date and time of the last triggering of the notification.
- Date and time of insertion. The date and time the notification was created.
In the "Filter and sort" panel, you can configure sorting and filtering of records.
By default, the table is sorted by the field "Id" in descending order. To sort by a particular field, in the "Sort by field" field, select the field you want to sort, in the "Sort order" field, select the sort order and click on the "Refresh" button. You can also filter on the "Name" and "Notification type" fields, enter the values for these fields and click the "Refresh" button.
To create a notification, click the "Add" button in the toolbar. The notification properties dialog box opens.
The notification properties dialog box can consist of several consecutive tabs:
- General.
- Objects.
- Dynamic tab. Depends on the selected value in the "Notification type" field on the "General" tab:
- Speed.
- Geofence.
- Digital sensor.
- Message parameter.
- Sensor value.
- Loss of communication.
- Idle.
- SMS.
- Relative location of objects.
- Exceeding the number of messages.
- Refuel.
- Defuel.
- Driver.
- Maintenance.
- Notification text.
- Actions.
Creating a notification consists of several consecutive steps, broken into tabs, to go to the next tab you need to click the "Forward" button, to return to the previous tab you need to click the "Back" button.
The "General" tab can consist of the following fields:
- Name. The name of the notification.
- Description. Custom description of the notification. Not a required field.
- Notification type. The following types of notifications are available:
- Speed. It is used, for example, to control the speed of an object.
- Geofence. Used for example, to control the exit of an object from a certain zone, for example, city.
- Alarm (SOS). Used for example to control the pressing of the SOS button by the driver. The corresponding sensor must be set in the properties of the object.
- Digital sensor. Used for example to control the ignition on.
- Message parameter. Used for example to track a parameter in messages from an object.
- Sensor value. Used for example to monitor the value of the object sensor.
- Loss of communication. It is used, for example, to control the loss of communication with an object.
- Idle. Used for example, to control the idle time of an object.
- SMS. It is used for example when receiving an SMS from an object.
- Relative location of objects. Used for example to control the approach of objects to each other or to move away from each other.
- Exceeding the number of messages. Used for example to control the flow of messages from an object.
- Refuel. Used, for example, to control the refueling of an object.
- Defuel. Used for example, to control the defueling of an object.
- Driver. Used for example to control the driver's assignment to an object.
- Maintenance. Used for example to monitor the oil change in the engine of the object.
- Enabled. Notification enable flag.
- Date and time of activation. The date and time the notification was activated.
 Expire date. Duration of the notification. To determine the validity period, set the flag and specify the date and time. If you do not want to limit the expiration date, clear the flag.
 - Max triggering count. Limit on the number of notifications. If you want to limit the number of notifications, you need to fill in this field.
- Maximum difference between message time and current time, minutes. This field is visible only for some types of notification. If the flag is set, then if the difference between the message time and the current time is greater than the indicated difference, the message will not be taken into account. For example, if you set this flag and set the value to 60, messages older than 60 minutes from the current time will be ignored.
- Minimum duration of notification status, seconds. This field is visible only for some types of notification. This parameter allows you to exclude accidental triggering of the notification, for example, due to the error of the tracker, the object was out of the zone, and after a few seconds returned to the zone. To activate, you need to set the flag and specify the duration in seconds.
- Condition for generating a notification. This field is visible only for some types of notification.
- When the state changes. The notification will only work if you change from the normal state to the notification status. For example, if the speed of an object is exceeded, the notification will work once, then the speed of the object should fall below the maximum value.
- Does not depend on the previous state. The notification will work regardless of the previous status.
- The minimum duration of the previous state, seconds. This field is visible only for some types of notification. This parameter is designed to exclude unnecessary operations. For example, the object can be in the normal state, then return to the notification status. To activate, set this flag and specify the duration in seconds.
- Maximum difference between the previous message and the notification message, minutes. This field is visible only for some types of notification. This parameter is designed to exclude unnecessary operations. For example, to control the difference between the time of the previous message and the notification message. To activate, set this flag and specify the difference in minutes.
- Time limit. For example, the control should be carried out only on working days and during working hours.
- Days of the week. For example, the control is only on Monday and Wednesday.
- Days of month. For example, control should be performed only on the fifth day of the month.
- Months. For example, control only in November and December.
- Time intervals. For example, the control is only from 09.00 AM to 6.00 PM.
The "Objects" tab allows you to select objects that will be monitored. In the first column, set the flags for the objects you want to monitor.
The next tab depends on the selected notification type on the "General" tab.
The "Speed" tab consists of the following fields:
- Speed control. The "Speed control" panel allows you to set the smallest and the maximum allowed speed. To set the marker, left click on it and keep it moving to the right or left.
- Monitor the sensor value. Flag for additional monitoring of the value of the sensor. If you set this flag, the notification will only work if both conditions are met.

The "Geofence" tab consists of the following fields:
- Geofence control type.
- Outside geofence. To trig outside the geofence.
- In geofence. Operate inside the geofence.
- Geofences. Geofence selection table. In the first column of the table, you can set flags on geofences.
- Control the speed. Additional speed control flag.
- Monitor the sensor value. Additional flag for monitoring the value of the sensor.
The "Digital sensor" tab consists of the following fields:
- Type of notification.
- Activation. Trigger when activated.
- Deactivation. Trigger when deactivated.
- Sensor name. You can filter by the name of the sensor.

The "Message parameter" tab consists of the following fields:
- Parameter. The name of the monitored message parameter.
- Value type.
- Value range. To monitor the range of values, specify the minimum and maximum values for the triggering and the type of triggering.
- Changing the value. To control the change in the parameter value to the specified delta, that is, the value jump is controlled. The delta value module is compared.
- Text value. Control the text value of the parameter.
- Absence. Trigger if there is no parameter.
- Presence. Trigger when there is a parameter.
- Minimum value. This field is visible when selecting the value type "Value range".
- Maximum value. This field is visible when selecting the value type "Value range".
- Type of triggering. This field is visible when selecting the value type "Value range".
- Inside the range. Trigger when the value is between the minimum and maximum value.
- Out of range. Trigger when the value is out of bounds, that is, either less than the minimum value or greater than the maximum value.
- Delta. This field is visible when selecting the value type "Changing the value".
- Text value. This field is visible when selecting the value type "Text value".

The "Sensor value" tab consists of the following fields:
- Value type.
- Value range. To monitor the range of values, specify the minimum and maximum values for the triggering and the type of triggering.
- Changing the value. To control the change in the value of the sensor to the specified delta, that is, the value jump is controlled. The delta value module is compared.
- Text value. Control the text value of the sensor.
- Sensor type. Select the type of sensor to filter the sensors of the object, for example, only the fuel level sensors.
- Sensor name. The name of the monitored sensor with the condition.
- Minimum value. This field is visible when selecting the value type "Value range".
- Maximum value. This field is visible when selecting the value type "Value range".
- Type of triggering. This field is visible when selecting the value type "Value range".
- Inside the range. Trigger when the value is between the minimum and maximum value.
- Out of range. Trigger when the value is out of bounds, that is, either less than the minimum value or greater than the maximum value.
- Delta. This field is visible when selecting the value type "Changing the value".
- Text value. This field is visible when selecting the value type "Text value".
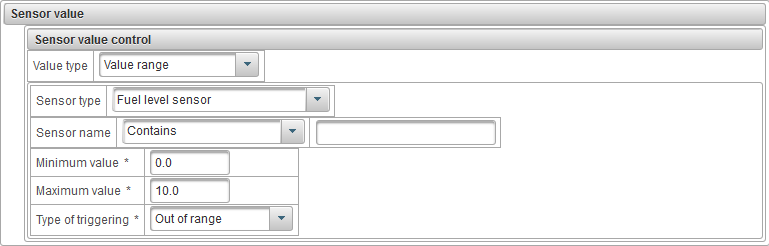
The "Loss of communication" tab consists of the following fields:
- Type of communication loss.
- No data. A notification is triggered if there are no messages from the object within the specified interval.
- No coordinates. The notification is triggered in the absence of positional messages from the object during the specified interval, for example, in the case of problems with the GPS antenna.
- Interval, minutes. The time lost in minutes, after which the notification will work.
- Also notify when the connection is restored. Set the flag if you want to also receive a notification if the connection is restored.

The "Idle" tab consists of the following fields:
- Idle time, minutes. Specify the idle time in minutes.
- Max speed, km/h. Specify the maximum idle speed in km/h. To take into account the error of the equipment, it is recommended to specify a speed greater than zero.
- Monitor the sensor value. Set the flag if you want additionally control the value of the sensor. For example, to monitor idle with the engine running.

The "SMS" tab consists of the following fields:
- SMS text. Specify the SMS text condition for triggering the notification. If this field is left blank, the notification will work for any SMS received from the object.

The "Relative location of objects" tab consists of the following fields:
- Relative location type.
- Removal. Trigger when objects are moved away from each other.
- Approach. Activate when objects approach each other.
- Radius, meters. Specify the radius in meters, that is, the distance between objects, when increasing or decreasing, the notification will work.
- Objects. Selection table for objects. In the first column of the table, set the flags for the objects.
- Control the speed. Flag of additional speed control of the object.
- Monitor the sensor value. Flag for additional monitoring of the object sensor value.
The "Exceeding the number of messages" tab consists of the following fields:
- Excess type.
- Data messages. Trigger for messages with data, for example, positional messages.
- SMS messages. Trigger for SMS messages.
- Counter reset interval, minutes. The reset interval of the counter in minutes, for example for 60 minutes, can receive a maximum of 10 messages, otherwise the notification will work.
- Message limit. The maximum number of messages per specified interval. If the limit is exceeded, a notification will be triggered.

The "Refuel" tab consists of the following fields:
- Sensor name. The sensor name with the condition for filtering.
- Control geozone. In addition, you can control the geofence. For example, refueling in certain geofences.

The "Defuel" tab consists of the following fields:
- Sensor name. The sensor name with the condition for filtering.
- Control geozone. In addition, you can control the geofence. For example, defueling in certain geofences.

The "Driver" tab consists of the following fields:
- Operation kind.
- Assignment. Operate when assigning a driver to an object.
- Removal. Operate when removing the driver from the object.
- Name of driver. The driver's name with the condition for filtering.

The "Maintenance" tab consists of the following fields:
- Type.
- Expiration. Operate when the scheduled maintenance is overdue.
- Approaching of the time. Work at the approach of planned maintenance.
- Service interval name. The name of the maintenance interval with the condition for filtering.
- Notify by mileage. If you want to set mileage control, then set this flag and specify the mileage in km.
- Notify by motohours. If you want to set the control on the engine hours, then set this flag and specify motohours in hours.
- Notify by days. If you want to set monitoring by days, then set this flag and specify the number of days.
The "Notification text" tab consists of the following fields:
- Notification text. Enter the notification text using the parameters below. For example, the text of a notification "Object '%OBJ_NAME%' violated speed limitations. At %MSG_DT% it moved with speed %SPD% near '%LOCATION%'.".
- Standard parameters. A list of standard parameters for use in the notification text that are available for all types of notifications. When the left mouse button is clicked on the name of the standard parameter, the parameter is appended to the end of the notification text.
- Special parameters. A list of special parameters to use in the notification text associated with the selected notification type. When the left mouse button is clicked on the name of a special parameter, the parameter will be appended to the end of the notification text.
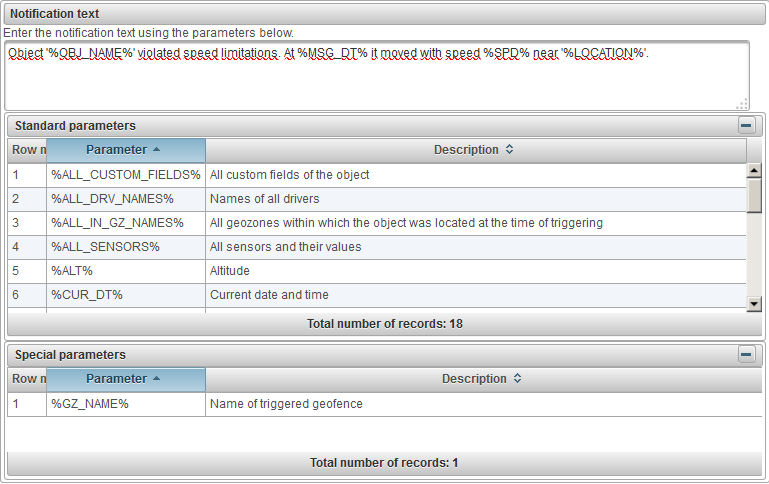
The "Actions" tab consists of the following fields:
- Notify by e-mail. A flag for sending an e-mail notification when a notification is triggered. When you set this flag, you can add one or more email addresses to the table.
- Notify by SMS. Flag for sending SMS notification when a notification is triggered. When you set this flag, you can add one or more phone numbers to the table. Phone numbers must be specified in an international format, for example +77012343322.
- Display online notification in a pop-up window. Flag for displaying online notification in a pop-up window when a notification is triggered. If you set this flag, the alert will be displayed in a pop-up window and accompanied by a beep.
- Color of the online notification title. You can change the color of the online notification title.
- Set the counters value. Flag for setting the value of the counters when the notification is triggered. If you set this flag, you can change the value of the mileage counter or motohour counter. For example, if you leave a certain geofence, you need to reset the mileage counter value.
- Mileage counter value, km. When this flag is set, when the notification is triggered, the specified mileage counter value is set in km.
- Motohour counter value, h. When this flag is set, the indicated motohour counter value will be set at the time the notification is triggered.
- Send report by e-mail. Flag for sending an e-mail report when a notification is triggered.
- Отчет. Select the report to be sent to the e-mail.
- Форматы экспорта. Select the formats in which you want to receive reports.
- E-mail получателей. Fill in the table of e-mail addresses of the recipients of the report.
- Remove the driver. Flag for removal driver when a notification is triggered. For example, when you return to the base, you automatically need to remove the driver from the object.
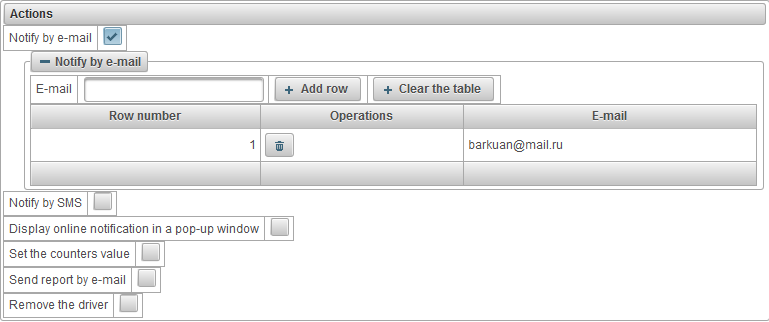
To save the notification, click the "Save" button.
The user can receive online notifications if he is authorized on the system at the time the notification is triggered. Online notifications are displayed in a pop-up window as they appear and are accompanied by a beep, and the number of unread online notifications will be displayed in the bottom panel to the right of the icon . The online notification window can be closed, you can also open it by clicking on the icon in the bottom panel. When left-clicking on the title of the online notification, the map is centered in the place where the notification occurred. When left-clicking on the name of the object, the map is centered on the last position of the object.
The notification table contains the following columns:
- - Show / hide text of online notification.
- - Delete online notification.
- - Icon of the object.
- The name of the object with the title of the online notification, separated by the symbol "|".
To delete all online notifications, click the "Delete all" button. To delete the read online notifications, click the "Delete read" button.
To close the online notification window, click on the icon at the very top on the right.
To hide the contents of the online notification window, click on the icon  at the very top, to expand it, click on
  .
.
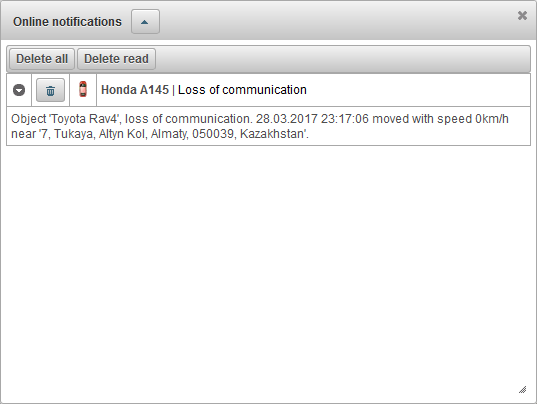
The "Users" panel allows you to create users, give access to objects and much more.
To open the "Users" panel, in the top panel, select "Users" from the drop-down list.
The user table consists of the following fields:
- Row num. Serial number.
- Actions.
- - open the user properties dialog.
- - remove user.
- Id. The identifier of the record.
- Name. User name.
- Creator. The name of the user who created this user.
- Access is given to users. The names of the users who are granted access.
- Enabled. User enable flag.
- E-mail. E-mail of the user.
- Dealer. The dealer's flag.
- Tariff. The tariff assigned to the user.
- Status. User status.
- Activation date. The date and time when the user was activated.
- Note. User note.
- Date and time of insertion. The date and time the user was created.
- Self signed up. Self-registration flag. This flag is for those users who have registered themselves in the system.
In the "Filter and sort" panel, you can configure sorting and filtering of records.
By default, the table is sorted by the field "Id." in descending order. To sort by a particular field, in the "Sort by field" field, select the field you want to sort, in the "Sort order" field, select the sort order and click on the "Refresh" button. You can also filter by fields "Creator", "Access is given to users", "Name", "E-mail", "Tariff", "Status" and "Note". To filter, enter the values for these fields and click the "Refresh" button. You can also adjust the number of lines per page in the "Number of rows per page" field.
To create a user, click the "Add" button in the toolbar. The user properties dialog box opens.

The user properties dialog box can consist of several tabs:
The "General" tab can consist of the following fields:
- Name. User name (login).
- Change password. Password change flag. If you want to change the password for the user, set this flag, enter a new password in the "Password" field and repeat the new password in the "Confirm password" field.
- Password. The user's password.
- Confirm password. Repeat the user password.
- E-mail. E-mail of the user. On the specified e-mail the user will receive notifications from the provider of tracking services.
- Host mask. You need to specify the host mask if you want to restrict the login to only certain IP addresses, for example, you can set the host mask to "192.168.1.*", which will allow only users with an IP address of 192.168.1.* to log on to the system.
- Creator. Select the user-creator.
- Tariff. The user's tariff, by default, is "root default", which does not limit the user.
- Status. User status. Users with the status "Blocked" can not log in.
- Activation date.
- Can create elements. A flag allowing the user to create monitoring objects, users, geofences, points of interest, etc.
- Can change password. A flag allowing a user to change their password.
- Can send SMS. A flag allowing the user to send SMS messages to drivers, to objects, etc.
- Enabled. User enable flag. Disabled users can not log in.
- Can change own settings. A flag allowing the user to change their settings.
- Dealer. The dealer's flag. Dealers have great opportunities, they can create tariffs, conduct billing, etc.
- Note. User note.
The "Additional" tab consists of the following fields:
- Activate mobile access. The mobile access activation flag, that is, allows you to log in from mobile applications.

The "Access" tab allows you to give the editable user access to objects and consists of the following tabs:
- General.
- Access rights templates for objects.

The "General" tab on left side displays the table of objects, on right side assigned rights to the selected object.
The object table consists of the following columns:
- Name. The name of the object.
- Access given. Access grant flag.
- Access rights template. The assigned access rights template for the object.
To select an object, select the object on the left. On the right, the assigned rights to the selected object are displayed. Tick the rights that you want to give the user to the selected object.
To facilitate the work of distributing rights to objects, you can create an access rights template and assign it to objects by specifying it in the "Access rights template" field.
The "Access rights templates for objects" tab displays a table of access rights templates for objects that can be assigned to an object.
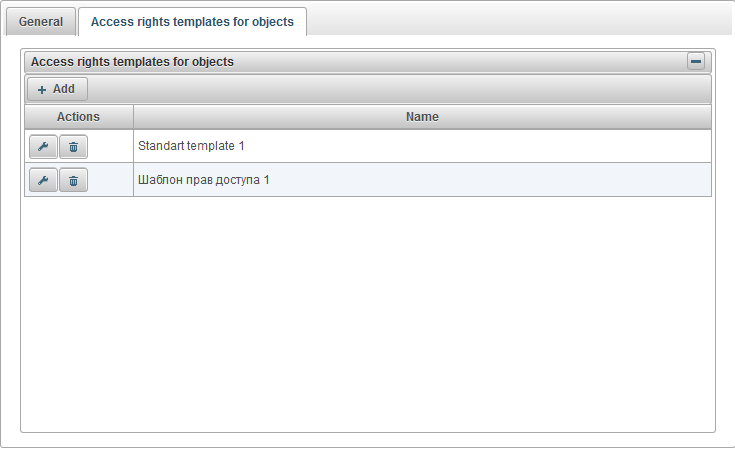
The table of access right templates for objects consists of the following columns:
- Actions.
- - open the properties dialog of the access rights template for objects.
- - delete the access rights template for objects.
- Name. The name of the access rights template for objects.
To add an access rights template for objects, click on the "Add" button, the properties dialog of the access rights template for objects opens.
Specify a name, check the required rights and click "Save".
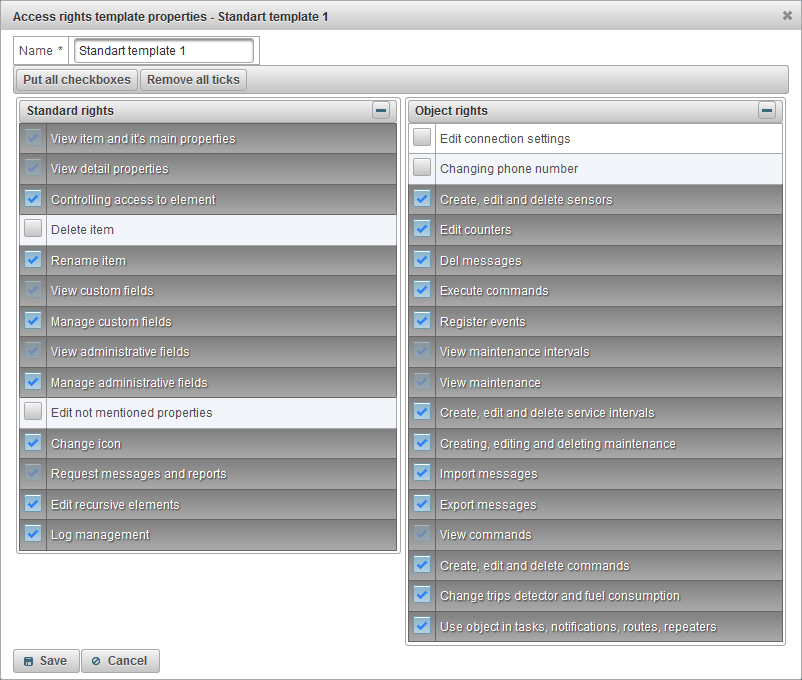
The "Custom fields" tab displays custom user fields and consists of a table with the following fields:
- Administrative field. The flag of the administrative field, that is, will be visible only to users with the appropriate rights.
- Name. The name of an custom field.
- Value. The valueof an custom field.
- - Change record icon. When you click on this icon, you can change the values in the columns of the record.
- - Delete record icon. When you click on this icon, an custom field will be deleted.
To add an custom field, click the "Add record" button.
The "Objects" panel allows you to create objects, as an object can be a vehicle, a person, an animal, a moving or stationary object, which is monitored.
To open the "Objects" panel, in the top panel, select "Objects" from the drop-down list.
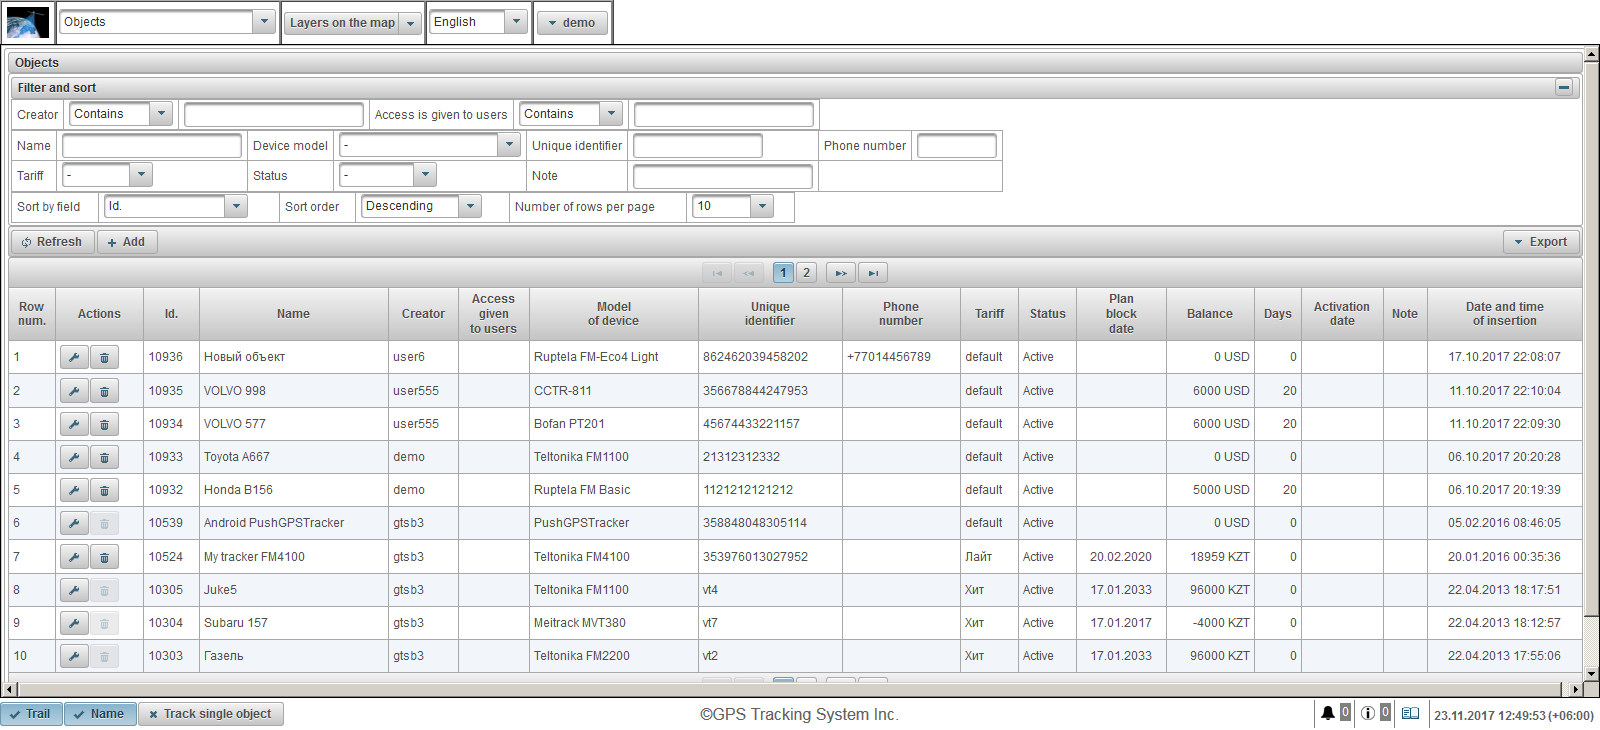
The object table consists of the following fields:
- Row num. Serial number.
- Actions.
- - open the object properties dialog.
- - delete object.
- Id. The identifier of the record.
- Name. The name of the object.
- Creator. The name of the user who created this object.
- Access given to users. The names of the users who are granted access.
- Model of device. Model of the device.
- Unique identifier. A unique identifier for the object, for example, the IMEI code of the device.
- Phone number. The phone number of the SIM card inserted in the device. It is necessary to specify in the international format, for example +77012345677.
- Tariff. The tariff assigned to the object.
- Status. The status of the object.
- Plan block date. If billing is enabled, it shows the date of the planned blocking according to the assigned tariff of the object.
- Balance. Balance.
- Days. Days left.
- Activation date. The date and time when the object was activated.
- Note. User note.
- Date and time of insertion. The date and time the object was created.
In the "Filter and sort" panel, you can configure sorting and filtering of records.
By default, the table is sorted by the field "Id." in descending order. To sort by a particular field, in the "Sort by field" field, select the field you want to sort, in the "Sort order" field, select the sort order and click on the "Refresh" button. You can also filter by fields "Creator", "Access is given to users", "Name", "Device model", "Unique identifier", "Phone number", "Tariff", "Status" and "Note". To filter, enter the values for these fields and click the "Refresh" button. You can also adjust the number of lines per page in the "Number of rows per page" field.
To create an object, click the "Add" button in the toolbar. The object properties dialog box opens.
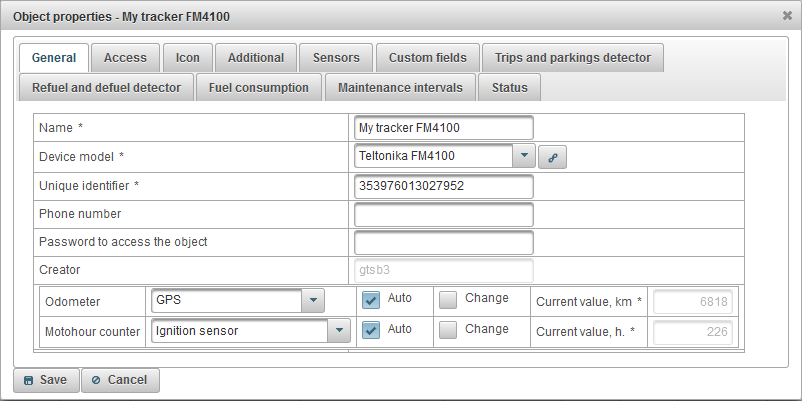
The object properties dialog can consist of several tabs:
The "General" tab can consist of the following fields:
- Name. Name of the object.
- Device model. Model of the device. After selecting the model of the device, a button will appear on the right, when clicked, a window will open displaying the server's IP address and the server port for setting up the device.
- Unique identifier. A unique identifier of the object, for example, the IMEI code of the device.
- Phone number. The phone number of the SIM card inserted in the device. It is necessary to specify in the international format, for example +77012345677.
- Password to access the object. Some device models require a password to execute commands on it.
- Tariff. The tariff of the object, by default, is "default", which does not limit the object.
- Status. The status of the object. Objects with the status "Blocked" can not receive data on the server, that is, messages from the object will not be downloaded.
- Activation date. The date and time when the object was put into operation.
- Mileage counter. Method for calculating the mileage. The default value is "GPS". To increase the mileage counter on arrival of a new message from the object, you need to set the flag "Auto". To change the value of the mileage counter, set the flag "Change" and in the field "Current value, km" enter the value in km.
- GPS + ignition sensor. Calculation of the mileage by taking into account the readings of the ignition sensor and GPS-coordinates.
- Relative odometer. Calculation of the mileage by the relative odometer sensor, which takes into account the distance traveled from the last message.
- Mileage sensor. Calculation of the mileage by the mileage sensor.
- GPS. Calculation of the mileage by GPS-coordinates.
- Motohour counter. Method for calculating the operating hours. The default value is "Ignition sensor". To increase the motohour counter on arrival of a new message from the object, you need to set the flag "Auto". To change the value of the motohour counter, set the flag "Change" and in the field "Current value, h." enter the value in hours.
- Relative motohour sensor. The calculation of the motohours by relative motohour sensor, which takes into account the time of work from the last message.
- Absolute motohour sensor. The calculation of the motohours by absolute motohour sensor.
- Ignition sensor. The calculation of the motohours by ignition sensor.
- Note. Object note.
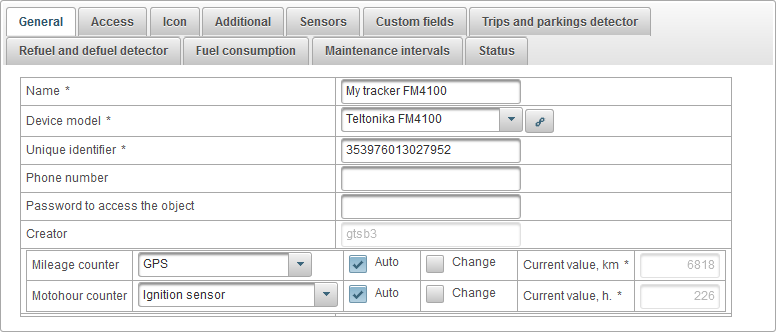
The "Access" tab allows you to give users rights to this object and consists of the following tabs:
- General.
- Access rights templates for objects.
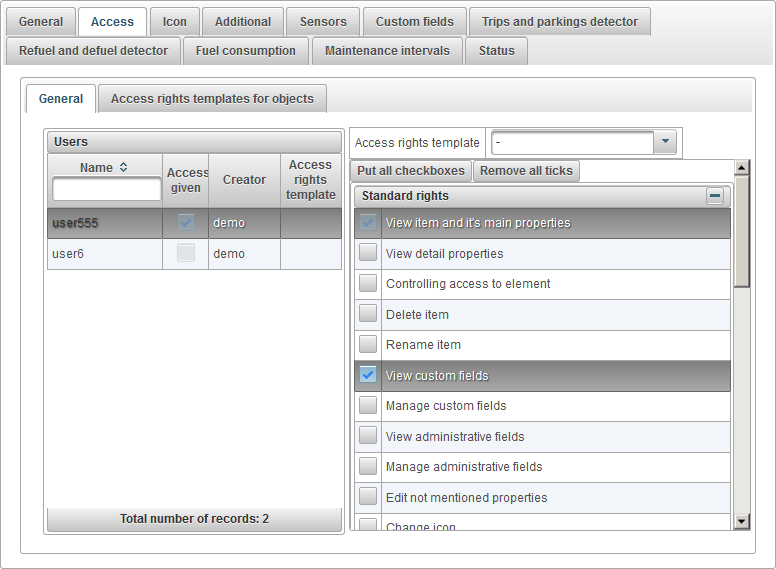
The "General" tab on left side displays the table of users, on right side displays assigned rights to the selected user.
The user table consists of the following columns:
- Name. User name.
- Access given. Access grant flag.
- Creator. The creator of the user.
- Access rights template. The assigned access rights template for the user.
On the left, select the user, the assigned rights of the selected user are displayed on the right. Check the rights that you want to give to the user.
To facilitate the work of distributing rights to objects, you can create an access rights template and assign it to the user by specifying it in the "Access rights template" field.
The "Access rights templates for objects" tab displays a table of access rights templates for objects that can be assigned to an object.
The table of access rights for objects consists of the following columns:
- Actions.
- - open the properties dialog of the access rights template for objects.
- - delete the access rights template for objects.
Name. The name of the access rights template for objects.
To add an access rights template for objects, click on the "Add" button, the properties dialog of the access rights template for objects opens.
Specify a name, check the required rights and click "Save".
The "Icon" tab consists of the following fields:
- Rotate icon. Rotation flag of the icon. When this flag is set, the icon can be rotated on the map depending on the course (direction of movement) of the object. For the rotation to look correct on the map, you need to select an icon that looks to the north.
- Icon width. The width of the icon in pixels on the map.
- Image. Image of the object icon. You can select an icon from the standard library by clicking the "Library" button. You can also upload your own image by clicking on the "Download" button.
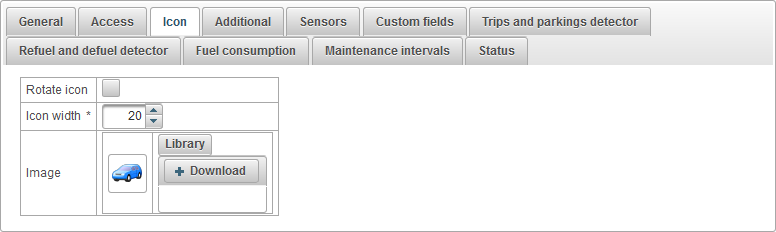
The "Additional" tab consists of the following fields:
- Overspeed. The choice of method for determining speeding. Exceeding the speed can be viewed in reports on speeding, as well as when viewing a track.
- A method for determining the overspeed. Method for determining excess speed.
- Fixed limit. If you receive messages at a speed greater than the value indicated in the "Overspeed limit, km/h" field and the minimum time for exceeding the speed specified in the field "Min.timeout of overspeed, seconds", speeding will be recorded.
- Overspeed limit, km/h. Limitation of speeding in km/h.
- Min.timeout of overspeed, seconds. The minimum time to exceed the speed in seconds.
- Color of the label to the object.
- Color of the label to the object. By default, the color of the object's signature on the map is red. It is possible to set a different color.
- Permanent track color.
- Use fixed track color. Flag using constant color when building tracks.
- Permanent track color. Selection of the color for track.
- Filtering position information of the object in messages. All messages from the object are recorded in the database. But in the case of data releases, the errors of the GPS receiver may distort the mileage count and various indications in the reports. In this case, you can enable the filtering of information about the position of the object in the messages.
- Enable position filtering of the object in messages. Flag for enabling filtering of information about the position of the object in messages.
- Ignore invalid messages. Flag for ignoring invalid messages. Some device models send a coordinate validity flag.
- Minimum number of satellites. To enable the number of satellites check, set the flag and enter the minimum number of satellites.
- Maximum value of HDOP. HDOP - horizontal error. The smaller the value, the more precise the coordinates. To enable HDOP verification, set the flag and enter the maximum HDOP value.
- Max.speed value, km/h. To enable the speed check, set the flag and enter the maximum speed in km/h.
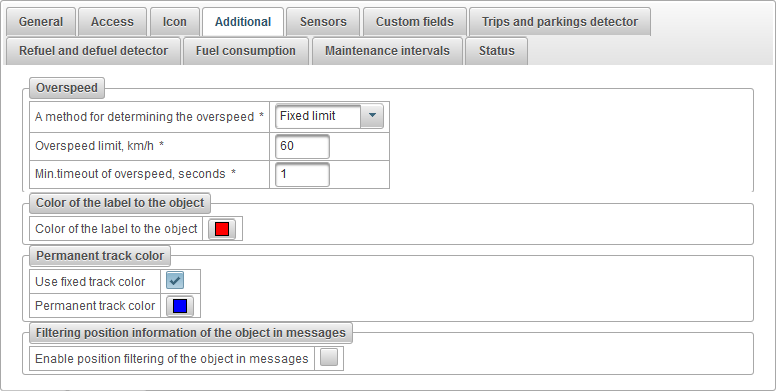
The "Sensors" tab displays a list of all the created sensors for this object.
The sensor table consists of the following columns:
- Row num. Serial number.
- Name. The name of the sensor.
- Sensor type. Sensor type.
- Unit. Unit of measurement.
- Parameter. Message parameter or formula.
- Description. Description of the sensor.
- Visibility. Visibility flag of the sensor in various places of the interface.
- Actions.
- - open the object's sensor properties dialog.
- - add a copy of the object sensor.
- - delete the object sensor.
 - move up the object sensor.
 - move down the object sensor.
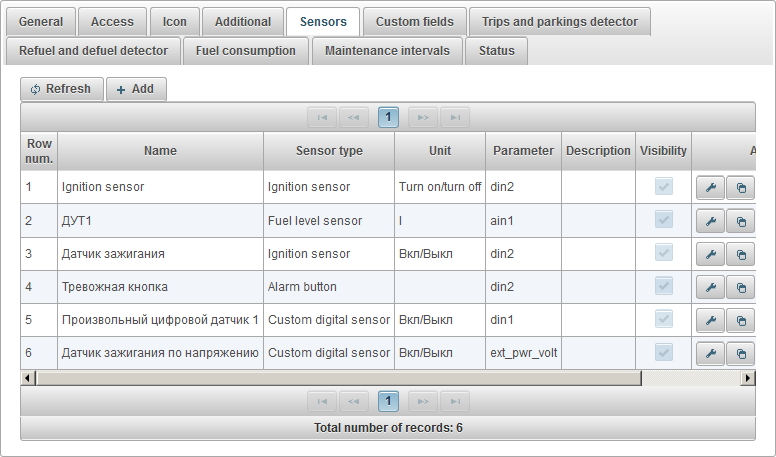
To add a new sensor, click the "Add" button in the toolbar.
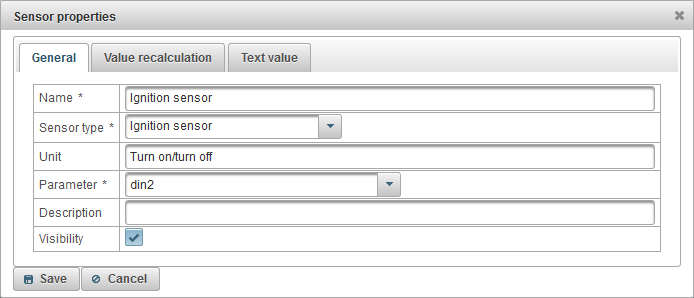
The object sensor properties dialog box can consist of several tabs:
The "General" tab can consist of the following fields:
- Name. Name of the sensor.
- Sensor type. Type of sensor.
- Absolute motohours. A sensor showing the total number of hours worked.
- Accelerometer. Sensor, which allows to fix acceleration along the axes X, Y, Z. It allows to detect traffic accidents (road accidents).
- Absolute fuel expense sensor. A sensor that shows the fuel consumption for the entire period of operation of the car.
- Weight sensor. A sensor that shows the weight of the load.
- Ignition sensor. This sensor is used for the calculation of engine hours, as well as for the detection of trips and parking.
- Instant fuel expense sensor. A sensor that displays the fuel consumption from the previous message.
- Voltage sensor. A sensor that displays the voltage value.
- Engine speed sensor. A sensor that displays the engine speed.
- Engine useful work sensor. Sensor, with which you can determine the coefficient when working under load. Can be used to calculate fuel consumption by calculation.
- Mileage sensor. A sensor that shows the distance traveled.
- Temperature sensor. A sensor that shows the temperature value.
- Fuel level sensor. A sensor that displays the fuel level value.
- Pulse fuel expense sensor. A sensor that displays the accumulated value of the pulses.
- Pulse fuel level sensor. A sensor that is used to calculate the amount of fuel in the tank.
- Temperature factor. The coefficient that is used to calculate the fuel level at different temperatures in the tank.
- Relative motohours. A sensor that displays the number of hours with regard to the intensity factor of the work.
- Relative odometer. A sensor that shows the distance traveled from the previous message.
- Binding driver. A sensor that allows you to assign a driver to an object, for example iButton.
- Binding trailer. A sensor that allows you to attach a trailer to an object.
- Custom sensor. An custom sensor for the calculation of any indicators.
- Custom digital sensor. Custom digital sensor.
- Counter. A sensor that allows you to calculate the number of certain actions.
- Alarm button. A sensor that displays the alarm status (SOS).
- Unit. The unit of measure depends on the selected sensor type.
- Parameter. Select an parameter from the last message of the object, or enter the calculation formula (syntax of the Java programming language). For example, "odom*0.001" means the value of the message parameter "odom" should be multiplied by "0.001." For example "status.charAt(18)" means to get the 19th character of the message parameter "status".
- Visibility. Flag for the visibility of the sensor in various places of the interface.
- Smooth values. Flag for the sensor smoothing. Only available for certain sensor types. For example, the fuel level sensor can send data that jumps up and down, you need to set this flag to smooth it and fill in the "Messages quantity to smooth" field, which allows you to smooth out the incoming values to exclude unnecessary refuels and defuels.
- Messages quantity to smooth. The number of messages for smoothing, should be odd.
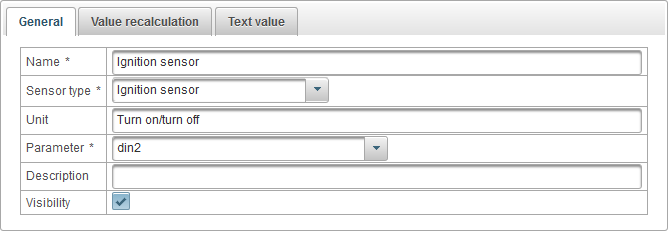
The "Value recalculation" tab allows you to recalculate the value and can consist of the following fields:
- Value recalculation.
- No. Do not recalculate the value.
- Correspondence table. Recalculate the value according to the matching table. For example, the fuel level sensor sends a value of 442, this will be 53 liters.
- Calculation table. The calculation table allows you to recalculate the value according to the formula.
- Correspondence table.
- Lower limit. If you want to limit on the lower border, enter a value in this field.
- Upper limit. If you want to limit the top border, enter a value in this field.
- Apply borders to X. The flag of applying the lower and upper bound to the value of X in the table, if the flag is removed, then to the value of Y in the table.
- Calculation table. The calculation table allows you to recalculate the value according to the formula Y = a*X + b, where X, a and b are the columns in the calculation table.
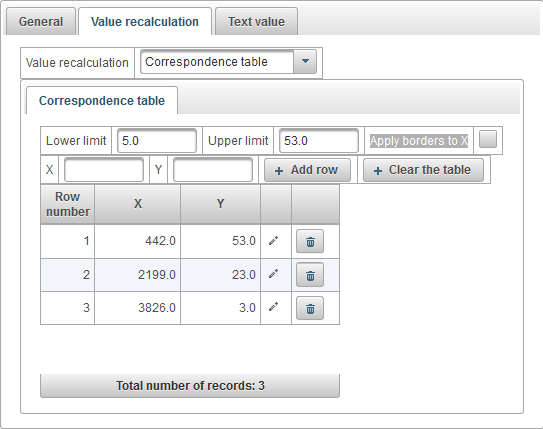
Example of setting the correspondence table for the fuel level sensor. The fuel level sensor sends raw data to the system, we have to convert it to liters, for example, the value 442 is 53 liters, the value 2199 is 23 liters, the value 3826 is 3 liters. We specify a lower bound equal to 5, an upper bound equal to 53 and remove the flag "Apply borders to X", so the lower and upper bounds are applied to the Y column, that is, to the liters. Thus, excluding values in liters below 3 and above 53, this is necessary to exclude erroneous values in liters.
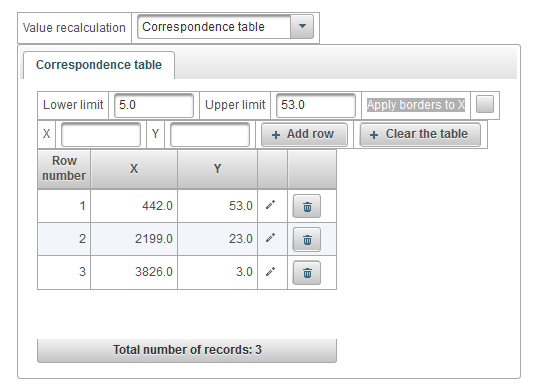
An example of setting a calculation table for converting the supply voltage of the device into an ignition sensor. For example, if the voltage is less than 1V, then the ignition is turned off, that is, the value will be 0 according to the downstream calculation table. If the voltage is greater than 1V, the ignition is on, that is, the value 1.
The "Text value" tab allows you to calculate a text value and consists of the following fields:
- Calculate text value. Flag for converting the value to a text value.
- Text table. The table of the correspondence between the value and the text value.

An example of setting a text table to convert a device's power voltage to a text value. For example, if the voltage is less than 1V, then the text value "Ignition off" will be displayed. If the voltage is greater than 1V, the text value "Ignition on" will be displayed.
The "Custom fields" tab displays custom fields of the object and consists of a table with the following fields:
- Administrative field. The flag of the administrative field, that is, will be visible only to users with the appropriate rights.
- Name. The name of an custom field.
- Value. The value of an custom field.
- - Change record icon. When you click on this icon, you can change the values in the columns of the record.
- - Delete record icon. When you click on this icon, an custom field will be deleted.

To add an custom field, click the "Add record" button.
Trips and parkings detector of the object
The "Trips and parkings detector" tab consists of the following fields:
- Movement detector. Selection of the method of motion detection.
- GPS speed. The movement is fixed if the speed of the object is greater than in the field "Minimum speed, km/h".
- Ignition sensor. The movement is fixed if the ignition sensor is switched on and the speed of the object is greater than in the field "Minimum speed, km/h".
- Minimum speed, km/h. The minimum speed of the beginning of movement, km/h. This is necessary to exclude the GPS error.
- Minimum parking time, seconds. Specify the minimum parking time in seconds for fixing parking.
- Correction to GPS.
- Activate correction by GPS. GPS correction activation flag.
- Minimum number of satellites. Specify the minimum number of satellites.
- Maximum distance between messages, meters. Specify the maximum distance between messages in meters.
- Minimum trip time, seconds. Specify the minimum travel time in seconds.
- Minimum trip distance, meters. Specify the minimum travel distance in meters.
Refuel and defuel detector of the object
The "Refuel and defuel detector" tab consists of the following fields:
- Ignore messages after start of motion, sec. Skip messages after the movement starts at the specified time in seconds.
- Refuel detector. Specify the parameters for fixing refueling.
- Minimum volume of refuel, liters. Specify the minimum amount of fuel change to increase, which should be considered as refueling.
- Search refuels only when stopped. Flag to enable search for refuels only when the object is stopped.
- When calculating refuels take into account all the time. Flag calculating refuels without taking into account the detector of trips and parkings.
- Defuel detector. Specify the parameters for fixing defueling.
- Minimum volume of defuel, liters. Specify the minimum amount of fuel change in the direction of decrease, which should be considered as a defuel.
- Minimum time of defuel, sec. Specify the minimum time for the defuel, which must pass.
- Search defuels in motion. Flag for the search of defuels in motion, and not only when the object is stopped.
- When calculating defuels take into account all the time. Flag counting defuels without taking into account the detector of trips and parkings.
The "Fuel consumption" tab consists of the following fields:
- Fuel consumption rate. Specify the fuel consumption parameters according to the norms.
- Consumption on summer, liters per 100km. Specify the fuel consumption in the summer per 100 km.
- Consumption on winter, liters per 100km. Specify the fuel consumption in winter per 100 km.
- Winter begin. Enter the start date for the winter period.
- Winter end. Specify the end date for the winter period.
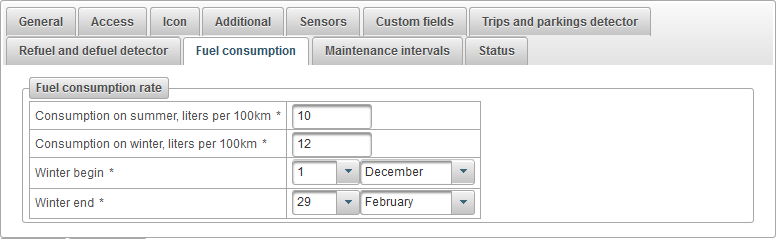
Maintenance intervals of the object
The "Maintenance intervals" tab displays the maintenance intervals table and consists of the following fields:
- Row num. Serial number.
- Work kind. Type of maintenance interval, for example, oil change.
- Description. Custom description of the maintenance interval.
- Interval by mileage. Flag repeat work by mileage, for example every 5000km.
- Interval by motohours. The flag of the repetition of work on the machine hours, for example every 1000 hours.
- Interval by days. Flag repetition of work by days, for example every six months.
- Date and time of last execution of works. The date and time when the maintenance interval was last performed.
- Execution count. The number of times this maintenance interval is performed.
- Status. The textual status of the maintenance interval, for example, "1818 km overdue".
- Actions.
- - open the maintenance interval dialog.
- - add a copy of the maintenance interval.
- - delete the maintenance interval.

To add an object maintenance interval, click on the "Add" button.
The maintenance dialog box for the maintenance interval of the object opens with the following fields:
- Work kind. Type of work, for example, oil change.
- Description. Custom description of the maintenance interval.
- Interval by mileage. Flag repeat work by mileage, for example every 5000km.
- Interval by mileage, km. Specify the mileage interval in km.
- Mileage counter last value, km. The value of the counter at the time of work last time.
- Current mileage, km. The current value of the mileage counter in km.
- Interval by motohours. The flag of the repetition of work on the motohours, for example every 1000 hours.
- Interval by motohours, h. Specify the interval of repeated works in hours.
- Motohour counter last value, h. The value of the counter at the time of work last time.
- Current motohours, h. The current value of the motohour counter in hours.
- Interval by days. Flag repetition of work by days, for example every six months.
- Interval by days, days. Specify the interval of repeated works in days.
- Date and time of last execution of works. Date and time of the work last time.
- Execution count. The number of times this maintenance interval is performed. This counter automatically increases after work is completed.

Use of maintenance intervals.
Maintenance intervals are used for monitoring, a tooltip to the object and extended information about the object can be displayed.
The maintenance intervals can be applied when creating a notification with the type of "Maintenance" notification, then you will be notified of the approaching or overdue maintenance of the object by e-mail, SMS, in a pop-up window or in other ways.
Maintenance intervals can also be used in reports.
The "Status" tab contains the following fields depending on the rights:
- Tariff. The tariff assigned to the object.
- Balance remain. Remain on the balance of the object.
- Days remain. Remain of the days of the object.
- Plan block date by balance. Calculated date, according to which the object is to be blocked by balance.
- Plan block date by days. Calculated date, according to which it is planned to block the object by days.
- Plan block date. Calculated date, according to which the object is to be blocked.
- Blocked. The object block flag, blocked objects can not receive messages on the server.
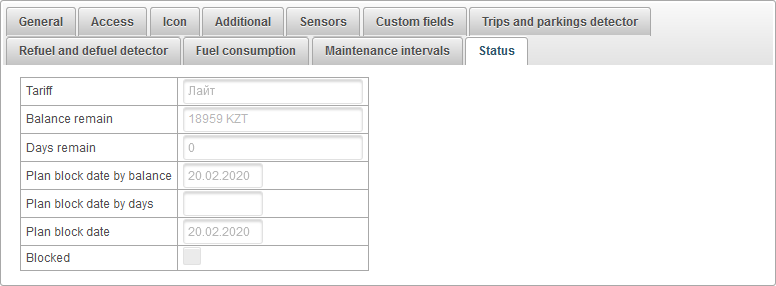
The "Groups of objects" panel allows you to create groups of objects. Objects can be grouped together on a feature or without it. Groups of objects can be used for monitoring by groups of objects.
To open the "Groups of objects" panel, in the top panel, select "Groups of objects" from the drop-down list.
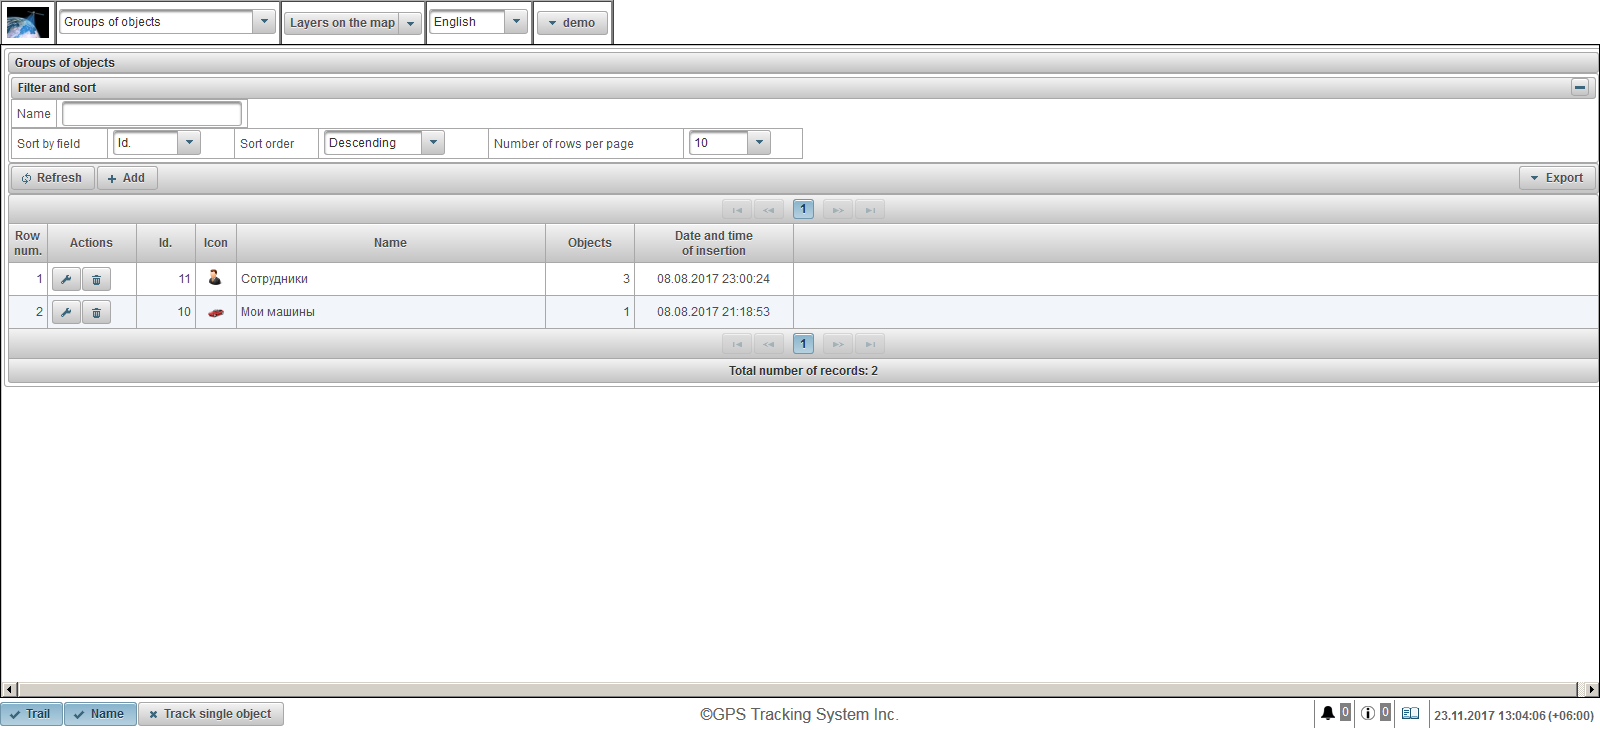
The table of groups of objects consists of the following fields:
- Row num. Serial number.
- Actions.
- - open the properties dialog of a group of objects.
- - delete group of objects.
- Id. The identifier of the record.
- Icon. Icon assigned to a group of objects.
- Name. The name of the group of objects.
- Objects. Number of objects in the group.
- Date and time of insertion. Date and time when the group of objects was created.
In the "Filter and sort" panel, you can configure sorting and filtering of records.
By default, the table is sorted by the field "Id." in descending order. To sort by a particular field, in the "Sort by field" field, select the field you want to sort, in the "Sort order" field, select the sort order and click on the "Refresh" button. It is also possible to filter on the "Name" field. To filter, enter a value for this field and click the "Refresh" button. You can also adjust the number of lines per page in the "Number of rows per page" field.
To create a group of objects, click the "Add" button in the toolbar. The object group properties dialog box opens.
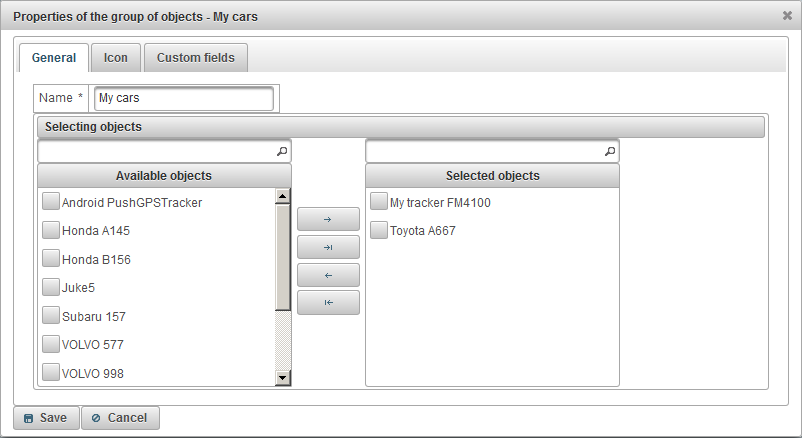
The properties dialog of the group of objects can consist of several tabs:
The "General" tab can consist of the following fields:
- Name. The name of the group of objects.
- Selecting objects.
- Available objects. Displays a list of available objects. There is the possibility of filtering by the name of objects. To add objects to a group, move it with the left mouse button to the right part or double click on the object name. You can also set flags for objects and click on the button
 . To add all the objects to the group, click the button
  .
.
- Selected objects. Displays the list of selected objects. There is the possibility of filtering by the name of objects. To delete objects from the group, move it with the left mouse button to the left part or double click on the object name. You can also set flags for objects and click on the button
 . To delete all objects from the group, click the button
  .
.
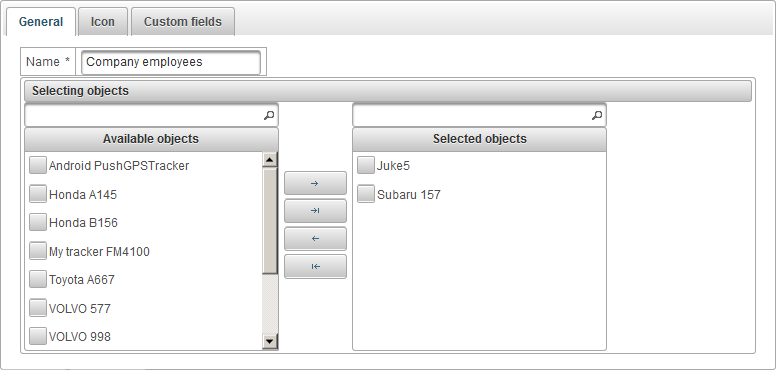
The "Icon" tab consists of the following fields:
- Image. The icon of the group of objects. You can select an icon from the standard library by clicking the "Library" button. You can also upload your own image by clicking on the "Download" button.

The "Custom fields" tab displays custom fields of a group of objects and consists of a table with the following fields:
- Name. The name of an custom field.
- Value. The value of an custom field.
- - Change record icon. When you click on this icon, you can change the values in the columns of the record.
- - Delete record icon. When you click on this icon, an custom field will be deleted.

To add an custom field, click the "Add record" button.
Maintenance
The "Maintenance" panel allows you to register maintenance of objects.
To open the "Maintenance" panel, select "Maintenance" in the top panel from the drop-down list.
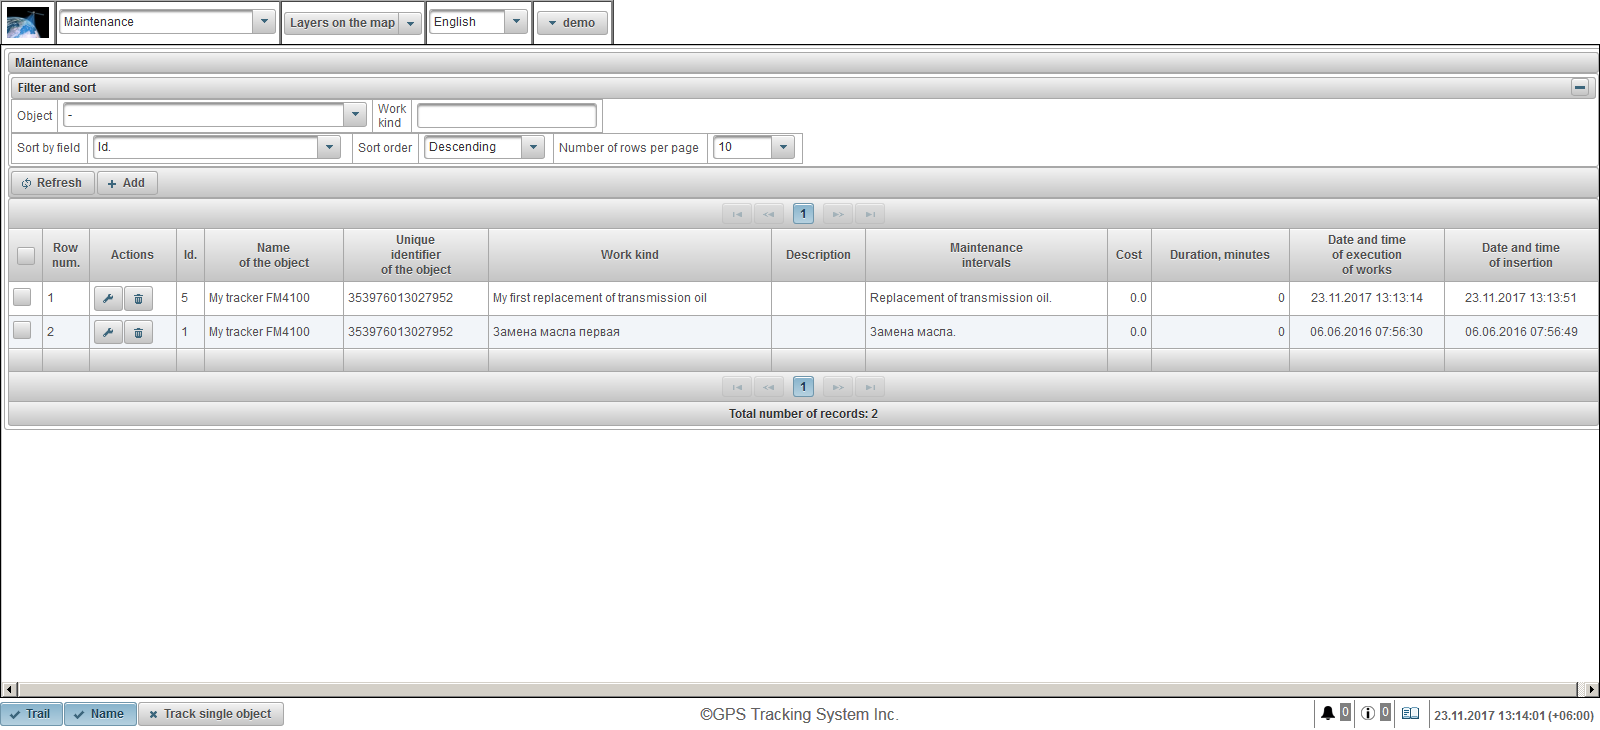
The maintenance registration table for objects consists of the following fields:
- Row num. Serial number.
- Actions.
- - open the maintenance dialog of the object.
- - delete object maintenance.
- Id. The identifier of the record.
- Name of the object. The name of the object.
- Unique identifier of the object. The unique identifier of the object.
- Work kind. Type of work performed.
- Description. Description of the work performed.
- Maintenance intervals. Selected maintenance intervals for the object.
- Cost. Cost of work performed.
- Duration, minutes. Duration of the work.
- Date and time of execution of works. Date and time of work execution.
- Date and time of insertion. The date and time the object was created.
In the "Filter and sort" panel, you can configure sorting and filtering of records.
By default, the table is sorted by the field "Id." in descending order. To sort by a particular field, in the "Sort by field" field, select the field you want to sort, in the "Sort order" field, select the sort order and click on the "Refresh" button. It is also possible to filter on the "Object" and "Work kind" fields. To filter, enter the values for these fields and click the "Refresh" button. You can also adjust the number of lines per page in the "Number of rows per page" field.
To register the maintenance of the object, click the "Add" button in the toolbar. The maintenance dialog box for the object opens.

The dialog box for the maintenance properties of the object can consist of the following fields:
- Object. Select an object from the list.
- Work kind. Enter the name of the type of work performed.
- Description. The description of the completed works, an optional field.
- Maintenance intervals. This field displays a list of maintenance intervals that are on the "Maintenance" tab in the properties of this object. Mark the maintenance intervals that have been carried out. This is necessary in order for the interval intervals to be zeroed according to the maintenance intervals and the countdown of days / hours / kilometers started anew.
- Cost. Cost of service.
- Duration, minutes. Duration of service in minutes.
- Mileage counter value, km. Current mileage counter value in km. By default, the current mileage counter value is displayed in km.
- Motohour counter value, h. Current motohour counter value in hours. By default, the current motohour counter value is displayed.
- Date and time of execution of works. Date and time of service. The current date and time are displayed by default.
The "Clients" panel allows you to create clients, as a client can serve individuals or legal entities.
To open the "Clients" panel, select "Clients" from the drop-down list in the top panel.
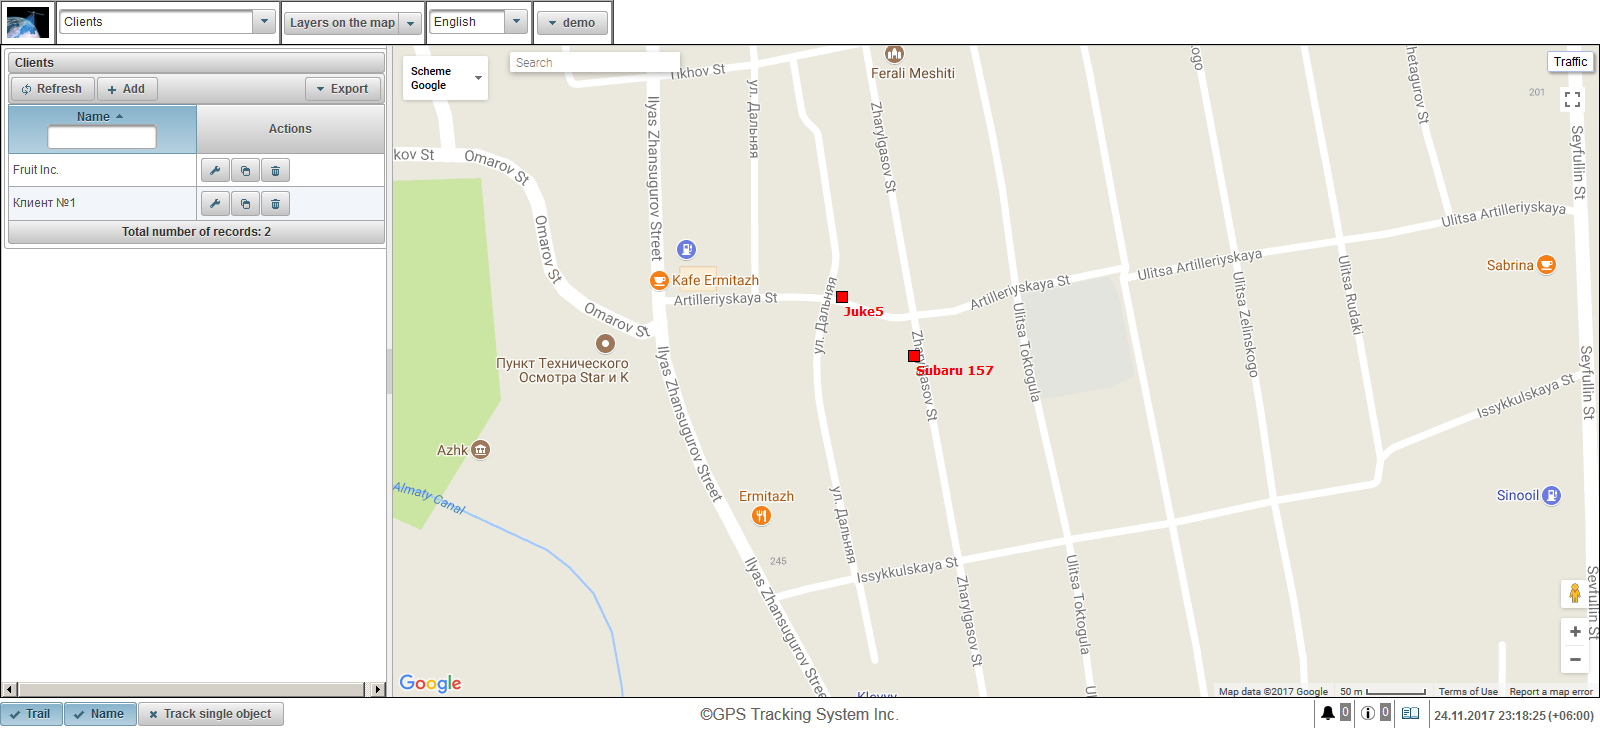
The client table consists of the following fields:
- Name. Client name.
- Actions.
- - open the client properties dialog.
- - add a copy of the client.
- - delete the client.
There is the possibility of filtering by client's name. You can export the list of clients by clicking on the "Export" button.
To create a client, click the "Add" button in the toolbar. The client properties dialog box opens.
The client properties dialog can consist of several tabs:
The "General" tab consists of the following fields:
- Name. Client name.
- Description. Description of the client, optional field.

The "Custom fields" tab displays custom fields of the client and consists of a table with the following fields:
- Name. The name of an custom field.
- Value. The value of an custom field.
- - Change record icon. When you click on this icon, you can change the values in the columns of the record.
- - Delete record icon. When you click on this icon, an custom field will be deleted.
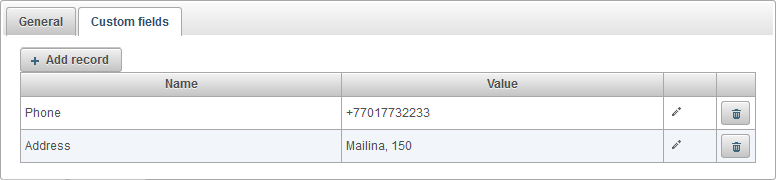
To add an custom field, click the "Add record" button.
The "Waybills" panel allows you to create waybills and automate the calculation of values in a waybill.
To open the "Waybills" panel, in the top panel from the drop-down list, select "Waybills".
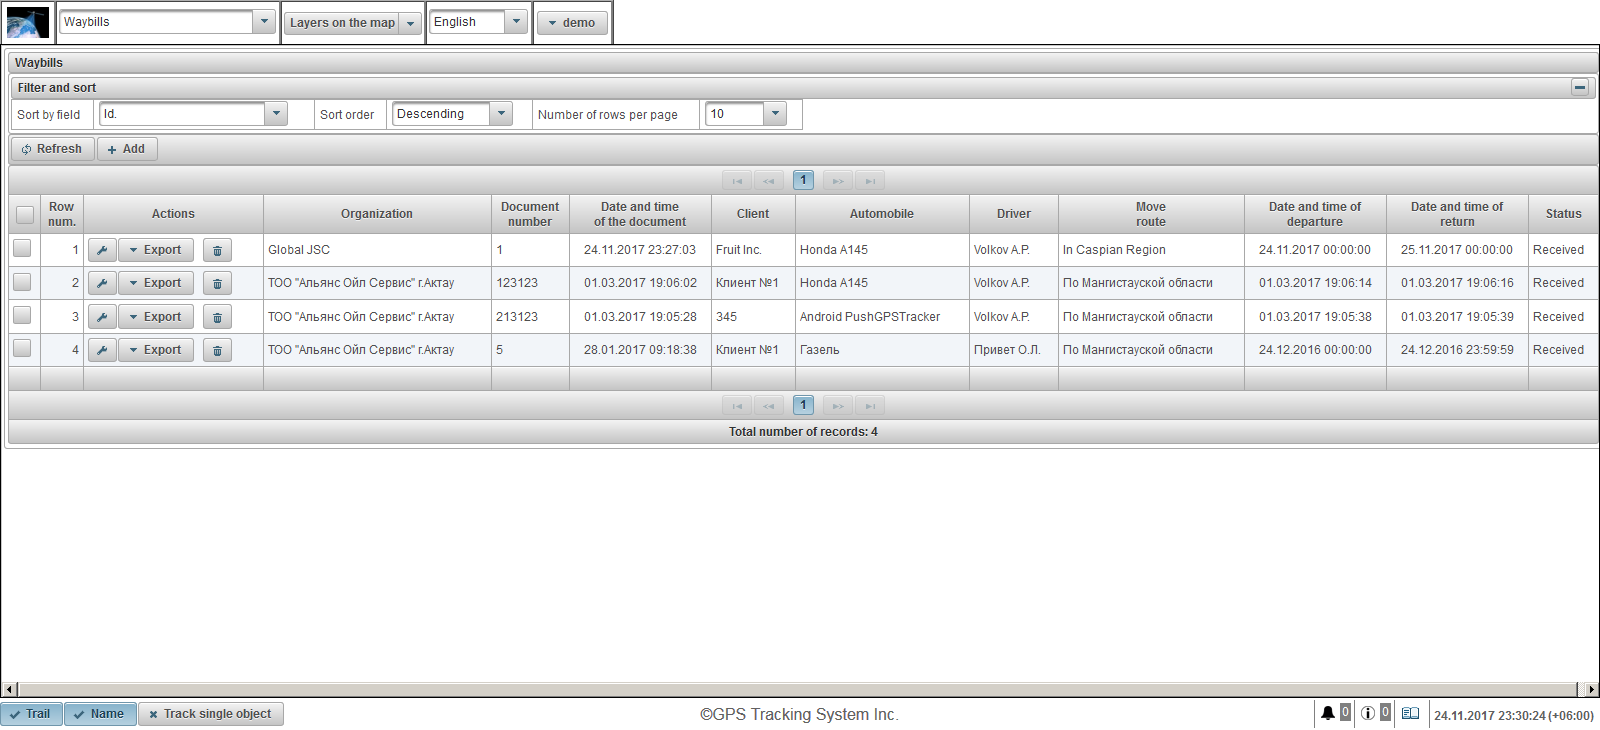
The table of waybills consists of the following fields:
- Row num. Serial number.
- Actions.
- - open the properties dialog of the waybill.
- Export. Select the format for exporting a waybill, for example PDF.
- - delete the waybill.
- Organization. The name of the organization that writes out the waybill.
- Document number. Number of the waybill.
- Date and time of the document. Date and time of the waybill.
- Client. The client served by this organization.
- Automobile. Attached vehicle.
- Driver. Attached driver.
- Move route. The route of the driver's movement.
- Date and time of departure. Date and time of departure from the base.
- Date and time of return. Date and time of return to the base.
- Status. Status of a waybill.
By default, the table is sorted by the field "Id." in descending order. To sort by a particular field, in the "Sort by field" field, select the field you want to sort, in the "Sort order" field, select the sort order and click on the "Refresh" button. You can also adjust the number of lines per page in the "Number of rows per page" field.
To create a waybill, click the "Add" button in the toolbar. The properties dialog of the waybill opens.
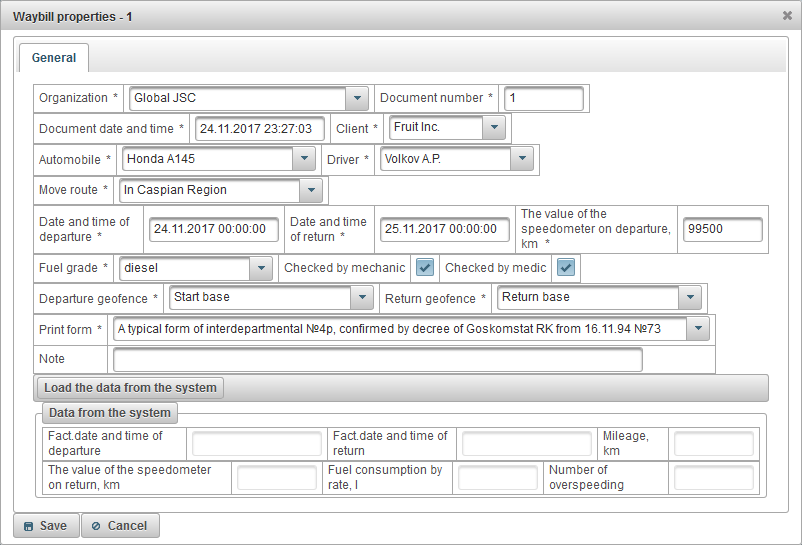
The properties dialog of the waybill consists of the following fields:
- Organization. Select from the list or type the name of the organization manually.
- Document number. Enter the number of the waybill.
- Document date and time. Enter the date and time of the waybill.
- Client. Select a client from the list.
- Automobile. Choosing a car for a trip.
- Driver. Choice of driver for the trip.
- Move route. Enter the route.
- Date and time of departure. Date and time of departure from the base.
- Date and time of return. Planned date and time of return to the base.
- The value of the speedometer on departure, km. Car mileage on the departure in km.
- Fuel grade. A mark of fuel, for example, gasoline.
- Checked by mechanic. Flag check by the mechanic.
- Checked by medic. Flag check by the medic.
- Departure geofence. The choice of geofence from which the car left. This base will be a geofence.
- Return geofence. Expected return base, selection from the list.
- Print form. Select a print form from the list.
- Note. Custom note, optional field.
After the car returns to the base, go to the properties of the waybill and click on the "Load the data from the system" button.
The system will automatically calculate the following fields:
- Fact.date and time of departure. Based on messages from the object, the system calculates when the car actually left the base.
- Fact.date and time of return. Based on the messages from the object, the system calculates when the car actually returned to the base.
- Mileage, km. Based on messages from the object, the system calculates the actual mileage from the time of departure from the base and return to the base.
- The value of the speedometer on return, km. Automatically calculated by the system, is equal to the difference in the value of the field "Mileage, km" and the field "The value of the speedometer on departure, km".
- Fuel consumption by rate, l. Automatically calculated by the system, is equal to the value in the field "Mileage, km", multiplied by the fuel consumption at the rate, which is set on the "Fuel consumption" tab in the properties of the object.
- Number of overspeeding. The system automatically calculates speed violations, according to the speeding settings on the "Additional" tab in the properties of the object.
The printing form of a waybill may look like this.
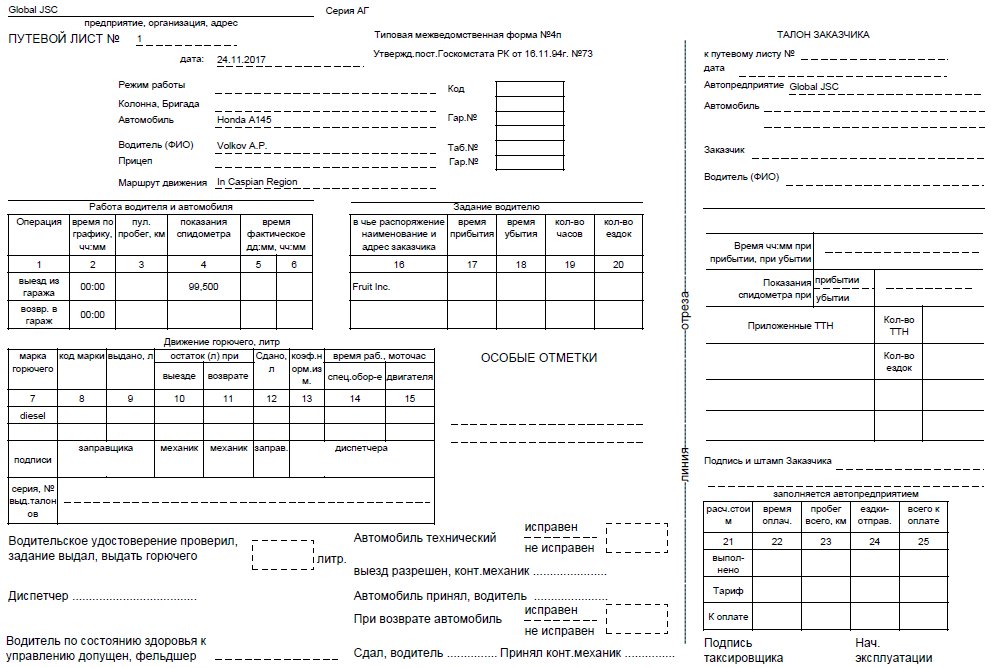
The "Sites" panel is available only for dealers and allows you to customize the dealer's website under your domain, with your logo, system name, copyright and much more.
To open the "Sites" panel, in the top panel, select "Sites" from the drop-down list.
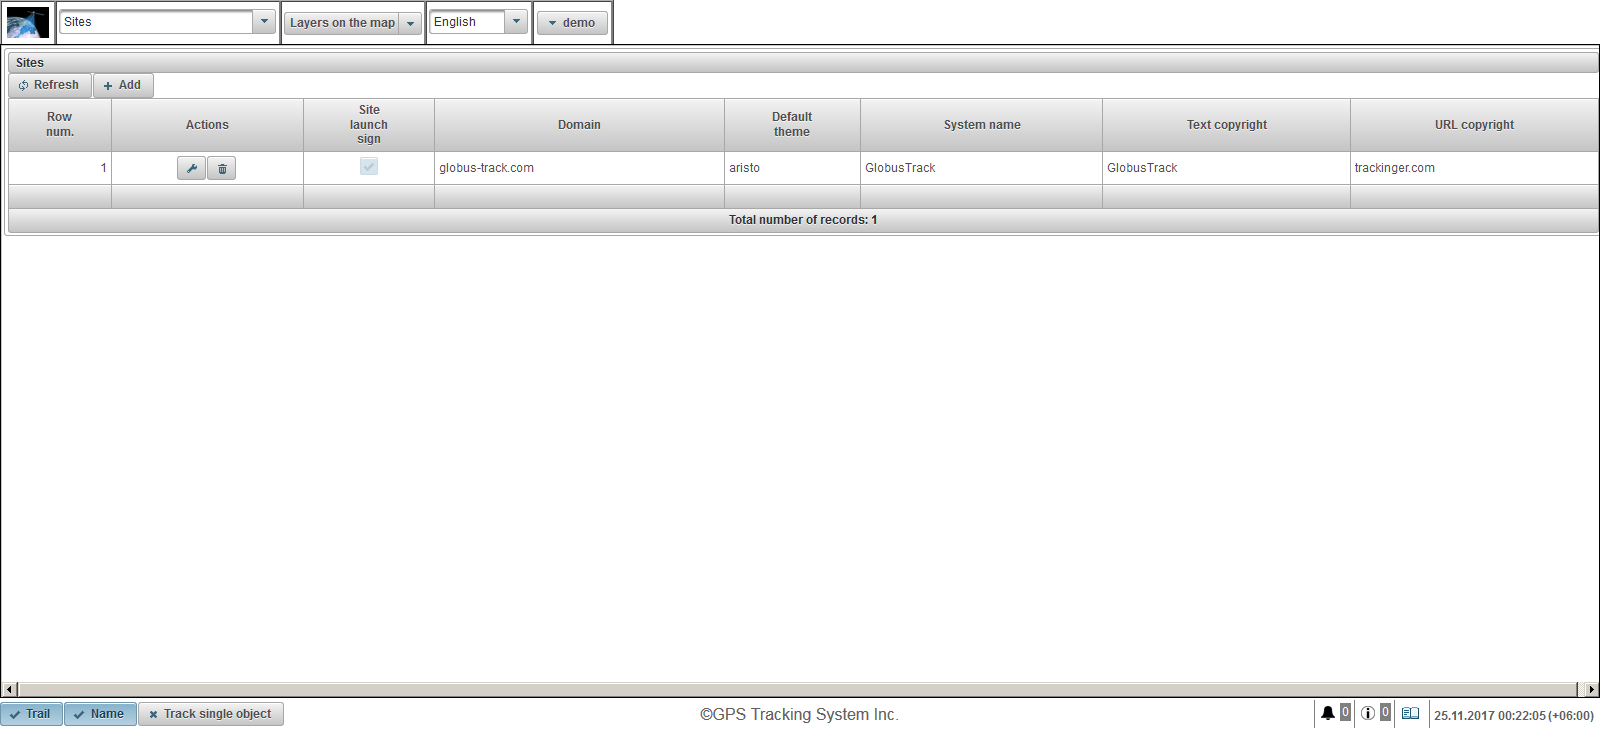
The site table consists of the following fields:
- Row num. Serial number.
- Actions.
- - open the site properties dialog.
- - delete site.
- Site launch sign. Site launch flag. If the site is not running, users will not be able to log in to the specified domain.
- Domain. The domain under which the dealer launchs the site to provide monitoring services.
- Default theme. The default theme for new users of the dealer. The theme is a combination of colors, backgrounds, icons and buttons. The default is "aristo".
- System name. The name of the system under which the dealer will provide services.
- Text copyright. The text that appears in the bottom panel in the middle.
- URL copyright. URL of the page to which the user will click on the text of the copyright. The page will open in a browser in a new window.
To create a site, click the "Add" button in the toolbar. The site properties dialog box opens.
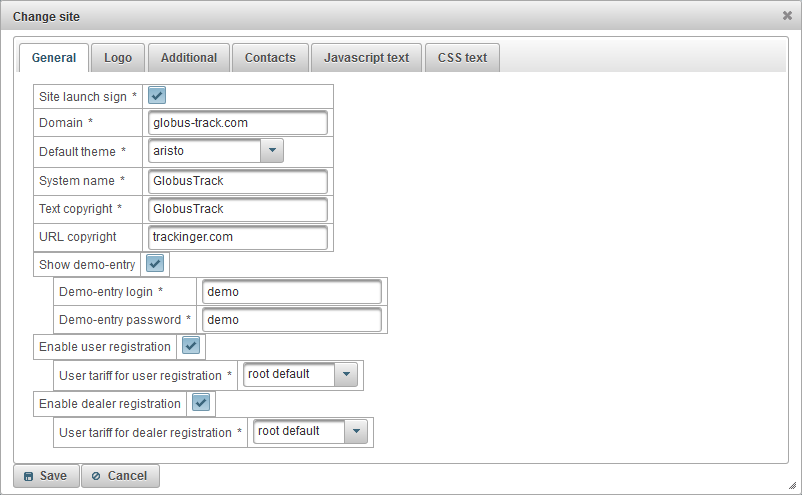
The site properties dialog box consists of the following tabs:
- General.
- Logo.
- Additional.
- Contacts.
- Javascript text.
- CSS text.
The "General" tab consists of the following fields:
- Site launch sign. The flag for launching the website. If the website is not running, users will not be able to log in to the specified domain.
- Domain. The domain under which the dealer runs a website to provide monitoring services. In order for the dealer's web site to work under the specified domain, you need to create or change a type A record in the DNS control panel of the specified domain and specify the IP address 148.251.67.207 or 148.251.67.210.
- Default theme. The default theme for new users of the dealer. The theme is a combination of colors, backgrounds, icons and buttons. The default is "aristo".
- System name. The name of the system under which the dealer will provide monitoring services.
- Text copyright. The text that will be displayed in the bottom panel.
- URL copyright. URL of the page to which the user will click on the text of the copyright. The page will open in a browser in a new window.
- Show demo-entry. The flag for displaying the link "Demo" on the system login page, it is useful for acquaintance of the user with the system without registration.
- Demo-entry login. Login, under which the user will go by clicking on the link "Demo".
- Demo-entry password. The password under which the user will go by clicking on the link "Demo".
- Enable user registration. The flag to enable the user to register for himself, the link "Registration" will be displayed.
- User tariff for user registration. Tariff that will be assigned to the user on self-registration.
- Enable dealer registration. The flag to enable the user to register by himself, the link "Registration" will be displayed and the "Dealer" flag will be available when registering.
- User tariff for dealer registration. Tariff that will be assigned to the dealer on self-registration.
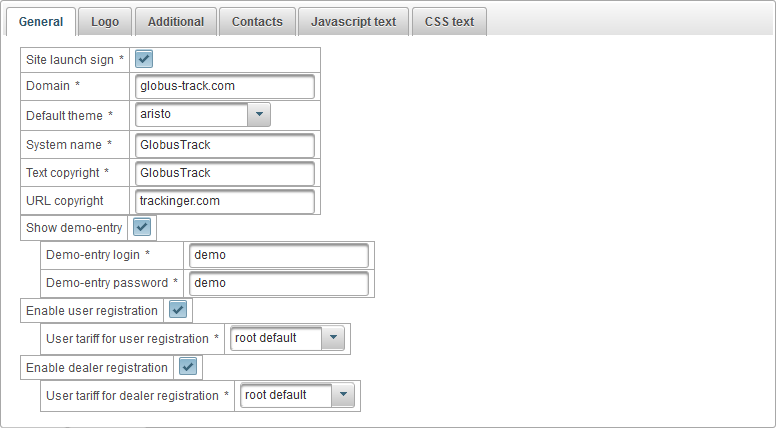
The "Logo" tab consists of the following fields:
- Logo image. Upload a logo that will be displayed after logging in.
- Image logo at the entrance. Upload a logo that will be displayed at the login.
- Favicon. Upload the site icon (site icon or favicon), which will be displayed in the browser.
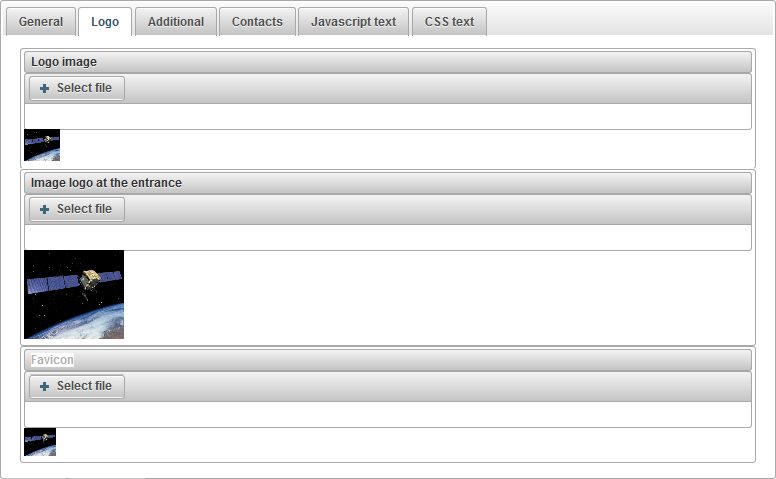
The "Additional" tab consists of the following fields:
- Show tariff costs. A flag displaying the cost of tariffs on the dealer's website.

The "Contacts" tab consists of the following fields:
- Contacts. Allows you to specify the text that will be displayed on the "Contacts" page of the dealer's website in different languages, on top there is language switch. Usually here you specify e-mail, phone numbers, address and other details of the dealer.
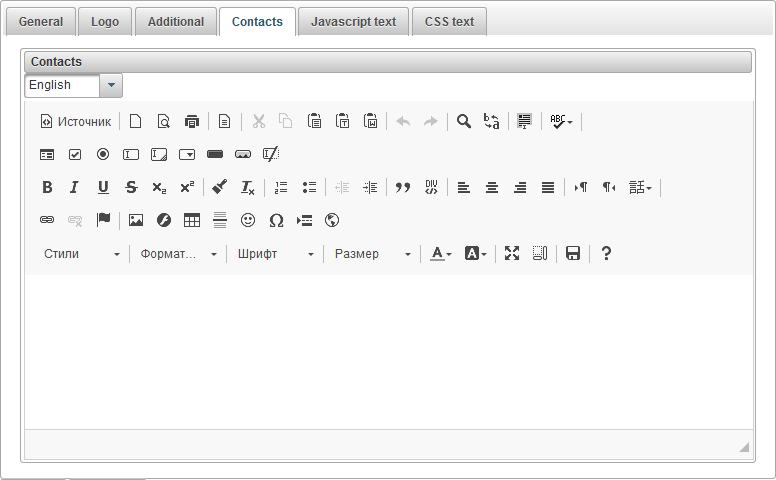
The "Javascript text" tab consists of the following fields:
- Javascript text. Allows you to specify the Javascript text to be executed on the dealer's website. Usually here you specify the Javascript text of Google Analytics, Yandex.Metrica or other.
The "CSS text" tab consists of the following fields:
- CSS text. Allows you to specify the text of the CSS that will be applied to the dealer's website. CSS is a style language that defines the display of HTML documents. For example, CSS works with fonts, colors, fields, lines, height, width, background images, positioning elements, and many other things.
The "User tariffs" panel is available only for dealers and allows you to set tariffs for dealer users and enable billing. You can restrict user actions and set the cost of services. You can set a minimum balance in which to block the user and much more.
To open the "User tariffs" panel, in the top panel, select "User tariffs" from the drop-down list.
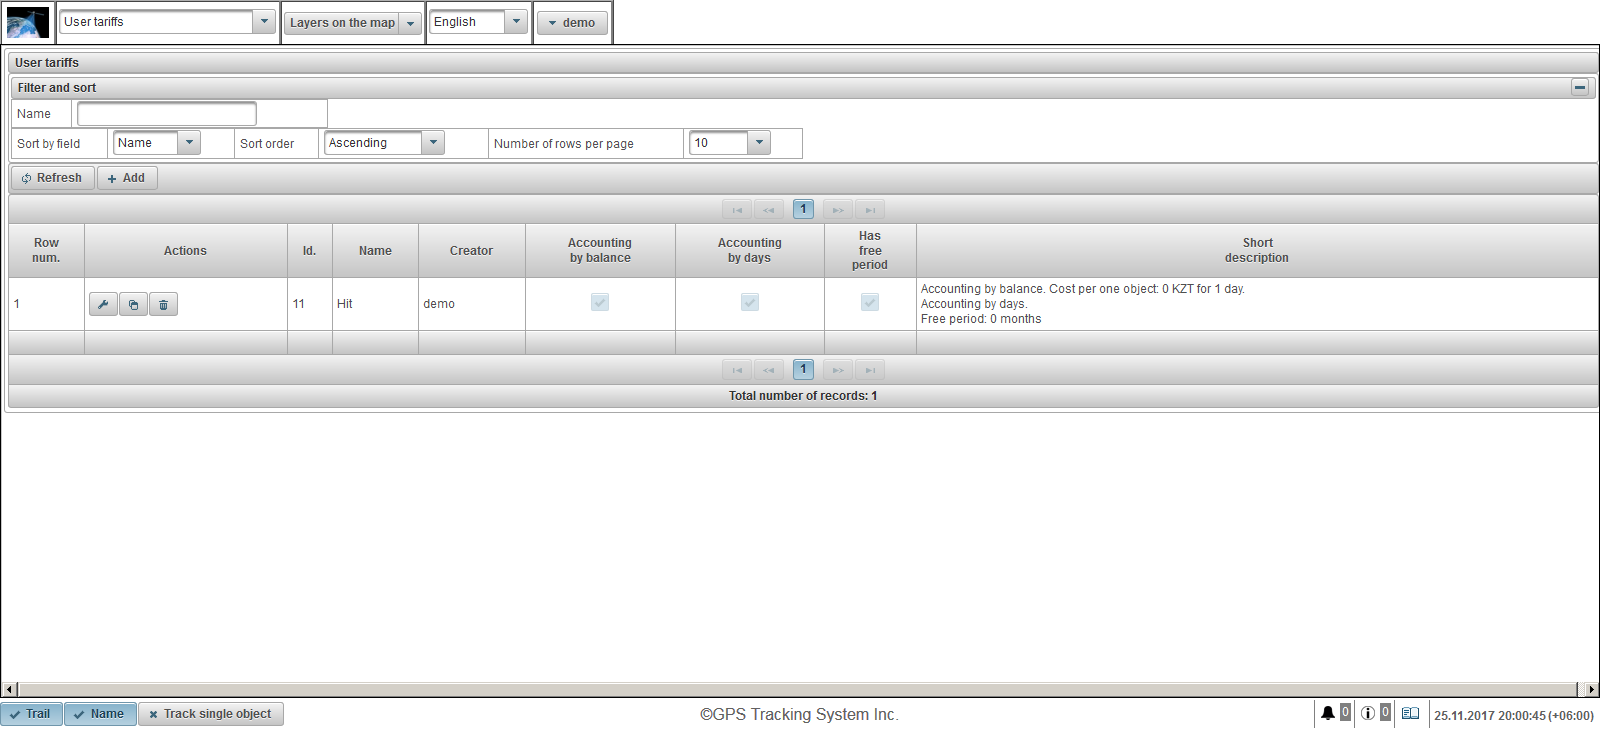
The user tariff table consists of the following columns:
- Row num. Serial number.
- Actions.
- - open the user tariff properties dialog.
- - add a copy of the user tariff.
- - delete user tariff.
- Id. The identifier of the record.
- Name. The name of the user's tariff.
- Creator. The user who created the user's tariff.
- Accounting by balance. Flag for accounting by balance.
- Accounting by days. Flag for accounting by days.
- Has free period. Flag of inclusion of the free period.
- Short description. Short description of the user's tariff.
To create a user tariff, click the "Add" button in the toolbar. The user tariff properties dialog box opens.
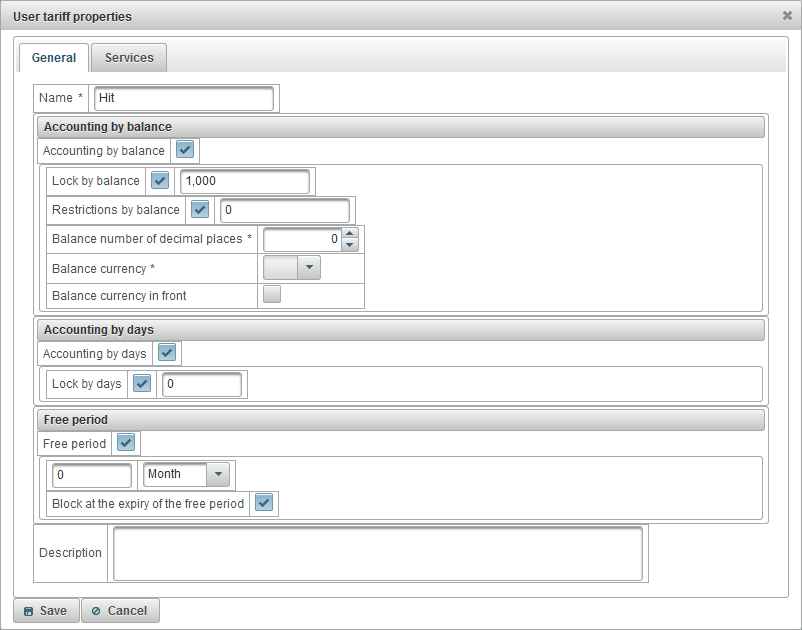
The user tariff properties dialog box consists of the following tabs:
The "General" tab can consist of the following fields:
- Name. The name of the user's tariff.
- Accounting by balance. Flag for accounting on balance.
- Lock by balance. To enable balance blocking, set the flag and specify the balance level (the amount of money on the account) at which the user will automatically block and can not log into the system. 7 days before the user is blocked, the user will receive e-mail messages about the forthcoming blocking.
- Restrictions by balance. Specify the level of balance at which paid services will be banned to the user.
- Balance number of decimal places. Specify the number of digits after the decimal point, if an integer, then specify zero.
- Balance currency. Select the balance currency from which the system will keep records.
- Balance currency in front. Flag for placing the currency balance in front of the amount.
- Accounting by days. Flag of accounting by day.
- Lock by days. To enable blocking by day, set the flag and specify the remainder of the number of days at which the user automatically blocks and can not log in. 7 days before the user is blocked, the user will receive e-mail messages about the forthcoming blocking.
- Free period. To enable the free period, set the flag and specify the period of free provision of the service to the user.
- Block at the expiry of the free period. The user's lock flag at the expiration of the free period, the user will be blocked if the "Lock by balance" flag and the balance below the specified amount are valid or the "Lock by days" flag and the remainder of the days below the specified number of days are valid.
- Description. Arbitrary description, optional field.
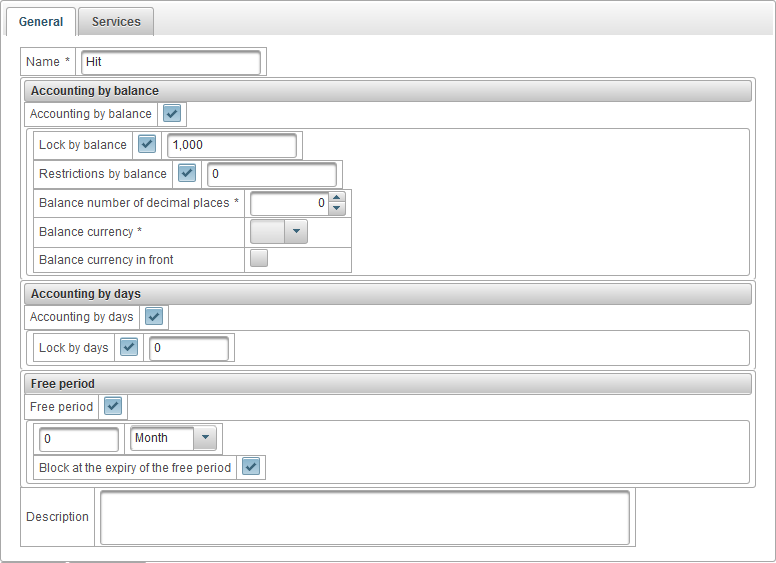
The "Services" tab displays a list of all available services, as well as their quantity and cost. It is possible to enable or disable any services, change the maximum number and cost of the service.
The service table consists of the following columns:
- №. Serial number.
- Service. Name of the service.
- Enables. The service activation flag.
- Cost correspondence table. For example, it is possible to specify the cost of the service depending on the number of objects. If you do not want to divide the cost of the service depending on the quantity, add one record, then in the "Quantity" field, specify 1 and enter the cost in the "Cost" field.
 - Add a record to the table.
- - Clear the table.
- Frequency of charge.
- Day. The system will charge a daily fee.
- Month. The system will charge a monthly fee.
- Year. The system will annually charge a fee.
- Max quantity. The maximum allowed number.
- Max quantity limit. The maximum number from the top user. If the top user has set the maximum amount to 100, then we can not specify more than 100 in the field "Max quantity", that is, it is limited from above.
- - change record. To change the record, click on this icon.
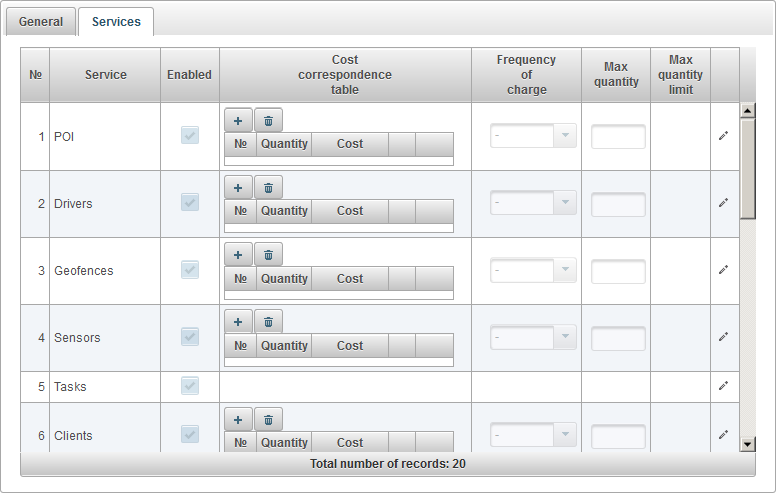
The "Balance operations of users" panel is available only for dealers and allows you to add operations to the balance of users, for example, when the user pays for the services provided or when you want to manually remove the balance from the user for the services provided.
To open the "Balance operations of users" panel, in the top panel, select "Balance operations of users" from the drop-down list.
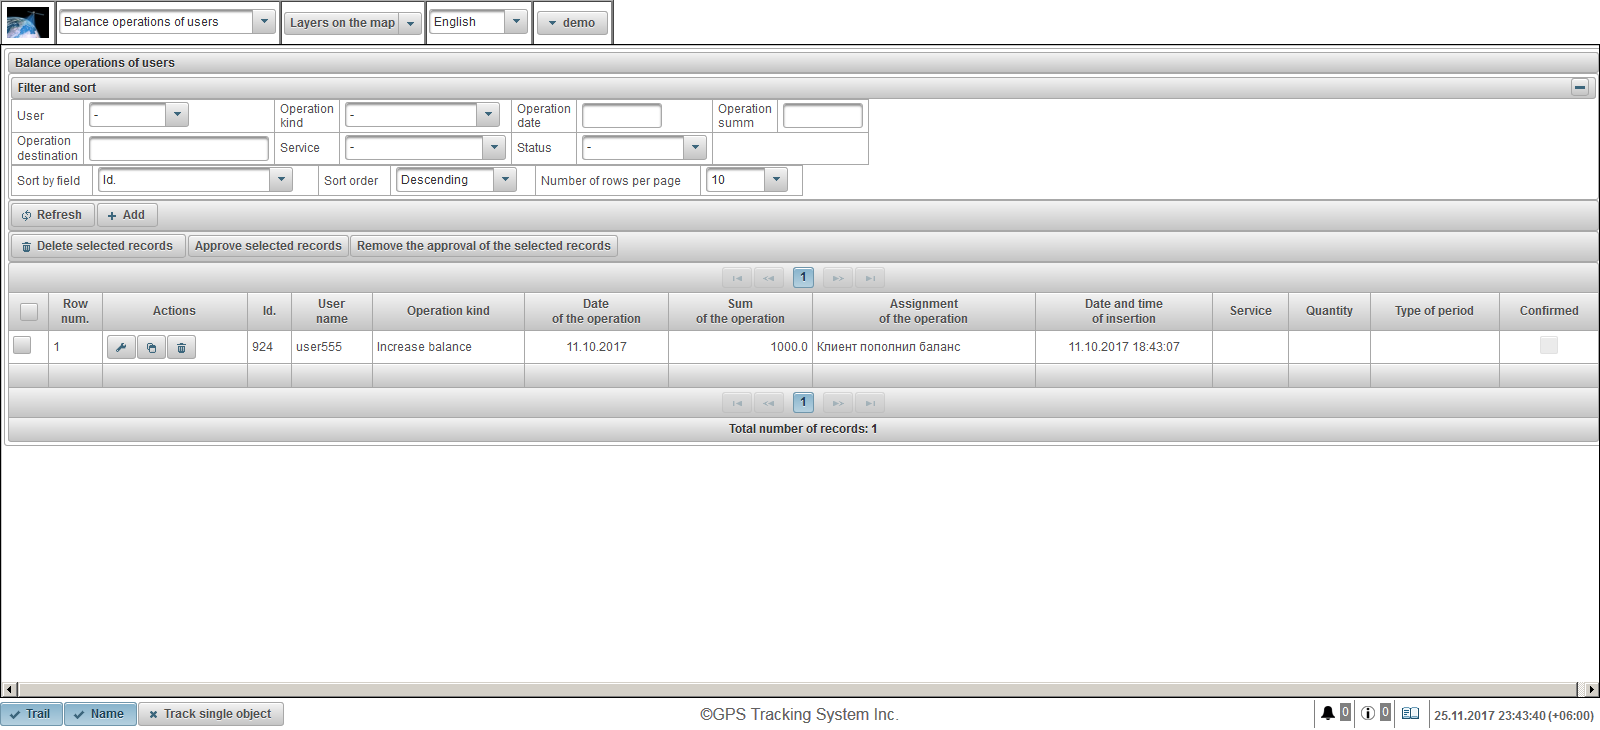
The user balance table consists of the following columns:
- - Operation selection flag.
- Row num. Serial number.
- Actions.
- - open the properties dialog for the user balance.
- - add a copy of the operation to the user's balance.
- - delete operation on the user's balance.
- Id. The identifier of the record.
- User name. User name.
- Operation kind. Type of operation.
- Date of the operation. Date of the operation.
- Sum of the operation. The amount of the transaction.
- Assignment of the operation. The text of the operation assignment.
- Date and time of insertion. The date and time the operation was created.
- Service. Name of the service.
- Quantity. Quantity of the operation.
- Type of period. Operation period type.
- Confirmed. Approval flag.
In the "Filter and sort" panel, you can configure sorting and filtering of records.
By default, the table is sorted by the field "Id." in descending order. To sort by a particular field, in the "Sort by field" field, select the field you want to sort, in the "Sort order" field, select the sort order and click on the "Refresh" button. You can also filter by the fields "User", "Operation kind", "Operation date", "Operation summ", "Operation destination", "Service" and "Status". To filter, enter the values for these fields and click the "Refresh" button. You can also adjust the number of lines per page in the "Number of rows per page" field.
To delete the selected records, click the "Delete selected records" button. To approve the selected records, click the "Approve selected records" button. To remove the approval from the selected records, click on the "Remove the approval of the selected records" button.
To create an operation for the user's balance, click the "Add" button in the toolbar. The properties dialog for the user balance operation opens.
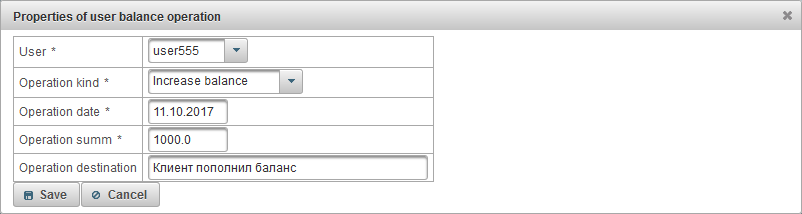
The properties dialog for the user balance operation consists of the following fields:
- User. Select the user on which to perform the operation on the balance.
- Operation kind.
- Increase balance. If you want to recharge the user, for example, if the user paid.
- Decrease balance. If you want to take the balance off the user.
- Operation date. Date of operation.
- Operation summ. The amount of the transaction.
- Operation destination. The purpose of the operation, an arbitrary text field is optional.
- Service. This field is visible if the operation type "Decrease balance" is selected. The choice of the service by which the operation will be performed is an optional field.
- Quantity. This field is visible if the operation type "Decrease balance" is selected. If you want to specify in one day, enter 1 in the "Quantity" field and select "Day" in the "Type of period" field.
- Type of period. This field is visible if the operation type "Decrease balance" is selected. If you want to specify in one month, enter 1 in the "Quantity" field and select "Month" in the "Type of period" field.
The panel "Day operations of users" is available only for dealers and allows you to add operations by user days, for example when the user wants to pay for 20 days of using the system or when you want to manually take days off from the user.
To open the "Day operations of users" panel, in the top panel, select "Day operations of users" from the drop-down list.

The table of operations by user days consists of the following columns:
- - Operation selection flag.
- Row num. Serial number.
- Actions.
- - open the operation properties dialog by user days.
- - add a copy of the operation by user day.
- - delete the operation by user's day.
- Id. The identifier of the record.
- User name. User name.
- Operation kind. Type of operation.
- Date of the operation. Date of the operation.
- Day count. Amount of days.
- Assignment of the operation. The text of the operation assignment.
- Date and time of insertion. The date and time the operation was created.
- Confirmed. Approval flag.
In the "Filter and sort" panel, you can configure sorting and filtering of records.
By default, the table is sorted by the field "Id." in descending order. To sort by a particular field, in the "Sort by field" field, select the field you want to sort, in the "Sort order" field, select the sort order and click on the "Refresh" button. You can also filter by fields "User", "Operation kind", "Operation date", "Day count", "Operation destination" and "Status". To filter, enter the values for these fields and click the "Refresh" button. You can also adjust the number of lines per page in the "Number of rows per page" field.
To delete the selected records, click the "Delete selected records" button. To approve the selected records, click the "Approve selected records" button. To remove the approval from the selected records, click on the "Remove the approval of the selected records" button.
To create an operation by user's days, click the "Add" button in the toolbar. The operation properties dialog will be opened by user's days.
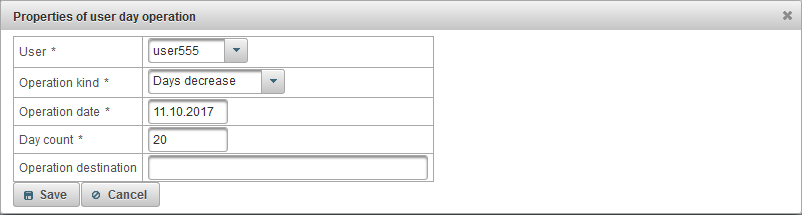
The operation properties dialog box for user days consists of the following fields:
- User. Select the user on which to perform the operation on the balance.
- Operation kind.
- Days increase. For example, if the user paid for 20 days of using the system.
- Days decrease. For example, if you want to take days off from a user.
- Operation date. Date of operation.
- Day count. Number of days of operation.
- Operation destination. The purpose of the operation, an arbitrary text field is optional.
The "Tariffs of objects" panel is available only for dealers and allows you to set tariffs for objects and enable billing for objects. You can set the minimum balance at which to block the object, subscription fee, the period of data storage and much more.
To open the "Tariffs of objects" panel, in the top panel from the drop-down list, select "Tariffs of objects".
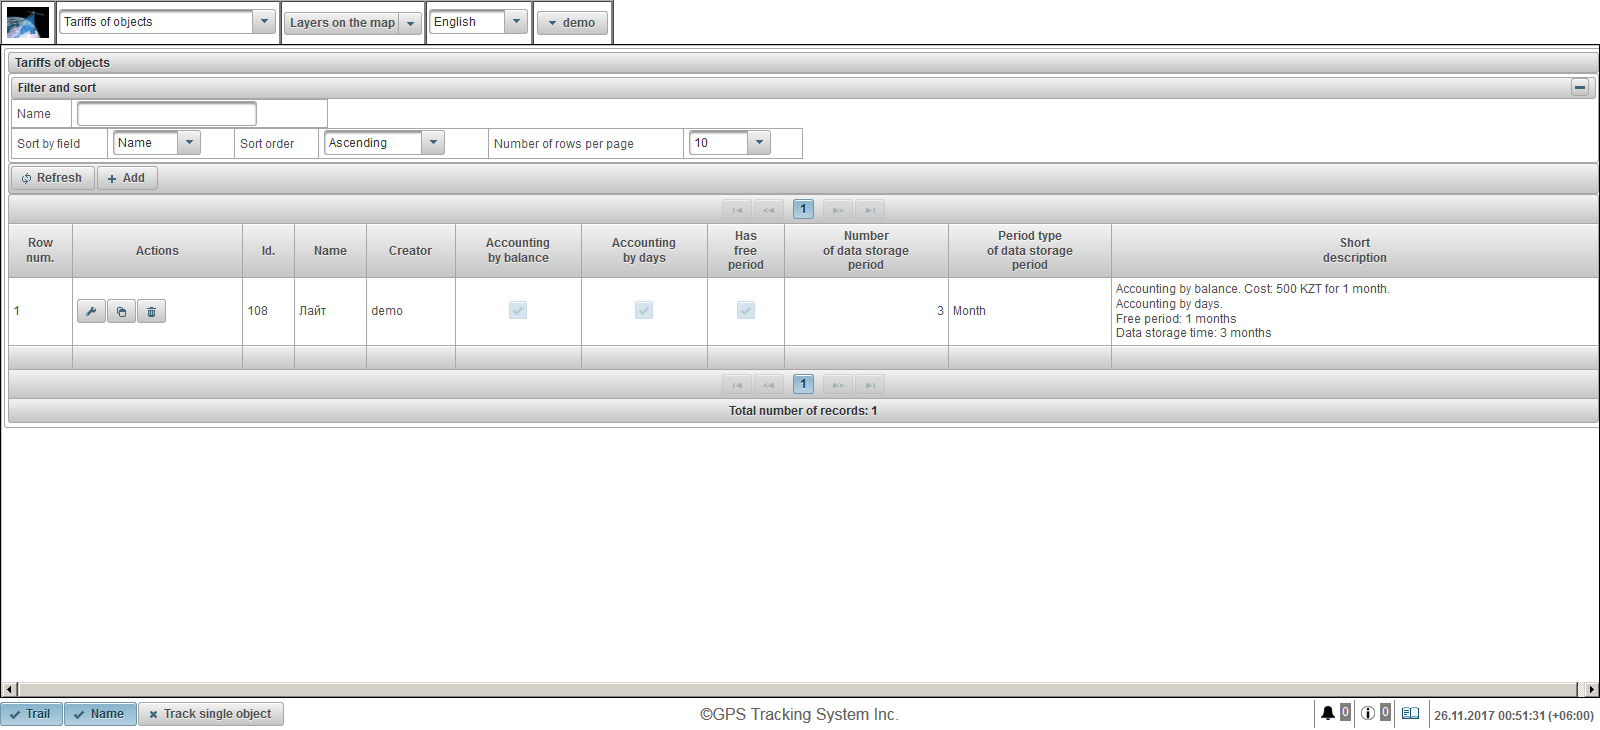
The tariffs table for objects consists of the following columns:
- Row num. Serial number.
- Actions.
- - open the tariff property dialog of the object.
- - add a copy of the tariff of the object.
- - delete the tariff of the object.
- Id. The identifier of the record.
- Name. Name of the tariff of the object.
- Creator. The user who created the tariff of the object.
- Accounting by balance. Flag for accounting on balance.
- Accounting by days. Flag of accounting by day.
- Has free period. Flag of inclusion of the free period.
- Number of data storage period. The amount of data storage period.
- Period type of data storage period. The type of the storage period of the data.
- Short description. Brief description of the tariff.
To create an object tariff, click on the "Add" button in the toolbar. The tariff properties dialog box appears.
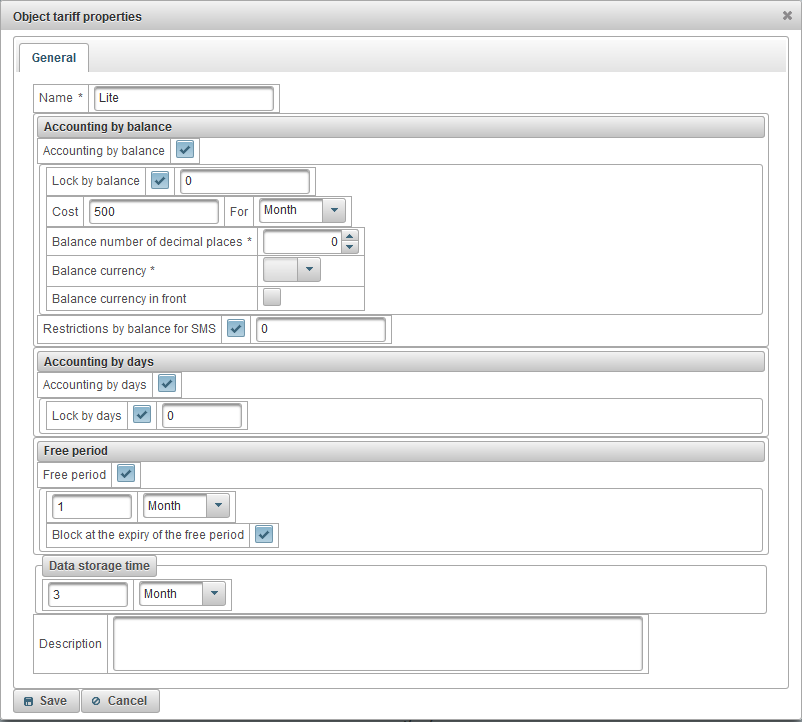
The dialog box for the object's tariff properties consists of the following fields:
- Name. Name of the tariff of the object.
- Accounting by balance. Flag for accounting on balance.
- Lock by balance. To enable balance blocking, set the flag and specify the balance level (the amount of money on the account) at which the object will be automatically blocked. 7 days before the object is blocked, the user will receive e-mail messages about the forthcoming blocking.
- Cost. Specify the monthly fee and select the frequency of charging a subscription fee.
- Balance number of decimal places. Specify the number of digits after the decimal point, if an integer, then specify zero.
- Balance currency. Select the balance currency from which the system will keep records.
- Balance currency in front. Flag for placing the currency balance in front of the amount.
- Restrictions by balance for SMS. Specify the balance level at which SMS messages will be banned by the object.
- Accounting by days. Flag of accounting by day.
- Lock by days. To enable blocking by day, set the flag and specify the remainder of the number of days when the object is automatically blocked. 7 days before the object is blocked, the user will receive e-mail messages about the forthcoming blocking.
- Free period. To enable the free period, set the flag and specify the period of free provision of the service to the object.
- Block at the expiry of the free period. The object lock flag at the expiration of the free period, the object will be blocked if the "Lock by balance" flag and balance is below the specified amount or the "Lock by days" flag and the rest of days below the specified number of days.
- Data storage time. Specify the storage period for the data.
- Description. Arbitrary description, optional field.
The panel "Balance operations of objects" is available only for dealers and allows you to add operations on the balance of objects, for example, when the user pays a monthly fee for the object or when you want to manually remove the balance from the object for the services provided.
To open the "Balance operations of objects" panel, in the top panel, from the drop-down list, select "Balance operations of objects".
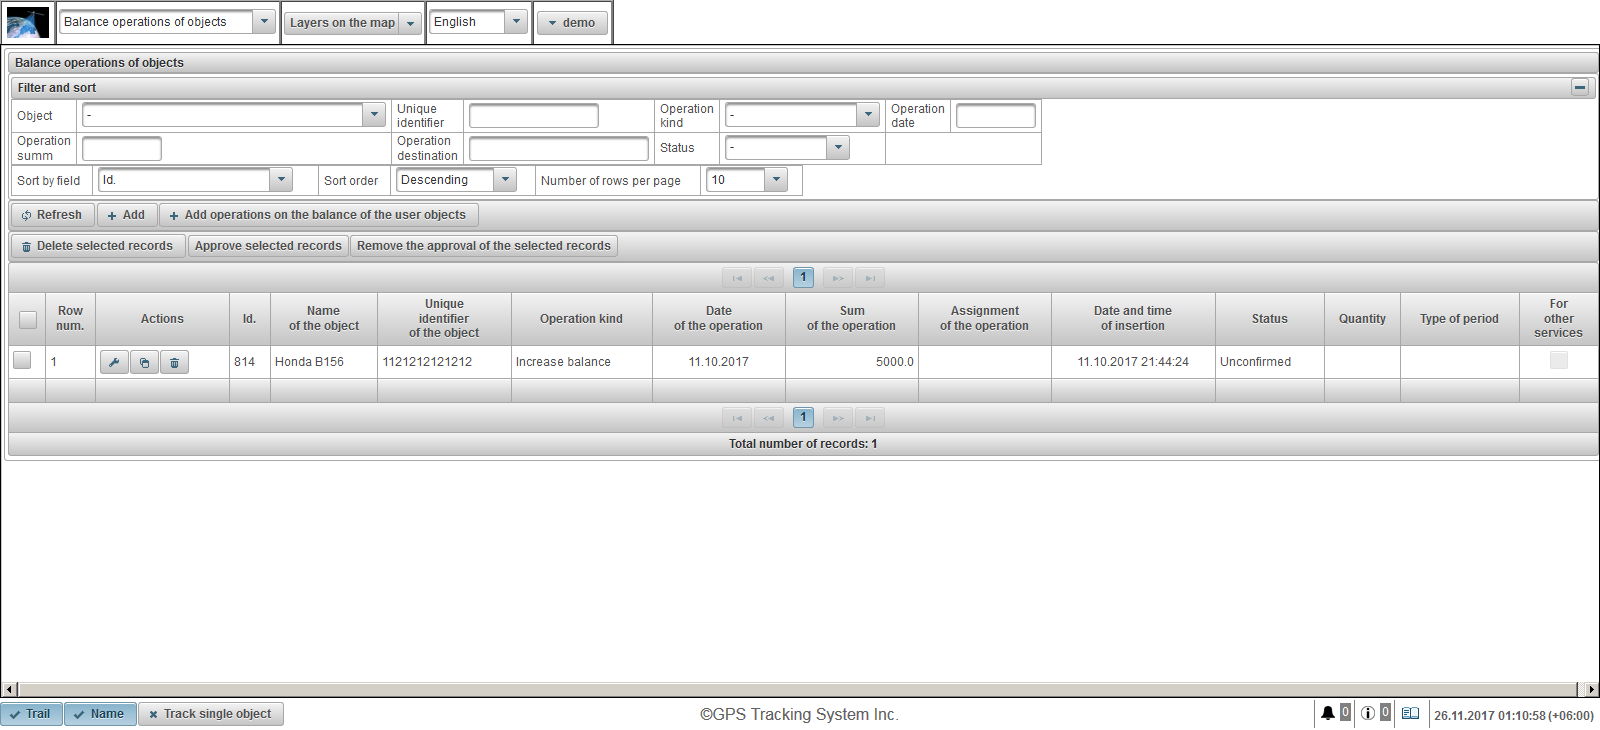
The table of operations for the balance of objects consists of the following columns:
- - Operation selection flag.
- Row num. Serial number.
- Actions.
- - open the properties dialog for the operation by object balance.
- - add a copy of the operation on the balance of the object.
- - delete an operation on the balance of the object.
- Id. The identifier of the record.
- Name of the object. The name of the object.
- Unique identifier of the object. The unique identifier of the object.
- Operation kind. Type of operation.
- Date of the operation. Date of the operation.
- Sum of the operation. The amount of the transaction.
- Assignment of the operation. The text of the operation assignment.
- Date and time of insertion. The date and time the operation was created.
- Status. The status of the operation.
- Quantity. Number of operations.
- Type of period. Operation period type.
- For other services. Flag operation for other services.
In the "Filter and sort" panel, you can configure sorting and filtering of records.
By default, the table is sorted by the field "Id." in descending order. To sort by a particular field, in the "Sort by field" field, select the field you want to sort, in the "Sort order" field, select the sort order and click on the "Refresh" button. You can also filter on the fields "Object", "Unique identifier", "Operation kind", "Operation date", "Operation summ", "Operation destination" and "Status". To filter, enter the values for these fields and click the "Refresh" button. You can also adjust the number of lines per page in the "Number of rows per page" field.
To delete the selected records, click the "Delete selected records" button. To approve the selected records, click the "Approve selected records" button. To remove the approval from the selected records, click on the "Remove the approval of the selected records" button.
To create an operation for object balancing, click the "Add" button in the toolbar. The operation properties dialog box will open on the balance of the object.
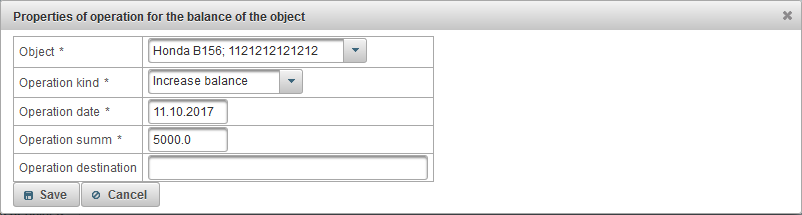
The operation properties dialog box for the object balance consists of the following fields:
- Object. Select the object on which to perform the operation on the object balance.
- Operation kind.
- Increase balance. If you want to refill the balance of the object, for example, if the user paid.
- Decrease balance. If you want to manually remove the balance from the object for the services provided.
- Operation date. Date of operation.
- Operation summ. The amount of the transaction.
- Operation destination. The purpose of the operation, an arbitrary text field is optional.
- For other services. Flag of transaction for other services, for example, for SMS messages.
- Quantity. This field is visible if the operation type "Decrease balance" is selected. If you want to specify in one day, enter 1 in the "Quantity" field and select "Day" in the "Type of operation" field.
- Type of period. This field is visible if the operation type "Decrease balance" is selected. If you want to specify in one month, enter 1 in the "Quantity" field and select "Month" in the "Type of operation" field.
To create a balance operation for user objects, click on the button "Add operations on the balance of the user objects" in the toolbar. The dialog box for adding a balance operation to the user objects opens.
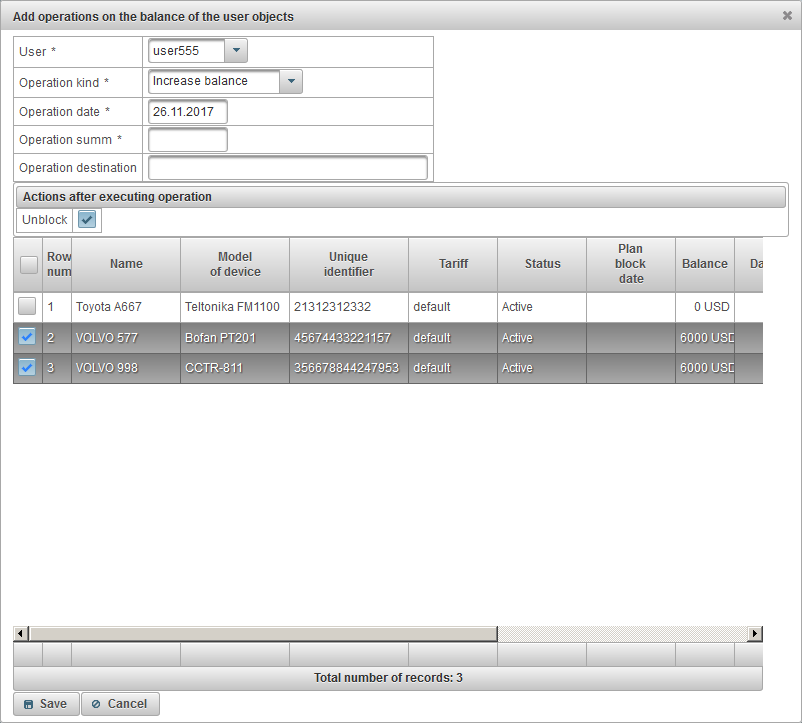
The dialog box for adding an operation for the balance by user objects consists of the following fields:
- User. Select a user.
- Operation kind.
- Increase balance. If you want to refill the balance of the object, for example, if the user paid.
- Decrease balance. If you want to manually remove the balance from the object for the services provided.
- Operation date. Date of operation.
- Operation summ. The amount of the transaction.
- Operation destination. The purpose of the operation, an arbitrary text field is optional.
- Quantity. This field is visible if the operation type "Decrease balance" is selected. If you want to specify in one day, enter 1 in the "Quantity" field and select "Day" in the "Type of period" field.
- Type of period. This field is visible if the operation type "Decrease balance" is selected. If you want to specify in one month, enter 1 in the "Quantity" field and select "Month" in the "Type of period" field.
- Actions after executing operation.
- Unblock. The flag to unlock the selected objects in the table.
At the bottom, the table for selecting the objects of the selected user will be displayed. Select the objects by setting the flag in the first column of the table. To create the operations, click the "Save" button.
The "Day operations of the objects" panel is available only for dealers and allows you to add operations by object day, for example, when the user wants to pay for 20 days of using the object or when you want to manually remove the days from the object.
To open the "Day operations of the objects" panel, in the top panel, from the drop-down list, select "Day operations of the objects".
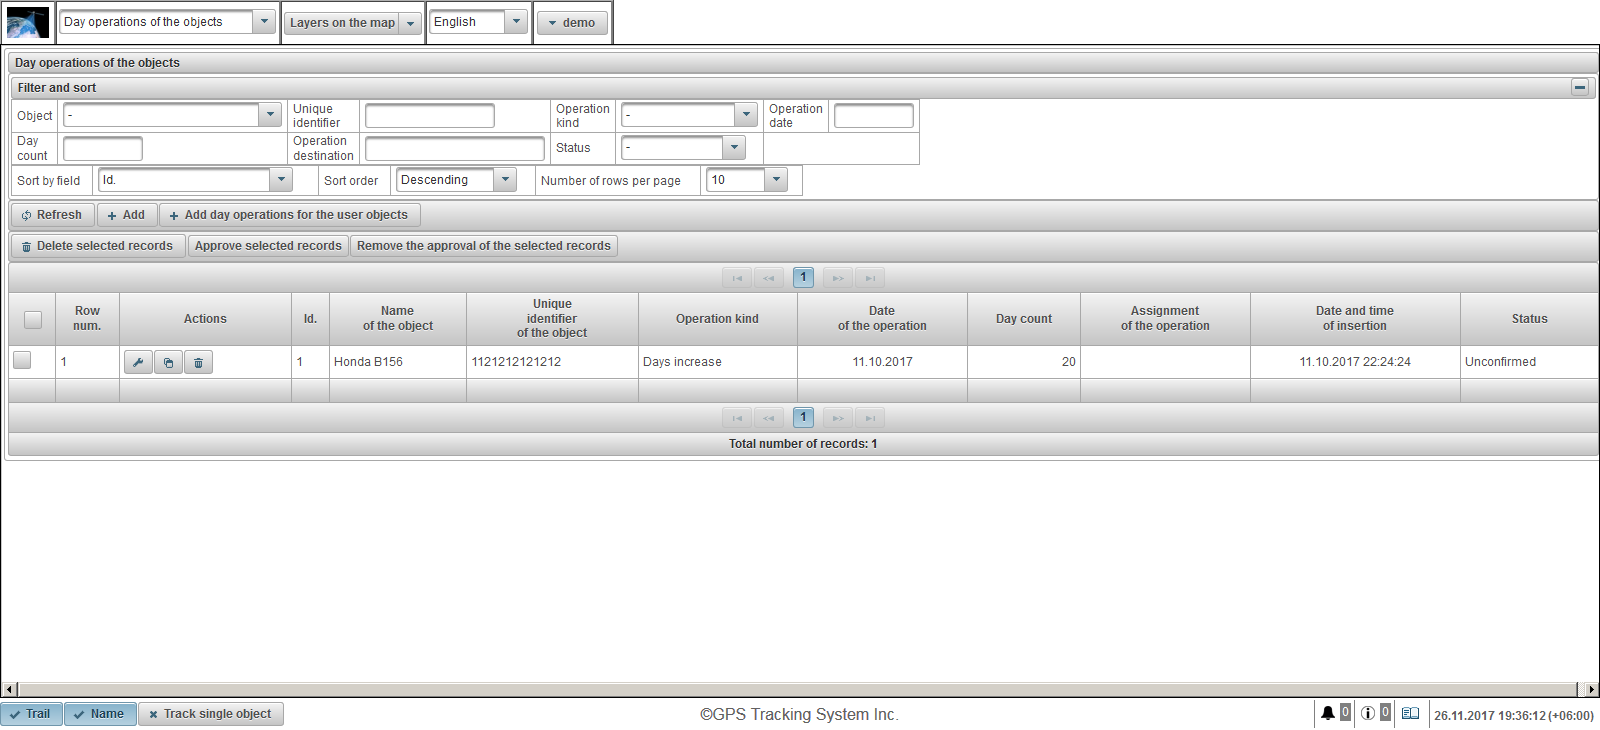
The table of operations by object day consists of the following columns:
- - Operation selection flag.
- Row num. Serial number.
- Actions.
- - open the operation properties dialog by object day.
- - add a copy of the operation by object day.
- - delete the operation by object day.
- Id. The identifier of the record.
- Name of the object. The name of the object.
- Unique identifier of the object. The unique identifier of the object.
- Operation kind. Type of operation.
- Date of the operation. Date of the operation.
- Day count. Number of days.
- Assignment of the operation. The text of the operation assignment.
- Date and time of insertion. The date and time the operation was created.
- Status. The status of the object.
In the "Filter and sort" panel, you can configure sorting and filtering of records.
By default, the table is sorted by the field "Id." in descending order. To sort by a particular field, in the "Sort by field" field, select the field you want to sort, in the "Sort order" field, select the sort order and click on the "Refresh" button. You can also filter on the fields "Object", "Unique identifier", "Operation kind", "Operation date", "Day count", "Operation destination" and "Status". To filter, enter the values for these fields and click the "Refresh" button. You can also adjust the number of lines per page in the "Number of rows per page" field.
To delete the selected records, click the "Delete selected records" button. To approve the selected records, click the "Approve selected records" button. To remove the approval from the selected records, click on the "Remove the approval of the selected records" button.
To create an operation by object day, click the "Add" button in the toolbar. The operation properties dialog will open on the days of the object.
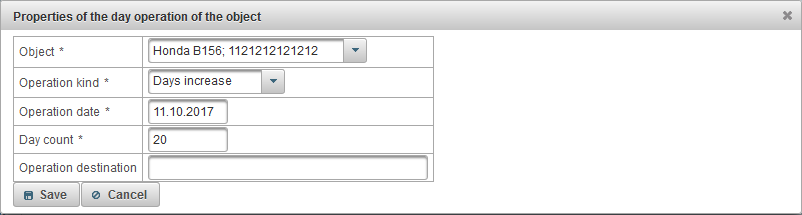
The operation properties dialog box by object day consists of the following fields:
- Object. Select the object on which to perform the operation on the day.
- Operation kind.
- Days increase. For example, if the user paid for 20 days of using the object.
- Days decrease. For example, if you want to take days off of an object.
- Operation date. Date of operation.
- Day count. Number of days of operation.
- Operation destination. The purpose of the operation, an arbitrary text field is optional.
To create an operation by days by user objects, click the button "Add day operations for the user objects" in the toolbar. The dialog box for adding operations by day by user objects opens.

The dialog box for adding operations by day by user objects consists of the following fields:
- User. Select a user.
- Operation kind.
- Days increase. If you want to refill the days of the object, for example if the user paid.
- Days decrease. If you want to manually remove the days from the object for the services provided.
- Operation date. Date of operation.
- Day count. Number of days.
- Operation destination. The purpose of the operation, an arbitrary text field is optional.
At the bottom, the table for selecting the objects of the selected user will be displayed. Select the objects by setting the flag in the first column of the table. To create the operations, click the "Save" button.
The "Test port" panel is available only for dealers and allows viewing the received server data from the test port, for this the device must be configured for this test port of the server.
To open the "Test port" panel, select "Test port" from the drop-down list in the top panel.
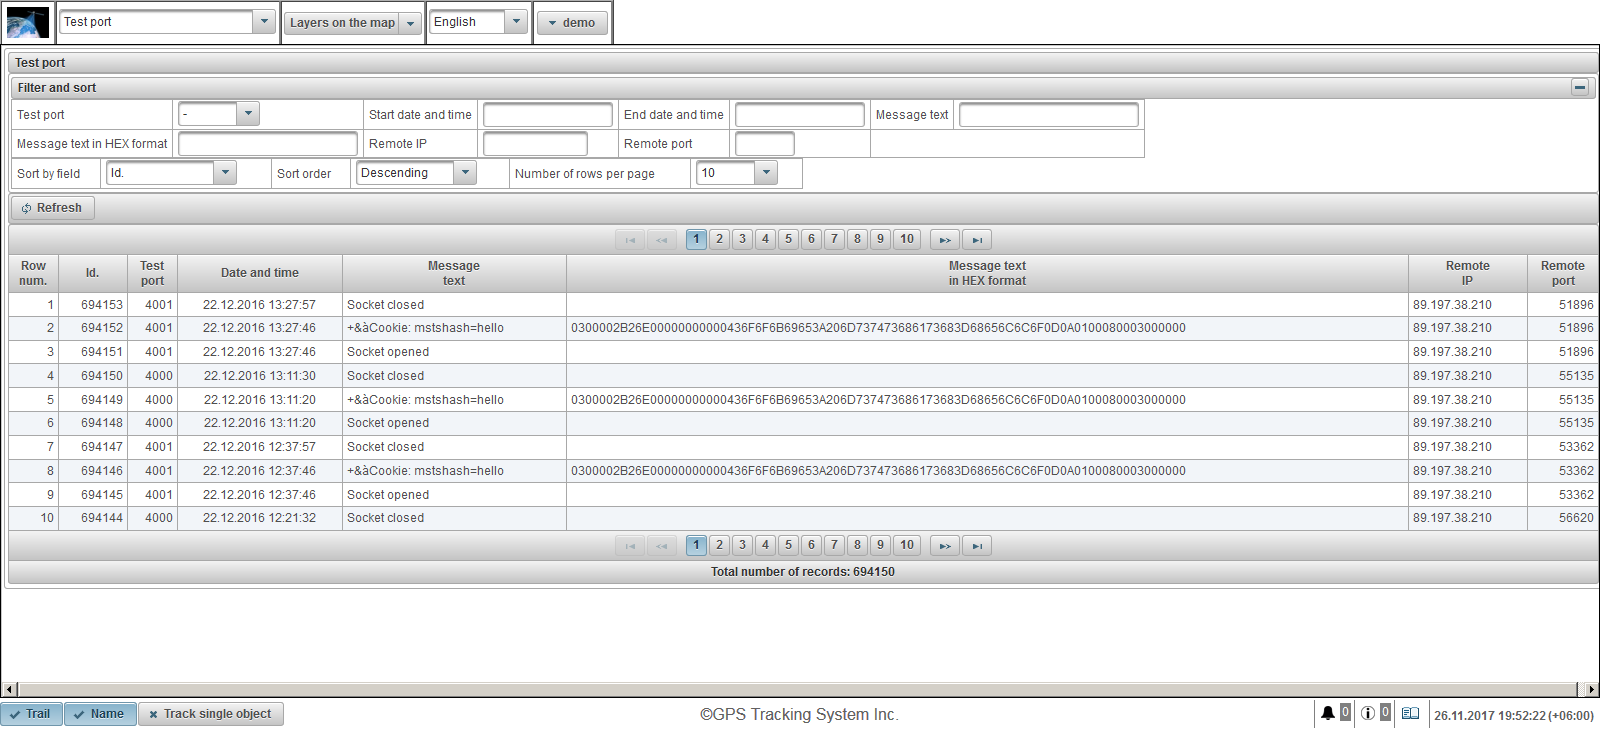
The message table from the objects consists of the following columns:
- Row num. Serial number.
- Id. The identifier of the record.
- Test port. Test server port.
- Date and time. The date and time the server received the message.
- Message text. Message received from the object in text form.
- Message text in HEX format. The message text received from the object in the HEX format.
- Remote IP. The IP address of the connection of the device that sent the data to the server.
- Remote port. The connection port of the device that sent the data to the server.
In the "Filter and sort" panel, you can configure sorting and filtering of records.
By default, the table is sorted by the field "Id." in descending order. To sort by a particular field, in the "Sort by field" field, select the field you want to sort, in the "Sort order" field, select the sort order and click on the "Refresh" button. You can also filter by the fields "Test port", "Start date and time", "End date and time", "Message text", "Message text in HEX format", "Remote IP" and "Remote port". To filter, enter the values for these fields and click the "Refresh" button. You can also adjust the number of lines per page in the "Number of rows per page" field.
Mobile version is a mobile simplified version that allows using the basic features of the system "JUSTRAC GPS". Main functions: viewing the last message of all objects, tracking objects on the map, viewing detailed information about the object, viewing the track of the object on the map. To go to the mobile version, click on the "Mobile version" link at the login.
On the login page, enter your login (user name) and password. After you have entered all the necessary data, click the "Sign In" button.
The interface language is defined at the very beginning by the browser. You can change the language of the system interface in the "Language" field from the drop-down list.
When you click on the "Demo" button, you will enter the demo version of the system.
When you click on the "Full version" button, you will enter the full version of the system.
When you click on the "Mobile version GTS4B" button, you will enter the mobile version GTS4B.
After you log in, the "Monitoring" panel will open by default, the following panels are available:
- Monitoring. By default will be opened after logging in. The monitoring panel allows you to monitor worklist objects on the map.
- Tracks. This panel allows you to view the track of the object on the map. A track is a line of movement of an object on a map. The track is constructed according to the messages of the object and connected by segments into one line. Markers can also be placed along the track, for example, speeding, stopping, refueling, defueling, etc.
Also below are links to mobile applications for Android, iOS and Windows Store operating systems.
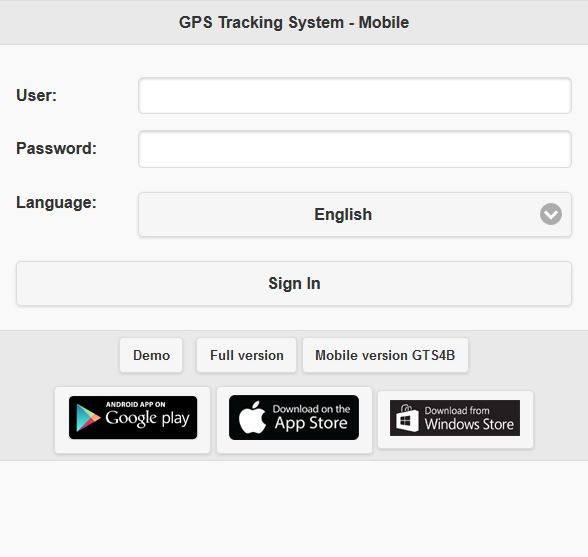
The top panel displays the following items:
- Panel selection. The list of available panels depends on the user's rights;
 - Show objects. Worklist display mode.
 - Show track options. The page for selecting the track parameters is displayed.
  - Show map. Map display mode.
  - Settings. Open window "Settings".
 - Full version. To go to the full version of the system.
 - User name. The name of the authorized user.
 - Log out. To log off the system.

The map displays monitoring objects, their movements, points of interest, geofences, etc.
In most browsers you can switch to full-screen display mode, it is activated by pressing the <F11> key.
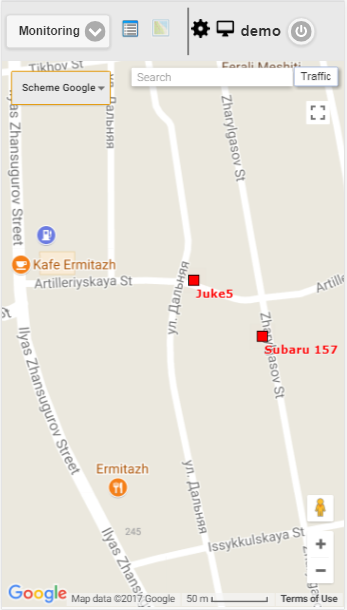
Using the map in different panels
The map is unified for many panels. This means that when switching between panels, the map scale and the coordinates of its center are saved. Also, graphic elements such as track lines, markers, icons of objects, points of interest, geofences, etc. remain in their places.
Navigation on the map
Navigating with the mouse.
Click the left mouse button on any place of the map and, without releasing the buttons, pull in the desired direction.
Scaling the map
To scale the map, you can use several methods:
-
Using the scale on the map.
In the lower right corner of the map there are zoom buttons, which allows you to zoom in (+) or zoom out (-) objects. In this case, the center of the map does not change its position. You can click on the "+" or "-" buttons to change the scale in a step-by-step mode.
-
Use the mouse scroll wheel.
It is even more convenient to set the appropriate scale using the mouse scroll wheel ("scroll"): from itself - approaching the object, on itself - its move away. In this case, the cursor itself needs to be directed to the place of interest to you so that when the scale is changed it will not be lost from view.
-
Double-clicking with the left mouse button at any point of the map leads to the approach of this place.
The lower right corner of the map also shows the current scale in which the map is displayed.
In the upper left corner of the map, you can select the source of the map.
In the upper left corner of the map there is a search.
In the upper right corner of the map, depending on the selected source of the map, the "Traffic" button may be displayed.
To enable the display of traffic jams, click the "Traffic" button (to turn off the mode - press it again).
The "Settings" window allows you to configure the system to meet the user's requirements and contains the following fields.
- Work list.
- Show icons in work list. A flag that displays the icons of objects in the worklist.
- Map.
- Show the trail of the objects. Flag showing the traces of objects. If the object is in motion, then behind the object there may be a trail showing the movement for the last few messages.
- Show the names of the objects. The flag for displaying the names of objects on the map.
- Track single object. The flag for enabling the tracking mode for one object, in this mode tracking will be conducted only for one selected object.
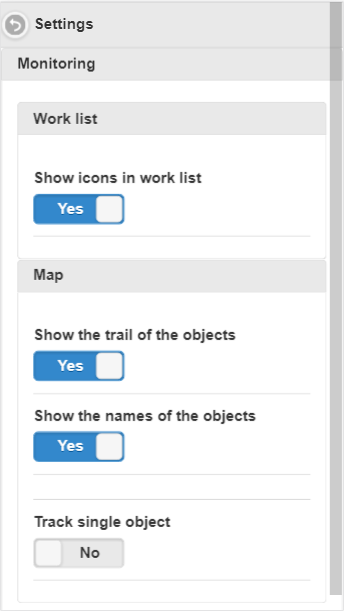
The monitoring panel allows you to monitor worklist objects on the map.
To open the monitoring panel, in the top panel, select "Monitoring" from the drop-down list.
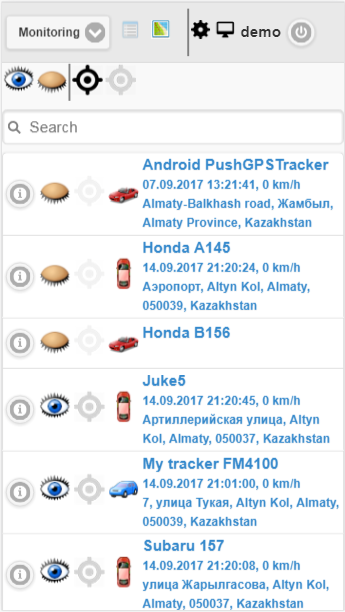
The worklist contains all the objects available to the current user.
By default, the table is sorted by object name in alphabetical order in ascending order.
The toolbar consists of the following buttons:
 - click on the icon to turn on the visibility of all objects on the map.
  - click on the icon to turn off the visibility of all objects on the map.
 - click on the icon to enable tracking of all the objects on the map.
 - click on the icon to disable tracking of all the objects on the map.
It is also possible to filter by object name, in the "Search" field enter the text and the table is filtered by the object name.
The worklist table of objects consists of the following columns:
 - when you click the icon, the information about the object opens.
 - - icon for displaying the object on the map, to hide it, click on the icon. - icon to hide the object from the map, to display, click on the icon. Objects with a map display icon are visible on the map only when they are in the visibility zone. The map can be freely moved and scaled.
- - icon to enable object tracking on the map, to disable click on the icon. - icon to disable object tracking on the map, to turn on click on the icon. Objects with a tracking icon on the map are always visible on the map. When a new positional message is received from the marked objects, the map is automatically scaled so that all these objects are in the field of view.
 - object icon. The icon assigned to the object.
- The name of the object, the date and time, the speed, the location of the last message of the object. To see the location of the object on the map, you need to click the left mouse button on the name of the object in the worklist, the map will be centered on the specified object, the scale will not be changed.
The "Object information" window displays detailed information about the object, including information about the last position of the object and the ability to configure the object.
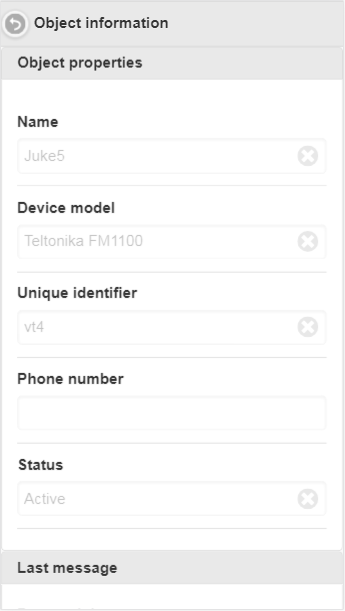
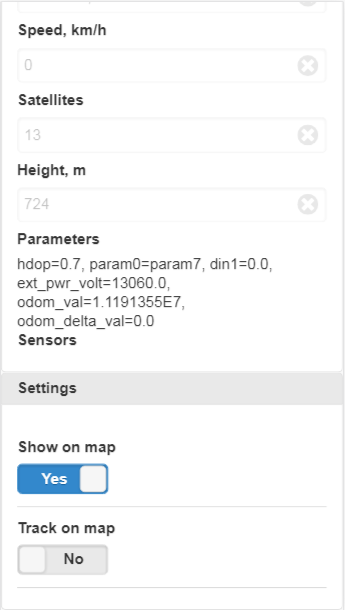
To return to the worklist, press the button  .
.
The "Object properties" panel can display the following fields:
- Name. Name of the object.
- Device model. Model of the device of the object.
- Unique identifier. The unique identifier of the object.
- Phone number. The telephone number of the object.
- Status. The status of the object.
The "Last message" panel, depending on the rights, can display the following fields:
- Date and time. Date and time of the last message.
- Location. The location of the last message.
- Coordinates. Latitude and longitude of the last message.
- Speed, km/h. The speed of the last message in km/h.
- Satellites. Satellites of the last message.
- Height, m. The height of the last message in meters.
- Parameters. Parameters of the last message.
- Sensors. The sensors of the last message.
The "Settings" panel can display the following fields depending on the rights:
- Show on map. Flag visibility of the object on the map.
- Track on map. The object tracking flag on the map.
A track is a line of movement of an object on a map. The track is constructed according to the messages of the object and connected by segments into one line. Markers can also be placed along the track, for example, speeding, stopping, refueling, defueling, etc.
To open the "Tracks" panel, from the drop-down list, select "Tracks".
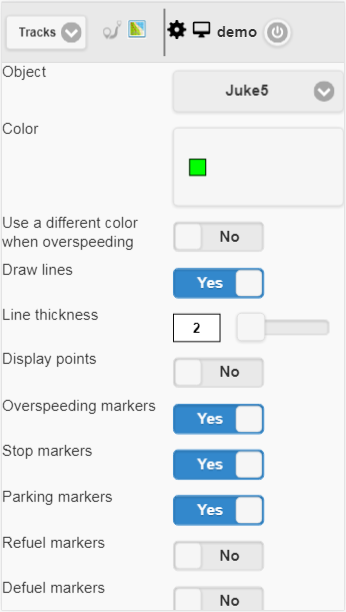
Fields for building a track:
- Object. Select an object from the drop-down list.
- Color. Select the color of the track.
- Use a different color when overspeeding. Flag for selecting a different color when the speed is exceeded. The default is red.
- Overspeed color. Select the color of the track when the speed is exceeded.
- Draw lines. Flag drawing the track line. If you set this flag, lines will be drawn between the points.
- Line thickness. The thickness of the track line.
- Display points. Flag for displaying points along the track line.
- Annotations. This field is visible if the flag "Display points" is set. Flag for displaying the tooltip to each point of the track. Annotations are useful, but make the track line visually heavier in the browser, it is advisable to turn them off.
- Overspeeding markers. Flag of markers of excess speed along the track line.
- Stop markers. Flag display stop markers along the track line.
- Parking markers. Flag of parking markers marking along the track line.
- Refuel markers. Flag display markers of refuels along the track line.
- Defuel markers. Flag display markers of defuels along the track line.
- Trips and parkings detector. Flag of application of the detector of trips and parking. This flag affects the counting of the mileage and the visualization of the track on the map. For example, if you set this flag, in parking and stops, instead of a large number of points, only one point will be displayed.
- From. Select the start date of the track.
- To. Select the end date of the track.
To build a track, click the "Build track" button.
As a result, the map will display the track according to the specified parameters.
The "A" marker will indicate the start point of the track, and the "B" marker will indicate the end point of the track.
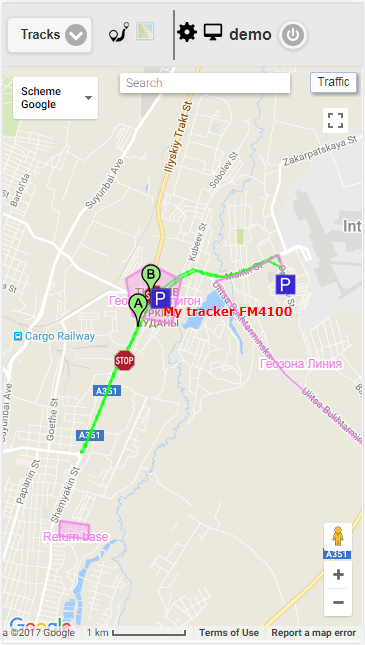
To return to the page for selecting track parameters, click on the icon .
To remove a track, click the "Remove track" button.
The track can be seen under the "Build track" button.
The table of tracks consists of the following fields:
- Name of the object with the selected period. If you click with the left mouse button, the track will be displayed in the center of the map.
- Mileage on trips for the specified period. Mileage on trips for the specified period in km.
The mobile version of GTS4B is a mobile simplified version that allows you to use the basic features of the "JUSTRAC GPS" system. Main functions: viewing the last message of all objects, tracking objects on the map, viewing detailed information about the object, viewing the track of the object on the map. To go to the mobile version of GTS4B, click on the link "Mobile version GTS4B" at the login.
The interface of the mobile version GTS4B is completely identical to the interface of the mobile application GTS4B.
The GTS4B mobile application is an application that allows you to use the basic features of the " JUSTRAC GPS " system. The main functions of the application: viewing the last message of all objects, tracking objects on the map, viewing detailed information on the object, viewing the track of the object on the map.


On the login page, enter your user name and password. After you have entered all the necessary data, click the "Sign In" button.
When you click on the "Demo-entry" button, you will enter the demo version of the system.
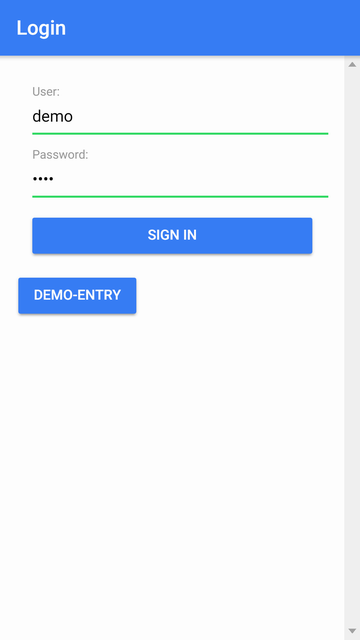
After logging in, you will have the main menu available.
The user name will be displayed at the top.
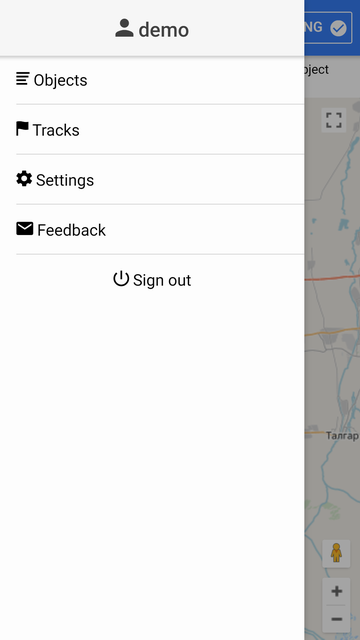
In the main menu, when you click on the "Objects" menu item, the worklist of objects will be displayed.
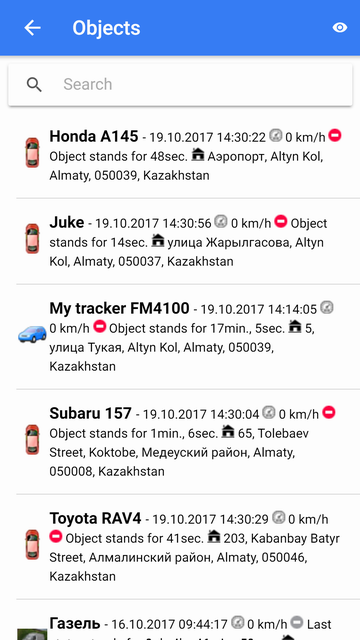
In the worklist, you can quickly find an object, for this, enter the part of the object name in the "Search" field.
In the worklist, you can monitor the objects, in each line from left to right are displayed:
- The object icon;
- Object name;
- Date and time, speed, state of movement, location of the last message of the object.
When you first start the application, the worklist will contain all the objects.
The map displays only objects from the worklist.
You can go to the tracking mode by object, for this click on the corresponding object line, then the map will be opened in the tracking mode by the object.
However, for convenience, it is recommended to include in the work list only those objects that are of interest to you at the moment. To do this, you need to go to the object selection menu by clicking on the icon  .
.
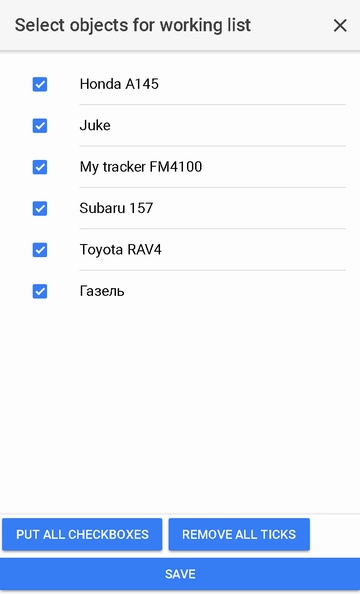
Objects marked with a checkbox constitute a worklist. You can set the flag for each object individually by clicking on it in the list, or select all objects using the corresponding button at the bottom of the list.
Also you can uncheck all the checkboxes by clicking the "Remove all ticks" button.
To return to the worklist after selecting objects, you must save or cancel the changes you have made.
After logging in, you will be taken to the map. The map displays objects from the worklist. By default, geofences and points of interest will be displayed on the map. In the settings, you can turn off the display of geofences and points of interest.
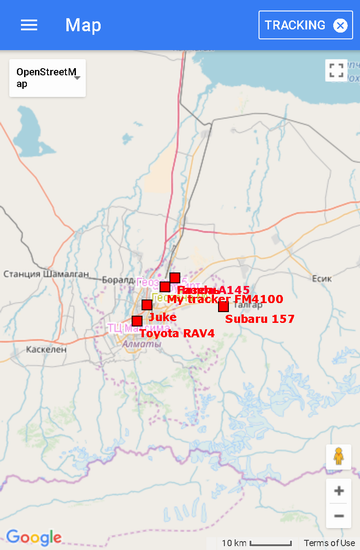
To go to the tracking mode by object, you will need to go to the main menu item "Objects" and click on a specific object, then the map will be displayed, in the center of which the selected object will be located, on top will be displayed:
- Object name;
- Button with icon
 ;
;
- The "Tracking" button will have a check mark on the right, indicating the tracking mode for the object
 .
.
In tracking mode by object, when new messages arrive from the object, the object will be centered on the map.

If you want to disable tracking mode by object, then you will need to click on the "Tracking" button, after that a tick will be removed on the right  and you will be switched to the mode "Map".
Also, if you want to return to the tracking mode by object, then you will need to click on the "Tracking" button, after that a tick will be placed to the right  .
.
If you want to view detailed information about the object, then you need to click on the icon .
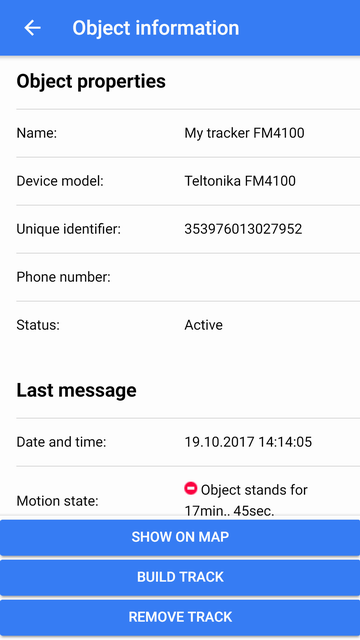
When you click on the "Show on map" button, the object will be displayed in the center of the map.
When you click on the "Build track" button, you will be moved to the "Tracks" page, where you can build a track of the object.
When you click on the "Delete track" button, the track will be deleted from the map.
Interaction with the map
Scaling
Scaling can be done using the corresponding buttons in the lower right corner of the map.
Also, the map can be scaled using special manipulations:
Map source
At the top left, you can select the source of the map from the drop-down list.
You can view the track by object for the specified period, to do this, select "Tracks" from the main menu.
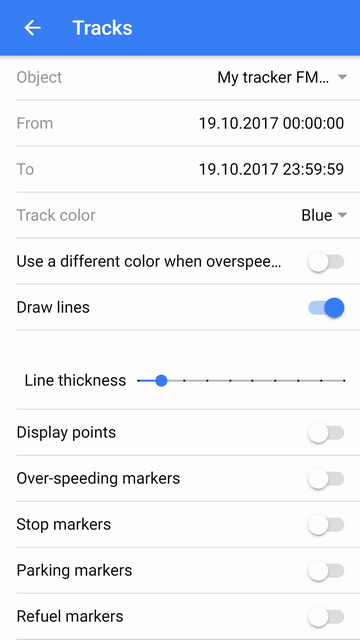
After selecting the track parameters, click the "Build track" button below, after clicking the button, the map will open in the "Map" mode, a track will be drawn on the map and the track will be displayed in the center of the map.
If you want to remove a track from the map, click the "Remove track" button below.
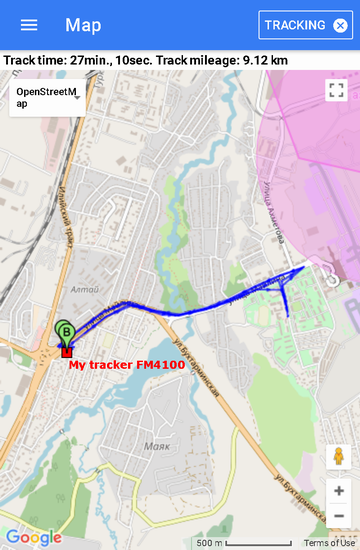
Marker "A" shows the start point of the track, marker "B" shows the end point of the track.
The track color of the object is shown in blue.
To go to the "Settings" page, select "Settings" from the main menu.
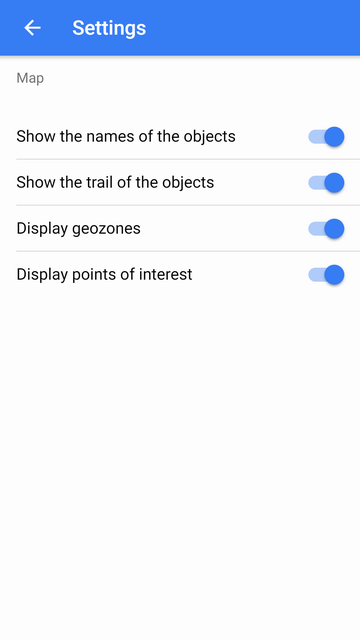
Show the names of the object - hide / show the names of objects on the map.
Show the trail of the objects - hide / show the track of the object on the map.
Display geozones - hide / show geofences on the map.
Display points of interest - hide / show points of interest on the map.
You can write a question, a response, a remark, a sentence or a letter, for this, select the "Feedback" item in the main menu.
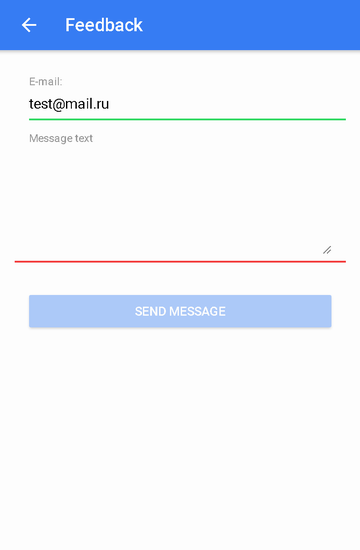
In the "E-mail" field, the user's e-mail will be automatically inserted.
In the "Message text" field enter the text of the message, then click on the "Send message" button.
A remote API provides the ability to retrieve system data via HTTP requests and responses in JSON format. It is used mainly for integration with other information systems, for developing their own mobile applications or developing their own sites.
Request template:
http://{host}/ts/json_api;jsessionid=<sid>?cmd=<cmd>¶ms={<params>}
Request parameters:
| sid |
unique session identifier |
| cmd |
command code |
| params |
parameters in JSON format |
Request
Request template:
http://{host}/ts/json_api?cmd=login¶ms={user_name:"<user_name>",user_password:"<user_password>"}
Request parameters:
|
user_name
|
user name (login)
|
|
user_password
|
user password
|
Response
Response template:
{"sid":"<sid>","remote_host":"<remote_host>","user_name":"<user_name>"}
Response parameters:
|
sid
|
unique session identifier
|
remote_host
|
remote host |
|
user_name
|
user name (login)
|
Examples
Request example:
http://justrac.com/ts/json_api?cmd=login¶ms={user_name:"demo",user_password:"demo"}
Response example:
{"sid":"023B22DA71F38F3AFEF1F3F847C18021","remote_host":"89.218.45.246","user_name":"demo"}
Request
Request template:
http://{host}/ts/json_api;jsessionid=<sid>?cmd=logout¶ms={}
Request parameters:
|
sid
|
unique session identifier
|
Response
Response template:
{"error_code":<error_code>}
Response parameters:
Examples
Request example:
http://justrac.com/ts/json_api;jsessionid=023B22DA71F38F3AFEF1F3F847C18021?cmd=logout¶ms={}
Response example:
{"error_code":0}
The server in the response can return the error information:
{"error_code":<error_code>,"error_message":<error_message>,"error_stack_trace":<error_stack_trace>}
Parameters:
error_code
|
error code
|
error_message
|
error text |
error_stack_trace
|
error stack trace |
Examples
Response example:
{"error_code":5,"error_message":"Parameter 'params' is not filled","error_stack_trace":""}
This section covers all requests related to objects.
Request
Request template:
http://{host}/ts/json_api;jsessionid=<sid>?cmd=get_all_objects¶ms={}
Request parameters:
|
sid
|
unique session identifier
|
Response
Response template:
{"objects":<objects>}
Response parameters:
Examples
Request example:
http://justrac.com/ts/json_api;jsessionid=023B22DA71F38F3AFEF1F3F847C18021?cmd=get_all_objects¶ms={}
Response example:
{"objects":[{"id":10607,"name":"0000"},{"id":10610,"name":"027043884840 GT02A"},{"id":10608,"name":"1500062924 CCTR-811"},{"id":10539,"name":"Android PushGPSTracker"},{"id":10609,"name":"CW9999C00028804 CCTR-811"},{"id":10615,"name":"ertetertert"},{"id":10302,"name":"Honda A145"},{"id":10305,"name":"Juke"},{"id":10611,"name":"obj1"},{"id":10304,"name":"Subaru 157"},{"id":10613,"name":"ter6456"},{"id":10604,"name":"test325"},{"id":10303,"name":"Газель"},{"id":10301,"name":"Машина №1"},{"id":10524,"name":"Мой трекер FM4100"}]}
Request
Request template:
http://{host}/ts/json_api;jsessionid=<sid>?cmd=get_all_digital_sensors¶ms={"obj_id":<obj_id>}
Request parameters:
|
sid
|
unique session identifier
|
obj_id
|
object identifier |
Response
Response template:
{"digital_sensors":<digital_sensors>}
Response parameters:
digital_sensors
|
array of digital sensors
|
Examples
Request example:
http://justrac.com/ts/json_api;jsessionid=0ABDEF9131EBF68D1418589584CA984D?cmd=get_all_digital_sensors¶ms={"obj_id":10524}
Response example:
{"digital_sensors":[{"id":141,"name":"Датчик зажигания"},{"id":142,"name":"Цифровой датчик внешнего питания"}]}
Request
Request template:
http://{host}/ts/json_api;jsessionid=<sid>?cmd=messages/get_last_messages¶ms={"obj_id":<obj_id>,"max_dt":"<max_dt>","count":<count>,"message_type":<message_type>}
Request parameters:
|
sid
|
unique session identifier
|
obj_id
|
object identifier |
max_dt
|
maximum date and time |
| count |
number of messages |
message_type
|
type of message |
Response
Response template:
{"count":<count>,"messages":<messages>}
Response parameters:
| count |
number of messages |
messages
|
message array
|
Examples
Request example:
http://justrac.com/ts/json_api;jsessionid=0ABDEF9131EBF68D1418589584CA984D?cmd=messages/get_last_messages¶ms={"obj_id":10524,"max_dt":"01.07.2016T00:00:00","count":5,"message_type":1}
Response example:
{"count":2,"messages":[{"dt":"30.06.2016T23:59:26","id":1006124,"lon":76.9858304,"trend":91,"satellite_cnt":10,"location":"132, улица Майлина, Altyn Kol, Almaty, 050039, Kazakhstan","speed":0,"alt":693,"params":"param0=param0, din1=0, din2=0, din3=0, din4=0, gsm_level=4, move_sensor=1, ain1=1175, ain2=25, ain3=18, ain4=2, ext_pwr_volt=12082, gps_pwr=1, speed=0, odom_val=0","lat":43.3409344},{"dt":"30.06.2016T23:58:25","id":1005968,"lon":76.9858496,"trend":84,"satellite_cnt":10,"location":"132, улица Майлина, Altyn Kol, Almaty, 050039, Kazakhstan","speed":0,"alt":694,"params":"param0=param0, din1=0, din2=0, din3=0, din4=0, gsm_level=4, move_sensor=1, ain1=1185, ain2=6, ain3=1, ain4=2, ext_pwr_volt=12086, gps_pwr=1, speed=0, odom_val=0","lat":43.3409312}]}
Request
Request template:
http://{host}/ts/json_api;jsessionid=<sid>?cmd=messages/get_messages_by_interval¶ms={"obj_id":<obj_id>,"begin_dt":"<begin_dt>","end_dt":"<end_dt>","count":<count>,"message_type":<message_type>}
Request parameters:
|
sid
|
unique session identifier
|
obj_id
|
object identifier |
begin_dt
|
start date and time |
end_dt
|
end date and time |
| count |
number of messages |
message_type
|
type of message |
Response
Response template:
{"count":<count>,"messages":<messages>}
Response parameters:
| count |
number of messages |
messages
|
message array
|
Examples
Request example:
http://justrac.com/ts/json_api;jsessionid=0ABDEF9131EBF68D1418589584CA984D?cmd=messages/get_messages_by_interval¶ms={"obj_id":10524,"begin_dt":"01.07.2016T00:00:00","end_dt":"01.07.2016T01:00:00","count":2,"message_type":1}
Response example:
{"count":2,"messages":[{"dt":"01.07.2016T00:00:27","lon":76.985824,"trend":88,"speed":0,"location":"132, улица Майлина, Altyn Kol, Almaty, 050039, Kazakhstan","coordinates_str":"43.34096, 76.985824 (10)","smooth_sensors":"ДУТ1=40.48 l, Датчик зажигания=Выкл, Цифровой датчик внешнего питания=Вкл","params":"param0=param0, din1=0, din2=0, din3=0, din4=0, gsm_level=4, move_sensor=1, ain1=1175, ain2=7, ain3=4, ain4=3, ext_pwr_volt=12079, gps_pwr=1, speed=0, odom_val=0","obj_id":10524,"speed_in_kph":0,"sensors":"ДУТ1=40.48 l, Датчик зажигания=Выкл, Цифровой датчик внешнего питания=Вкл","id":1006125,"satellite_cnt":10,"alt":682,"lat":43.34096},{"dt":"01.07.2016T00:01:27","lon":76.985824,"trend":99,"speed":0,"location":"132, улица Майлина, Altyn Kol, Almaty, 050039, Kazakhstan","coordinates_str":"43.340966, 76.985824 (10)","smooth_sensors":"ДУТ1=40.5 l, Датчик зажигания=Выкл, Цифровой датчик внешнего питания=Вкл","params":"param0=param0, din1=0, din2=0, din3=0, din4=0, gsm_level=4, move_sensor=1, ain1=1174, ain2=14, ain3=0, ain4=1, ext_pwr_volt=12081, gps_pwr=1, speed=0, odom_val=0","obj_id":10524,"speed_in_kph":0,"sensors":"ДУТ1=40.5 l, Датчик зажигания=Выкл, Цифровой датчик внешнего питания=Вкл","id":1006126,"satellite_cnt":10,"alt":680,"lat":43.3409664}]}
Request
Request template:
http://{host}/ts/json_api;jsessionid=<sid>?cmd=reports/get_over_speeds_by_interval¶ms={"obj_id":<obj_id>,"begin_dt":"<begin_dt>","end_dt":"<end_dt>"}
Request parameters:
|
sid
|
unique session identifier
|
obj_id
|
object identifier |
begin_dt
|
start date and time |
end_dt
|
end date and time |
Response
Response template:
{"count":<count>,"over_speeds":<over_speeds>}
Response parameters:
| count |
number of messages |
over_speeds
|
array of speeding excesses
|
Examples
Request example:
http://justrac.com/ts/json_api;jsessionid=0ABDEF9131EBF68D1418589584CA984D?cmd=reports/get_over_speeds_by_interval¶ms={"obj_id":10524,"begin_dt":"01.07.2016T00:00:00","end_dt":"01.07.2016T01:00:00"}
Response example:
{"count":2,"over_speeds":[{"total_time_from_first":0,"finish_message_dt":"01.06.2016T08:46:39","mileage":848,"message_id_list":[697007,697008,697009,697010,697013],"message_cnt":5,"duration_short_str":"41s.","avg_speed_in_kph":73,"duration_in_sec":41,"speed_limit_in_kph":60,"obj_id":10524,"start_message_id":697007,"finish_message_id":697013,"start_message_location":"ул.Бухтарминская, Колхозши, Almaty Province, Kazakhstan","start_message_coordinates_str":"43.325904, 77.015955 (9)","max_speed_in_kph":76,"start_message_lat":43.325904,"start_message_lon":77.0159552,"start_message_dt":"01.06.2016T08:45:58"},{"total_time_from_first":0,"finish_message_dt":"01.06.2016T09:08:30","mileage":427,"message_id_list":[697180,697181,697182],"message_cnt":3,"duration_short_str":"24s.","avg_speed_in_kph":63,"duration_in_sec":24,"speed_limit_in_kph":60,"obj_id":10524,"start_message_id":697180,"finish_message_id":697182,"start_message_location":"проспект Аль-Фараби, Баганашыл, Almaty, Бостандыкский район, Almaty, 050060, Kazakhstan","start_message_coordinates_str":"43.214675, 76.923469 (9)","max_speed_in_kph":65,"start_message_lat":43.2146752,"start_message_lon":76.9234688,"start_message_dt":"01.06.2016T09:08:06"}]}
Request
Request template:
http://{host}/ts/json_api;jsessionid=<sid>?cmd=reports/get_stops_by_interval¶ms={"obj_id":<obj_id>,"begin_dt":"<begin_dt>","end_dt":"<end_dt>"}
Request parameters:
|
sid
|
unique session identifier
|
obj_id
|
object identifier |
begin_dt
|
start date and time |
end_dt
|
end date and time |
Response
Response template:
{"count":<count>,"stops":<stops>}
Response parameters:
| count |
number of messages |
stops
|
array of stops
|
Examples
Request example:
http://justrac.com/ts/json_api;jsessionid=0ABDEF9131EBF68D1418589584CA984D?cmd=reports/get_stops_by_interval¶ms={"obj_id":10524,"begin_dt":"01.06.2016T00:00:00","end_dt":"01.06.2016T13:00:00"}
Response example:
{"count":1,"stops":[{"finish_message_dt":"01.06.2016T11:10:21","message_id_list":[697938,697939],"message_cnt":2,"time_from_prev_end_to_cur_beg":0,"duration_short_str":"23s.","duration_in_sec":23,"finish_message_location":"281, Rozybakiev St, Баганашыл, Almaty, Бостандыкский район, Almaty, 050023, Kazakhstan","finish_message_coordinates_str":"43.198202, 76.89431 (7)","obj_id":10524,"finish_message_lat":43.1982016,"start_message_id":697938,"finish_message_id":697939,"finish_message_lon":76.8943104,"start_message_location":"Кожабекова, Kozhabekov St, Баганашыл, Almaty, Бостандыкский район, Almaty, 050023, Kazakhstan","start_message_coordinates_str":"43.200099, 76.894336 (8)","start_message_lat":43.2000992,"start_message_lon":76.894336,"start_message_dt":"01.06.2016T11:09:58"}]}
Request
Request template:
http://{host}/ts/json_api;jsessionid=<sid>?cmd=reports/get_parkings_by_interval¶ms={"obj_id":<obj_id>,"begin_dt":"<begin_dt>","end_dt":"<end_dt>"}
Request parameters:
|
sid
|
unique session identifier
|
obj_id
|
object identifier |
begin_dt
|
start date and time |
end_dt
|
end date and time |
Response
Response template:
{"count":<count>,"parkings":<parkings>}
Response parameters:
| count |
number of messages |
parkings
|
array of parkings
|
Examples
Request example:
http://justrac.com/ts/json_api;jsessionid=0ABDEF9131EBF68D1418589584CA984D?cmd=reports/get_parkings_by_interval¶ms={"obj_id":10524,"begin_dt":"01.06.2016T10:00:00","end_dt":"01.06.2016T11:10:00"}
Response example:
{"count":2,"parkings":[{"finish_message_dt":"01.06.2016T10:36:06","message_id_list":[697558,697559,697560,697561,697562,697563,697564,697565,697565,697566,697566,697567,697568,697569,697570,697571,697572,697572,697573,697573,697574,697575,697575,697576,697576,697577,697578,697578,697579,697580,697580,697581,697582,697583,697736,697737,697738],"message_cnt":37,"time_from_prev_end_to_cur_beg":0,"duration_short_str":"36min., 3s.","duration_in_sec":2163,"finish_message_location":"289/1, улица Розыбакиева, Баганашыл, Almaty, Бостандыкский район, Almaty, 050023, Kazakhstan","finish_message_coordinates_str":"43.19489, 76.893926 (7)","obj_id":10524,"finish_message_lat":43.1948896,"start_message_id":697558,"finish_message_id":697738,"finish_message_lon":76.8939264,"start_message_location":"289/1, улица Розыбакиева, Баганашыл, Almaty, Бостандыкский район, Almaty, 050023, Kazakhstan","start_message_coordinates_str":"43.195043, 76.893267 (7)","start_message_lat":43.1950432,"start_message_lon":76.8932672,"start_message_dt":"01.06.2016T10:00:03"},{"finish_message_dt":"01.06.2016T11:06:08","message_id_list":[697755,697756,697757,697758,697759,697760,697761,697762,697763,697764,697765,697766,697767,697929],"message_cnt":14,"time_from_prev_end_to_cur_beg":530,"duration_short_str":"21min., 12s.","duration_in_sec":1272,"finish_message_location":"217, Gagarin Ave, Баганашыл, Almaty, Бостандыкский район, Almaty, 050060, Kazakhstan","finish_message_coordinates_str":"43.213459, 76.897894 (8)","obj_id":10524,"finish_message_lat":43.2134592,"start_message_id":697755,"finish_message_id":697929,"finish_message_lon":76.8978944,"start_message_location":"31, Baikadamov St, Баганашыл, Almaty, Бостандыкский район, Almaty, 050060, Kazakhstan","start_message_coordinates_str":"43.214048, 76.89671 (8)","start_message_lat":43.214048,"start_message_lon":76.8967104,"start_message_dt":"01.06.2016T10:44:56"}]}
Request
Request template:
http://{host}/ts/json_api;jsessionid=<sid>?cmd=reports/get_trips_by_interval¶ms={"obj_id":<obj_id>,"begin_dt":"<begin_dt>","end_dt":"<end_dt>"}
Request parameters:
|
sid
|
unique session identifier
|
obj_id
|
object identifier |
begin_dt
|
start date and time |
end_dt
|
end date and time |
Response
Response template:
{"count":<count>,"trips":<trips>}
Response parameters:
| count |
number of messages |
trips
|
array of trips
|
Examples
Request example:
http://justrac.com/ts/json_api;jsessionid=0ABDEF9131EBF68D1418589584CA984D?cmd=reports/get_trips_by_interval¶ms={"obj_id":10524,"begin_dt":"01.06.2016T10:00:00","end_dt":"01.06.2016T11:10:00"}
Response example:
{"count":2,"trips":[{"finish_message_dt":"01.06.2016T10:44:56","mileage":3391,"message_id_list":[697738,697739,697740,697741,697742,697743,697744,697745,697746,697747,697748,697749,697750,697751,697752,697753,697754,697755],"message_cnt":18,"time_from_prev_end_to_cur_beg":0,"duration_short_str":"8min., 50s.","avg_speed_in_kph":34,"duration_in_sec":530,"finish_message_location":"31, Baikadamov St, Баганашыл, Almaty, Бостандыкский район, Almaty, 050060, Kazakhstan","finish_message_coordinates_str":"43.214048, 76.89671 (8)","obj_id":10524,"finish_message_lat":43.214048,"start_message_id":697738,"finish_message_id":697755,"finish_message_lon":76.8967104,"start_message_location":"289/1, улица Розыбакиева, Баганашыл, Almaty, Бостандыкский район, Almaty, 050023, Kazakhstan","start_message_coordinates_str":"43.19489, 76.893926 (7)","max_speed_in_kph":50,"start_message_lat":43.1948896,"start_message_lon":76.8939264,"start_message_dt":"01.06.2016T10:36:06","time_from_cur_end_to_next_beg":1272},{"finish_message_dt":"01.06.2016T11:09:58","mileage":1834,"message_id_list":[697929,697930,697931,697932,697933,697934,697935,697936,697937,697938],"message_cnt":10,"time_from_prev_end_to_cur_beg":1272,"duration_short_str":"3min., 50s.","avg_speed_in_kph":36,"duration_in_sec":230,"finish_message_location":"Кожабекова, Kozhabekov St, Баганашыл, Almaty, Бостандыкский район, Almaty, 050023, Kazakhstan","finish_message_coordinates_str":"43.200099, 76.894336 (8)","obj_id":10524,"finish_message_lat":43.2000992,"start_message_id":697929,"finish_message_id":697938,"finish_message_lon":76.894336,"start_message_location":"217, Gagarin Ave, Баганашыл, Almaty, Бостандыкский район, Almaty, 050060, Kazakhstan","start_message_coordinates_str":"43.213459, 76.897894 (8)","max_speed_in_kph":43,"start_message_lat":43.2134592,"start_message_lon":76.8978944,"start_message_dt":"01.06.2016T11:06:08","time_from_cur_end_to_next_beg":0}]}
Request
Request template:
http://{host}/ts/json_api;jsessionid=<sid>?cmd=reports/get_motohours_by_interval¶ms={"obj_id":<obj_id>,"begin_dt":"<begin_dt>","end_dt":"<end_dt>"}
Request parameters:
|
sid
|
unique session identifier
|
obj_id
|
object identifier |
begin_dt
|
start date and time |
end_dt
|
end date and time |
Response
Response template:
{"count":<count>,"motohours":<motohours>}
Response parameters:
| count |
number of messages |
motohours
|
array of motohours
|
Examples
Request example:
http://justrac.com/ts/json_api;jsessionid=0ABDEF9131EBF68D1418589584CA984D?cmd=reports/get_motohours_by_interval¶ms={"obj_id":10524,"begin_dt":"01.06.2016T10:00:00","end_dt":"01.06.2016T11:10:00"}
Response example:
{"count":2,"motohours":[{"finish_motohours_in_sec":590,"message_id_list":[697737,697738,697739,697740,697741,697742,697743,697744,697745,697746,697747,697748,697749,697750,697751,697752,697753,697754,697755],"message_cnt":19,"time_from_prev_end_to_cur_beg":0,"duration_in_sec":590,"start_message_id":697737,"finish_message_lon":76.8967104,"motohours_in_sec_str":"9min., 50s.","start_message_location":"289/1, улица Розыбакиева, Баганашыл, Almaty, Бостандыкский район, Almaty, 050023, Kazakhstan","start_message_coordinates_str":"43.194832, 76.893901 (5)","start_message_lon":76.8939008,"start_message_lat":43.194832,"time_from_prev_end_to_cur_beg_str":"","finish_motohours_in_sec_str":"9min., 50s.","finish_message_dt":"01.06.2016T10:44:56","movement_productivity":89.83,"mileage":3397,"start_motohours_in_sec":0,"start_motohours_in_sec_str":"","duration_short_str":"9min., 50s.","motohours_in_sec":590,"avg_speed_in_kph":34,"finish_message_coordinates_str":"43.214048, 76.89671 (8)","finish_message_location":"31, Baikadamov St, Баганашыл, Almaty, Бостандыкский район, Almaty, 050060, Kazakhstan","obj_id":10524,"finish_message_lat":43.214048,"movement_time_in_sec":530,"finish_message_id":697755,"movement_time_in_sec_str":"8min., 50s.","max_speed_in_kph":50,"idling_time_in_sec":60,"start_message_dt":"01.06.2016T10:35:06","idling_time_in_sec_str":"1min."},{"finish_motohours_in_sec":820,"message_id_list":[697929,697930,697931,697932,697933,697934,697935,697936,697937,697938],"message_cnt":10,"time_from_prev_end_to_cur_beg":1272,"duration_in_sec":230,"start_message_id":697929,"finish_message_lon":76.894336,"motohours_in_sec_str":"3min., 50s.","start_message_location":"217, Gagarin Ave, Баганашыл, Almaty, Бостандыкский район, Almaty, 050060, Kazakhstan","start_message_coordinates_str":"43.213459, 76.897894 (8)","start_message_lon":76.8978944,"start_message_lat":43.2134592,"time_from_prev_end_to_cur_beg_str":"21min., 12s.","finish_motohours_in_sec_str":"13min., 40s.","finish_message_dt":"01.06.2016T11:09:58","movement_productivity":100,"mileage":1834,"start_motohours_in_sec":590,"start_motohours_in_sec_str":"9min., 50s.","duration_short_str":"3min., 50s.","motohours_in_sec":230,"avg_speed_in_kph":36,"finish_message_coordinates_str":"43.200099, 76.894336 (8)","finish_message_location":"Кожабекова, Kozhabekov St, Баганашыл, Almaty, Бостандыкский район, Almaty, 050023, Kazakhstan","obj_id":10524,"finish_message_lat":43.2000992,"movement_time_in_sec":230,"finish_message_id":697938,"movement_time_in_sec_str":"3min., 50s.","max_speed_in_kph":43,"idling_time_in_sec":0,"start_message_dt":"01.06.2016T11:06:08","idling_time_in_sec_str":""}]}
Request
Request template:
http://{host}/ts/json_api;jsessionid=<sid>?cmd=reports/get_refuels_by_interval¶ms={"obj_id":<obj_id>,"begin_dt":"<begin_dt>","end_dt":"<end_dt>"}
Request parameters:
|
sid
|
unique session identifier
|
obj_id
|
object identifier |
begin_dt
|
start date and time |
end_dt
|
end date and time |
Response
Response template:
{"count":<count>,"refuels":<refuels>}
Response parameters:
| count |
number of messages |
refuels
|
array of refuels |
Examples
Request example:
http://justrac.com/ts/json_api;jsessionid=0ABDEF9131EBF68D1418589584CA984D?cmd=reports/get_refuels_by_interval¶ms={"obj_id":10524,"begin_dt":"01.06.2016T10:00:00","end_dt":"01.06.2016T11:10:00"}
Response example:
{"count":0,"refuels":[]}
Request
Request template:
http://{host}/ts/json_api;jsessionid=<sid>?cmd=reports/get_defuels_by_interval¶ms={"obj_id":<obj_id>,"begin_dt":"<begin_dt>","end_dt":"<end_dt>"}
Request parameters:
|
sid
|
unique session identifier
|
obj_id
|
object identifier |
begin_dt
|
start date and time |
end_dt
|
end date and time |
Response
Response template:
{"count":<count>,"defuels":<defuels>}
Response parameters:
| count |
number of messages |
defuels
|
array of defuels |
Examples
Request example:
http://justrac.com/ts/json_api;jsessionid=0ABDEF9131EBF68D1418589584CA984D?cmd=reports/get_defuels_by_interval¶ms={"obj_id":10524,"begin_dt":"01.06.2016T10:00:00","end_dt":"01.06.2016T11:10:00"}
Response example:
{"count":0,"defuels":[]}
Inquiry
Request Template:
http: // {host} / ts / json_api; jsessionid = <sid>? cmd = reports / get_obj_summary_by_interval & params = {"obj_id": <obj_id>, "begin_dt": "<begin_dt>", "end_dt": "<end_dt > "," lang ":" <lang> "}
Request parameters:
sid | unique session identifier |
obj_id | object identifier |
begin_dt | start date and time |
end_dt | end date and time |
| lang | language |
Reply to request
Request response template:
{"count": <count>, "obj_summary": <obj_summary>}
Request response parameters:
| count | number of lines |
obj_summary | array of strings |
Description of request response fields:
obj_id | Object identifier |
obj_name | Object name |
mileage | Mileage, km |
mileage_by_trip | Mileage (on trips), km |
avg_speed_in_kph | Average speed, km / h |
max_speed_in_kph | Max. speed, km / h |
total_time_in_trips_str | Total travel time |
total_time_in_parkings_str | Total parking time |
motohours_str | Hours |
dart_spent | Spent on DART, l |
dut_spent | Spent on FLS, l |
spent_by_norm | Spent according to the rates, l |
spent_by_norm_by_trip | Spent according to the norms (for trips), l |
spent_by_calc | Spent according to calculation, l |
dart_avg | Average DART consumption, l |
dut_avg | Average fuel consumption by FLS, l |
dut_begin_level | Initial level of FLS, l |
dut_end_level | Final level of FLS, l |
refuel_cnt | Total refueling |
defuel_cnt | Total drains |
| refueled | Filled, l |
defueled | Drained, l |
last_message_dt | Date and time of the last message |
last_message_coordinates_str | Coordinates of the last message |
last_message_sensors | Last Message Sensors |
last_message_move_state_tooltip | The movement state of the last message |
motohour_counter_val | Hour meter value |
mileage_counter_val | Mileage counter value |
Examples of
Example request:
http: //justrac.com / ts / json_api; jsessionid = 0ABDEF9131EBF68D1418589584CA984D? cmd = reports / get_obj_summary_by_interval & params = {"obj_id": 10305, "begin_dt": "27.08.2021T00: 00: 00d 2021T23: 59: 59 "," lang ":" en "}
An example of a response to a request:
{"count": 1, "obj_summary": [{"refueled": 0, "dut_begin_level": 0, "total_time_in_trips": 0, "last_message_sensors": "", "obj_name": "Mercedes-Benz 140", " mileage_by_trip ": 0," max_speed_in_kph ": 0," total_time_in_parkings_str ":" 0sec. "," dut_end_level ": 0," spent_by_norm_by_trip ": 0," refuel_cnt ": 0," total_time_ grin_trisepxt. : "", "total_time_in_parkings": 0, "spent_by_calc": 0, "last_message_move_state_tooltip": "Last state: Stands for 2h., 46min., 29sec.", "dart_avg": 0, "last_message_dt": "08/26/2021T16 : 00: 04 "," mileage ": 0," motohours ": 0," motohour_counter_val ":" 0 h. "," Obj_id ": 10305," spent_by_norm ": 0," avg_speed_in_kph ": 0," mileage_counter_val ": "0 km", "defueled": 0, "dut_spent": 0, "dart_spent": 0, "dut_avg": 0, "last_message_coordinates_str": "43.360488, 77.016415 (16)", "motohours_str": "0sec." , "defuel_cnt": 0, "is_total_row": false}]}
Inquiry
Request Template:
http: // {host} / ts / json_api; jsessionid = <sid>? cmd = reports / get_all_obj_summary_by_interval & params = {"begin_dt": "<begin_dt>", "end_dt": "<end_dt>", "lang": " <lang> "}
Request parameters:
|
sid
|
unique session identifier
|
begin_dt
|
start date and time |
end_dt
|
end date and time |
| lang |
language |
Reply to request
Request response template:
{"count": <count>, "all_obj_summary": <all_obj_summary>}
Request response parameters:
| count |
number of lines |
all_obj_summary
|
array of strings
|
Description of request response fields:
obj_id
|
Object identifier |
obj_name
|
Object name |
mileage
|
Mileage, km |
mileage_by_trip
|
Mileage (on trips), km
|
avg_speed_in_kph
|
Average speed, km / h |
max_speed_in_kph
|
Max. speed, km / h |
total_time_in_trips_str
|
Total travel time |
total_time_in_parkings_str
|
Total parking time |
motohours_str
|
Hours |
dart_spent
|
Spent on DART, l |
dut_spent
|
Spent on FLS, l |
spent_by_norm
|
Spent according to the rates, l |
spent_by_norm_by_trip
|
Spent according to the norms (for trips), l |
spent_by_calc
|
Spent according to calculation, l |
dart_avg
|
Average DART consumption, l |
dut_avg
|
Average fuel consumption by FLS, l |
dut_begin_level
|
Initial level of FLS, l |
dut_end_level
|
Final level of FLS, l |
refuel_cnt
|
Total refueling |
defuel_cnt
|
Total drains |
| refueled |
Filled, l |
defueled
|
Drained, l |
last_message_dt
|
Date and time of the last message |
last_message_coordinates_str
|
Coordinates of the last message |
last_message_sensors
|
Last Message Sensors |
last_message_move_state_tooltip
|
The movement state of the last message |
motohour_counter_val
|
Hour meter value |
mileage_counter_val
|
Mileage counter value |
Examples of
Example request:
http://justrac.com/ts/json_api;jsessionid=0ABDEF9131EBF68D1418589584CA984D?cmd=reports/get_all_obj_summary_by_interval¶ms={"begin_dt":"27.08.2021T00:00:00","end_dt":"27.08.2021T23:59:59","lang":"en"}
An example of a response to a request:
{"count": 8, "all_obj_summary": [{"refueled": 0, "dut_begin_level": 0, "total_time_in_trips": 0, "last_message_sensors": "", "obj_name": "ADMINTELECOM", "mileage_by_trip": 0, "max_speed_in_kph": 0, "total_time_in_parkings_str": "0sec.", "Dut_end_level": 0, "spent_by_norm_by_trip": 0, "refuel_cnt": 0, "total_time_in_trips_str": "gr:" 0sep. " , "total_time_in_parkings": 0, "spent_by_calc": 0, "last_message_move_state_tooltip": "", "dart_avg": 0, "last_message_dt": "", "mileage": 0, "motohours": 0, "motohour "_counter "," obj_id ": 26377," spent_by_norm ": 0," avg_speed_in_kph ": 0," mileage_counter_val ":" "," defueled ": 0," dut_spent ": 0," dart_spent ": 0," dut_avg ": 0 , "last_message_coordinates_str": "", "motohours_str": "0sec.", "defuel_cnt": 0, "is_total_row": false}, {"refueled": 0, "dut_begin_level": 0, "total_time_in_trips": 0, " last_message_sensors ":" "," obj_name ":" asuto "," mileage_by_trip ": 0," max_speed_in_kph ": 0," total_time_in_parkings_str ":" 0sec. "," dut_end_level ": 0," spent_by_norm_by_by_nt " : 0, "total_time_in_trips_str": "0sec.", "Grp_t xt ":" "," total_time_in_parkings ": 0," spent_by_calc ": 0," last_message_move_state_tooltip ":" "," dart_avg ": 0," last_message_dt ":" "," mileage ": 0," motohours ": 0, "motohour_counter_val": "", "obj_id": 26336, "spent_by_norm": 0, "avg_speed_in_kph": 0, "mileage_counter_val": "", "defueled": 0, "dut_spent": 0, "dart_spent": 0, "dut_avg": 0, "last_message_coordinates_str": "", "motohours_str": "0sec.", "defuel_cnt": 0, "is_total_row": false}, {"refueled": 0, "dut_begin_level": 0_trips ": 0," last_message_sensors ":" "," obj_name ":" h, kh "," mileage_by_trip ": 0," max_speed_in_kph ": 0," total_time_in_parkings_str ":" 0sec. "," Dut_end_level_bytrip_by_by_norm_by_by_norm_by_ ": 0," refuel_cnt ": 0," total_time_in_trips_str ":" 0sec. "," Grp_txt ":" "," total_time_in_parkings ": 0," spent_by_calc ": 0," last_message_move_state_tooltip ":" "": dart , "last_message_dt": "", "mileage": 0, "motohours": 0, "motohour_counter_val": "", "obj_id": 26725, "spent_by_norm": 0, "avg_speed_in_kph": 0, "mileage_counter_val": " "," defueled ": 0," dut_spent ": 0," dart_spent ": 0," dut_avg ": 0," last_mess age_coordinates_str ":" "," motohours_str ":" 0sec. "," defuel_cnt ": 0," is_total_row ": false}, {" refueled ": 0," dut_begin_level ": 0," total_time_in_trips ": 0," last_message_sensage : "On-board voltage = 290.0 V, Battery voltage = 733.0 V", "obj_name": "Honda A145", "mileage_by_trip": 0, "max_speed_in_kph": 0, "total_time_in_parkings_str": "0sec.", "Dut_end_level" : 0, "spent_by_norm_by_trip": 0, "refuel_cnt": 0, "total_time_in_trips_str": "0sec.", "Grp_txt": "", "total_time_in_parkings": 0, "spent_by_calc": 0, "last_message_tooltip_str" for 48sec. "," dart_avg ": 0," last_message_dt ":" 08/26/2021T16: 28: 27 "," mileage ": 0," motohours ": 0," motohour_counter_val ":" 0 h. "," obj_id " : 10302, "spent_by_norm": 0, "avg_speed_in_kph": 0, "mileage_counter_val": "0 km", "defueled": 0, "dut_spent": 0, "dart_spent": 0, "dut_avg": 0, "last_messr_coordinates_coordinates ":" 51.99572, 70.933643 (10) "," motohours_str ":" 0sec. "," Defuel_cnt ": 0," is_total_row ": false}, {" refueled ": 0," dut_begin_level ": 0," total_time_in_trips ": 0, "last_message_sensors": "", "obj_name": "Mersede s-Benz 140 "," mileage_by_trip ": 0," max_speed_in_kph ": 0," total_time_in_parkings_str ":" 0sec. "," dut_end_level ": 0," spent_by_norm_by_trip ": 0," refuel_cnt ": 0," total_time_str " 0sec. "," Grp_txt ":" "," total_time_in_parkings ": 0," spent_by_calc ": 0," last_message_move_state_tooltip ":" Last state: Stands for 3h., 15min., 11sec. "," Dart_avg ": 0," last_message_dt ":" 08/26/2021T16: 29:04 "," mileage ": 0," motohours ": 0," motohour_counter_val ":" 0 h. "," obj_id ": 10305," spent_by_norm ": 0," avg_speed_in_kph " : 0, "mileage_counter_val": "0 km", "defueled": 0, "dut_spent": 0, "dart_spent": 0, "dut_avg": 0, "last_message_coordinates_str": "43.360428, 77.016322 (16)", " motohours_str ":" 0sec. "," defuel_cnt ": 0," is_total_row ": false}, {" refueled ": 0," dut_begin_level ": 0," total_time_in_trips ": 0," last_message_sensors ":" On-board voltage = 13426.0 V, Ignition sensor = Off "," obj_name ":" Subaru 157 "," mileage_by_trip ": 0," max_speed_in_kph ": 0," total_time_in_parkings_str ":" 0sec. "," Dut_end_level ": 0," spent_by_norm_ , "refuel_cnt": 0, "total_time_in_trips_ str ":" 0sec. "," grp_txt ":" "," total_time_in_parkings ": 0," spent_by_calc ": 0," last_message_move_state_tooltip ":" Object stands for 51sec. "," dart_avg ": 0," last_ "" 08/26/2021T16: 28: 24 "," mileage ": 0," motohours ": 0," motohour_counter_val ":" 0 h. "," Obj_id ": 10304," spent_by_norm ": 0," avg_speed_in_kph ": 0," mileage_counter_val ":" 0 km "," defueled ": 0," dut_spent ": 0," dart_spent ": 0," dut_avg ": 0," last_message_coordinates_str ":" 49.97726, 82.586107 (16) "," motohours_str ":" 0sec. "," Defuel_cnt ": 0," is_total_row ": false}, {" refueled ": 0," dut_begin_level ": 0," total_time_in_trips ": 0," last_message_sensors ":" "," obj_name ":" Aygyr " , "mileage_by_trip": 0, "max_speed_in_kph": 0, "total_time_in_parkings_str": "0sec.", "dut_end_level": 0, "spent_by_norm_by_trip": 0, "refuel_cnt": 0, "total_time_ser_trips_trips." grp_txt ":" "," total_time_in_parkings ": 0," spent_by_calc ": 0," last_message_move_state_tooltip ":" "," dart_avg ": 0," last_message_dt ":" "," mileage ": 0," motohours ": 0, "motohour_counter_val": "", "obj_id": 26379, "spent_by_norm": 0, "avg_speed_in_k ph ": 0," mileage_counter_val ":" "," defueled ": 0," dut_spent ": 0," dart_spent ": 0," dut_avg ": 0," last_message_coordinates_str ":" "," motohours_str ":" 0sec. "," defuel_cnt ": 0," is_total_row ": false}, {" refueled ": 0," dut_begin_level ": 0," total_time_in_trips ": 0," last_message_sensors ":" "," obj_name ":" Gazelle "," mileage_by_trip ": 0," max_speed_in_kph ": 0," total_time_in_parkings_str ":" 0sec. "," dut_end_level ": 0," spent_by_norm_by_trip ": 0," refuel_cnt ": 0," total_time_ grin_trisepxt. : "", "total_time_in_parkings": 0, "spent_by_calc": 0, "last_message_move_state_tooltip": "Last state: Stands for 3 d., 11h., 36min., 42sec.", "dart_avg": 0, "last_message_dt": "08/26/2021T16: 28: 54", "mileage": 0, "motohours": 0, "motohour_counter_val": "0 h.", "Obj_id": 10303, "spent_by_norm": 0, "avg_speed_in_kph": 0, "mileage_counter_val": "0 km", "defueled": 0, "dut_spent": 0, "dart_spent": 0, "dut_avg": 0, "last_message_coordinates_str": "43.232315, 76.922308 (14)", "motohours_str": "0sec.", "Defuel_cnt": 0, "is_total_row": false}]}